Making the electrical connections – King of Fans Sabitini User Manual
Page 9
Making the Electrical
Connections
REMEMBER to disconnect the power. If
you feel that you do not have enough
electrical wiring knowledge or experience,
have your fan installed by a licensed
electrician.
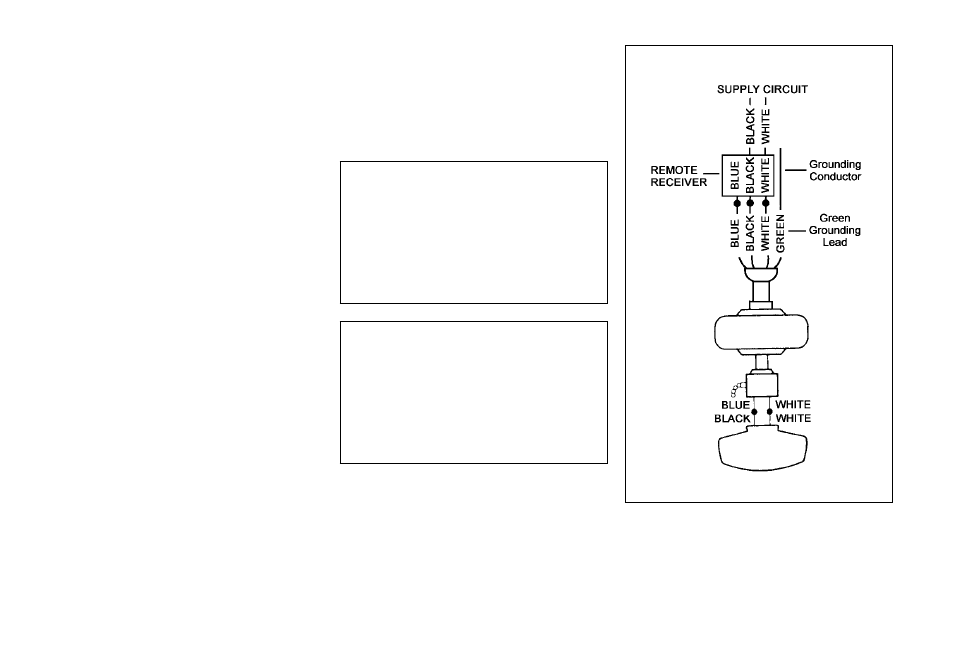
Follow the steps below to connect the fan
to your household wiring. Use the wire
connecting nuts supplied with your fan
and supplied with remote control. Secure
the connectors with electrical tape. Make
sure there are no loose strands or
connections (Figure 13).
l.
Connect both green wires from the
downrod and mounting plate to the bare
copper (Ground) from the electrical box.
2. Connect the black wire (AC IN L)
from the receiver unit to the black wire
from the electrical box.
3. Connect the white wire (AC IN N)
from the receiver unit to the white wire
from the electrical box.
4. Connect the white wire (To Motor N)
from the receiver unit to the white wire
from the fan assembly.
5. Connect the black wire (To Motor L)
from the receiver unit to the black wire
from the fan assembly.
6. Connect the blue wire (For Light)
from the receiver unit to the blue wire
from the fan.
After wires are connected, carefully tuck
them into the electrical box. Insert the
receiver unit into the mounting plate;
make sure the black antenna wire sits on
top of the receiver unit.
NOTE
THE FREQUENCIES ON YOUR RECEIVER AND
TRANSMITTER HAVE BEEN PRESET AT THE
FACTORY, BEFORE INSTALLING THE
RECEIVER, MAKE SURE THE DIP SWITCHES
ON THE RECEIVER AND TRANSMITTER ARE
SET TO THE SAME FREQUENCY. THE DIP
SWITCHES ON THE TRANSMITTER ARE
LOCATED INSIDE THE BATTERY
COMPARTMENT.
WARNING
EACH WIRE NUT (WIRE CONNECTOR)
SUPPLIED WITH THIS FAN IS DESIGNED TO
ACCEPT UP TO ONE 12 GAUGE HOUSE WIRE
AND TWO WIRES FROM THE FAN. IF YOU
HAVE LARGER THAN 12 GAUGE HOUSE
WIRING OR MORE THAN ONE HOUSE WIRE TO
CONNECT TO THE FAN WIRING, CONSULT AN
ELECTRICIAN FOR THE PROPER SIZE WIRE
NUTS TO USE.
Figure 13
7