Installing the light kit / glass bowl – King of Fans Almeida User Manual
Page 11
Installing the Light Kit /
Glass Bowl
CAUTION-
To reduce the risk of
electrical shock, disconnect the electrical
supply circuit to the fan before installing
light kit
.
THE GLASS IS FRAGILE, USE
CARE WHEN INSTALLING THE
LIGHT
KIT
AND
THE
GLASS
SHADE.
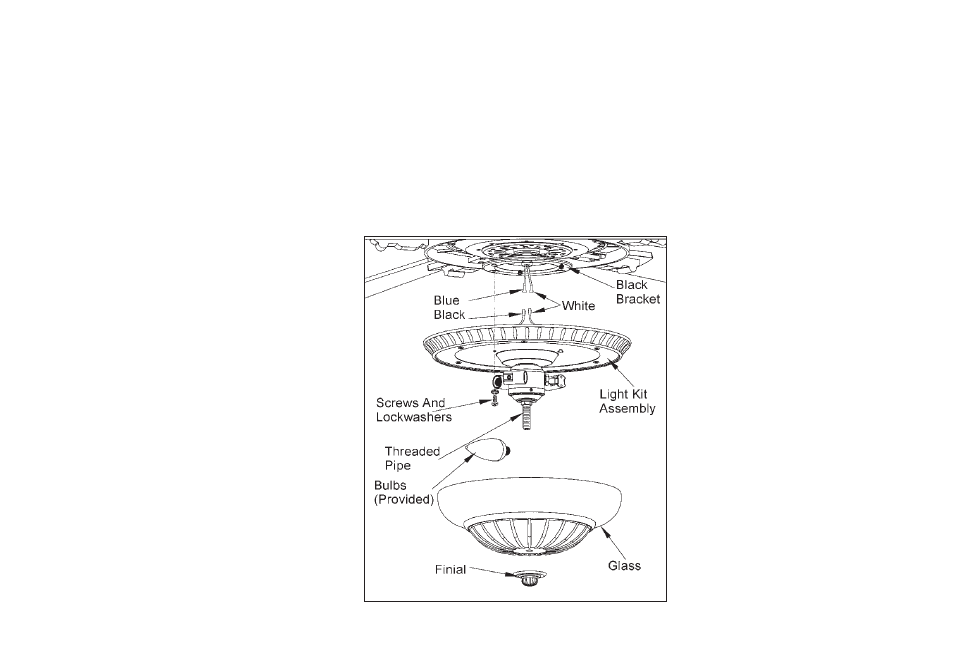
1.
Remove one of three mounting
screws and lockwashers in the black
bracket below the fan motor and
loosen the other two mounting screws
and lockwashers.
2.
Connect the Blue wire from the fan
motor to the Black wire from the light kit
by connecting the molded adaptor plug;
connect the White wire from the fan
motor to the White wire from the light
kit by connecting the molded adaptor
plug.
Carefully and neatly tuck the wires
connections into the light kit (Figure 13).
3. Align the two key slots in the light
kit with the two mounting screws and
lockwashers in the black bracket and
place the light kit over two screws, turn
the light kit clockwise until it locks,
tighten the two mounting screws and
lockwashers.
4. Re-install the mounting screw and
lockwasher that were removed in step 1
and tighten firmly.
5. Remove the finial from the threaded
pipe of the light kit (Figure 13).
6. With power off , install the light bulbs
(Max. 40w , provided) into the sockets.
7. Position the glass bowl over the
threaded pipe and finger tight with finial.
NOTE: ALLOW THE BULBS TO
COOL
COMPLETELY
BEFORE
TOUCHING OR REPLACING THE
BULBS TO AVOID ACCIDENTAL
BURNING OF THE SKIN.
Figure 13
8