User manual – MXL Revelation User Manual
Page 4
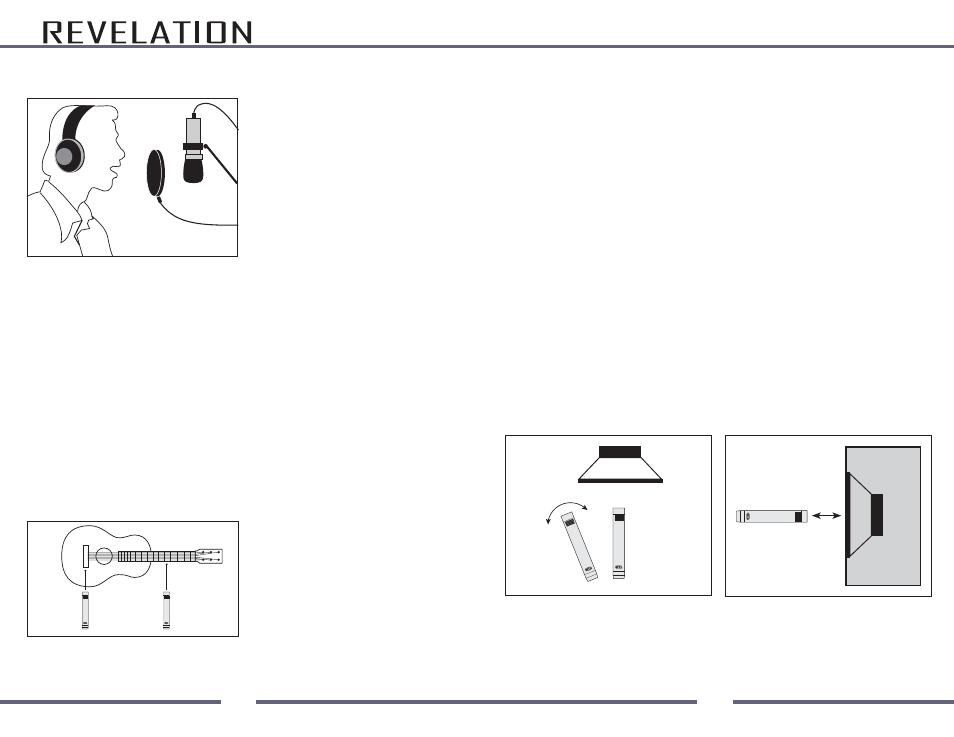
Fig. 1
Fig. 2
Bridge
Placement
12th Fret
Placement
Fig. 3
Mic is positioned
4” from grill
Side View
4”
Mic is aimed
directly at center
of loudspeaker
Top View
User Manual
5
Recording Tips and Tricks
Vocals and Dialog
Ideally, you want to record vocals in a
relatively “dead” room. If you clap your
hands and get an echo effect, you should
consider adding some carpet, blankets,
drapes, or other sound absorbing materi-
als. On that note, make every effort to
avoid getting too close to the room’s walls.
These hard, reflective surfaces can easily
complicate the recording process. Move
your mic setup toward the room’s center.
Generally, you should position the vocal-
ist roughly 6 - 8 inches away from the microphone. Getting too close to the microphone
tends to increase bass response and can create problems with plosive sounds (i.e., those
popping Ps, Bs, Ds, and Ts). Getting too far away makes the microphone more subject
to picking up room ambience and creates the effect of the vocalist being in a bowl. While
vocalists may need to move about in order to hit those high notes, make every effort to
maintain a constant distance from the microphone, as this will provide the greatest tonal
balance (see Fig. 1). For the most part, the microphone’s axis (or center line) should aim
toward the nose and mouth to obtain the fullest sound. It’s not a bad idea, however, to
experiment angling the microphone slightly away from dead center so as to help minimize
plosives. Further, you should always place a “pop” filter between the vocalist and the
microphone, with the pop filter positioned 3 - 4 inches in front of the microphone. This will
greatly increase your ability to achieve the most natural sounding recordings with minimal
interference from plosive sounds. Fixing plosives with audio editing software often creates
more of a problem than the plosive itself. Use of a pop filter will also protect your micro-
phone’s sensitive capsule, keeping it free from moisture caused by saliva and breath
condensation. Remember—good microphone technique, proper positioning, and use of a
pop filter can make all the difference between a so-so vocal recording and a great one.
Recording Acoustic Guitar
Your best results for capturing the
acoustic guitar (or any similar stringed
instrument) begin with a properly tuned
instrument and strings that, while not old,
aren’t so new as to create tuning issues
due to stretching. There are two optimum
points for microphone positioning: either
near the bridge or by the twelfth fret.
While it may seem natural to place the
microphone in front of the instrument’s sound hole, doing so usually increases low
frequency response to the point of making the instrument sound “boomy.”
Twelfth Fret Placement: Placing the microphone roughly 2 - 4 inches from the twelfth
fret and aimed directly at the strings will generally produce a warm, full bodied sound
with good tonal balance. In addition, the sound hole’s contribution to the sound will
be moderated since the microphone is not pointed directly at it.
Bridge Placement: Similarly, you can position the microphone so it is 3 - 6 inches from the
guitar’s bridge. This will generally produce a somewhat brighter tonal quality. You should
also be prepared to experiment with positioning the microphone slightly off-axis should you
find yourself capturing too much low frequency response from the guitar’s sound hole.
The acoustical characteristics of your room will also have a pronounced effect on your
results. A “live” room will produce an overall “brighter” guitar sound, while a “damped”
room will produce more of a mellow tone. If you have two microphones, you may wish
to experiment using one in close proximity to the guitar as previously described, with
the second microphone on a stand a few feet away to capture the room’s ambience.
Blending the two sources can produce excellent results.
Recording an Amplified (Electric) Guitar
While the electric guitar can certainly be recorded directly, there are times when there
is simply no substitute for the sound of a real amplifier. Guitar amps have particular
gain stages that facilitate the popular “crunch” guitar sound. While digital modeling and
processing systems certainly have their place, they may not have the same level of real-
ism as the sound from an amplifier. A small guitar amp can be just as effective for this
application as a stack, because you don’t necessarily need to “crank” the volume.
Instead, you want to increase the amp’s initial gain to achieve the desired amount of
overdrive.
Typically, a guitar amp is close miked to achieve the highest direct sound. Placing the mi-
crophone roughly 4 inches from the grill, aimed directly at the center of the loudspeaker
will produce the most “edge” to your sound. By angling the microphone slightly off axis
and towards the wall, you can add more “room sound.” Experimentation is a key factor in
achieving the sound you are looking for (see Fig. 3).
6