Seametrics WJ-Series User Manual
Page 4
LT-65200309-120513
12/5/2013
Seametrics Incorporated • 19026 72nd Avenue South • Kent, Washington 98032 • USA
(P) 253.872.0284 • (F) 253.872.0285 • 1.800.975.8153 • www.seametrics.com
MAINTENANCE AND REPAIR
Page 4
CAUTION: Before breaking the tamper-
evident seal on your meter, be sure that
you are in compliance with any regulatory
requirements (if applicable).
Changing the Pulse Rate. When changing the pulse rate, you
must first remove the existing reed switch (see note above).
1. Choose desired pulse rate and switch position.
2. Remove the black rubber plug from the other hole
and move it to the position the reed switch was
removed from.
3. Insert the reed switch assembly into the side of the
register housing in the direction of the dial with desired
pulse rate.
4. Lock in place with rivet and pin.
Recalibration. For meters used for revenue-billing purposes,
some states require periodic calibration checking. This type
of turbine meter is most commonly checked every four years.
Testing may be done by a local mobile meter service or in a
private or municipal meter shop. Changes in calibration should
be made at an authorized meter shop.
Turbine Insert Replacement. The entire turbine insert comes
out as a unit without removing the meter from the pipe. Carefully
noting position and retaining parts for reassembly.
1. Remove the lid and register as described.
2. After relieving pressure inside the meter, remove
the four flange hex-screws and washers.
3. Lift the flange and insert out in one piece, rocking
gently to break the seal.
4. Remove the four retaining ring screws, and lift
the retaining ring and flange off the turbine insert.
5. Remove and replace the large O-ring around the
top opening of the meter body.
6. Reassemble the retaining ring and flange on top of
the new insert. Be sure the alignment notch in the
retaining ring is directly above the screw in the
insert’s top plate.
7. Replace the entire mechanism in the meter body
with the drilled screw head in the same corner as
the security pin.
8. Replace the lid with a twist of the wrist, insert
the security pin in the tiny hole in the retaining ring,
and thread the security wire through the screw
head and the security pin. Affix lead seal and crimp.
Setting Your Pulse Rate
Size
Size
Pulse
Reed Switch
(inches)
(mm) Rate Position
2”
50
3” 80
4”
100
6”
150
8”
200
10
x1
100
x10
100
x10
1,000
x100
100
x10
1,000
x100
100
x10
1,000
x100
1,000
x100
10,000
x1000
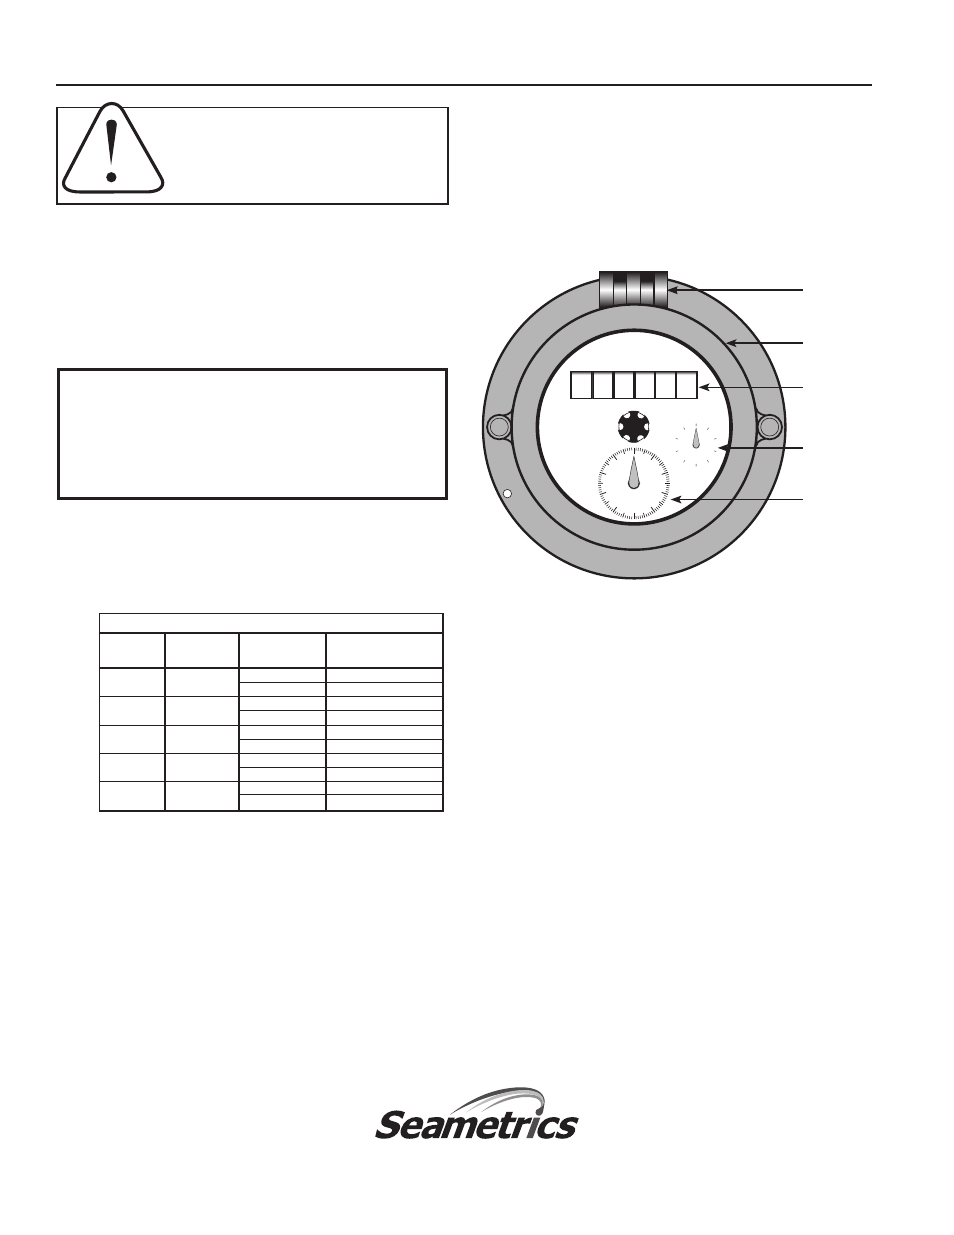
The Register (3” & 4” version shown)
Adding Reed Switch. For the contacting head option, WJ
meters use a meter-mounted reed switch to provide a two-
wire dry contact. To add a reed switch in the field, remove
one of the black rubber plugs from the side of the register
housing and slide the reed switch assembly into the hous-
ing in the direction of the dial with the desired pulse rate.
Lock in place with the rivet and pin (see page 2).
0 0 0 0 0 0
0
5
1
2
3
4
6
7
8
9
U.S. GALLONS X1000
80mm
40°C
X 10
0
5
1
2
3
4
6
7
8
9
X 100
12 345678
Retaining ring
Totalizer
Pulse rate dial #1
Cover Hinge
2” = X100
3” & 4” = X1000
6” & 8” = X10000
2” = X10
3” & 4” = X100
6” & 8” = X1000
Pulse rate dial #2
2” = X1
3” & 4” = X10
6” & 8” = X100
Register Removal. Clip and remove the copper security wire
from the security pin. Remove the security pin that holds
the lid in place, twist the lid and lift it off. Lift the register
free from the meter, noting orientation.
Note: If changing the pulse rate, you need to first remove
the reed switch from the position it is in. In doing so, the
small plastic rivet & pin will be damaged and should not
be reused. Have a replacement plastic pin & rivet before
beginning. If you do not have a spare, contact factory for
a replacement (see page 2 for part reference).