Basic system operation, Sound system accessories, Xtreme sound system control panel – Anchor Audio XTR-6000CU2 User Manual
Page 4
BASIC SYSTEM OPERATION
NOTE: Fully Charge Batteries Before First Use!
1. Before turning your system on: Set all Input Level Controls to
minimum & Tones Controls to the flat or middle setting
2. Plug in a wired microphone (MIC IN or BALANCED INPUT jacks)
and/or a separate audio source (LINE-IN jack)
3. Set Power Switch to “ON”, a red LED near switch will light up
4. Adjust Level Controls for active Input Jacks to desired volume
5. Speech/Projection Button: ON for speech applications or
OFF for music & indoor use
6. Adjust sound quality w/ the BASS & TREBLE Tone Controls
SOUND SYSTEM ACCESSORIES
XTR-6001- Xtreme Companion Speaker
Unpowered dual function companion speaker (speaker cable not included)
SC-50NL - Heavy Duty Speaker Cable
50’ speaker cable, use to connect the XTR-6001 to a powered Xtreme system
SC-100NL - Heavy Duty Speaker Cable
100’ speaker cable, use to connect the XTR-6001 to a powered Xtreme system
SS-550 - Heavy Duty Speaker Stand
Adjustable stand made of black, anodized aluminum
HC-1650L/X - Hard Case
For travel or storage - holds one Xtreme sound system & accessories
SOFT-TOTE - Soft Rolling Case
Soft case w/ wheels & collapsible handle, holds Xtreme, stand & accessories
MIC-90 - Handheld Wired Microphone
Anchor’s dynamic, balanced, low impedance microphone w/ unidirectional
pick-up pattern, mic “on/off” switch, 20’ cable & mic clip
ANCHOR WIRELESS - 16 CHANNEL UHF
WH-6000 - Handheld Microphone/Transmitter
WB-6000 - Body Pack Transmitter
Works w/ hands free microphones (mic not included - see below)
CM-60 - Collar Microphone
Lightweight, low-profile mic - works w/ WB-6000 body pack transmitter
EM-60T - UltraLite Microphone
Hands free “Over-the-Ear” mic - works w/ WB-6000 body pack transmitter
LM-60 - Lapel Microphone
Lightweight, clip-on lapel mic - works w/ WB-6000 body pack transmitter
HBM-60 - Headband Microphone
Ultra-lightweight headband mic - works w/ WB-6000 body pack transmitter
4
SPEECH/PROJECTION BUTTON
Allows you to customize the sound output of your Xtreme sound system
for different applications:
Speech Projection Off (button out): A flat, full range frequency
response for music or indoor voice applications.
Speech Projection On (button in): Frequencies in the vocal range
are boosted for added clarity and efficient sound projection. Use this
setting for outdoor functions, large crowds and speech applications.
WIRELESS RECEIVER CONTROLS
(see page 6)
CD PLAYER CONTROLS
(see page 6)
INPUT LEVEL CONTROLS
MIC IN - INPUT JACK
Balanced XLR - low impedance input
for balanced mics, +12VDC power for
condenser-type mics
LINE IN - INPUT JACK
Unbalanced 1/4” - high impedance, for
any line-level signal source: cassette/
VCR/CD/DVD players, musical instru-
ments, 2nd sound system, etc.
CD PLAYER VOLUME CONTROL
AC POWER CORD INLET
LINE OUT - OUTPUT JACK
Balanced 1/4” - provides a combined
output of all active system inputs
Record your presentation or connect to
another powered sound system
This output is post source level; any
volume fluctuations for a specific input
will affect this output signal level
FUSE
POWER SWITCH
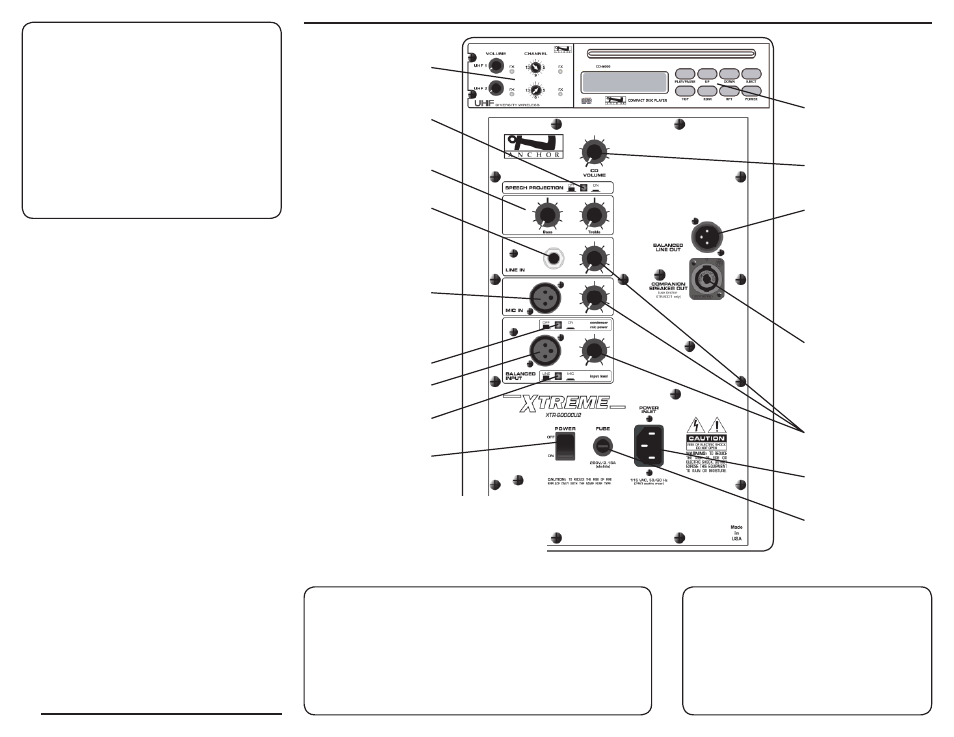
XTREME SOUND SYSTEM
CONTROL PANEL
Model Shown: XTR-6000CU2
SPEECH/PROJECTION BUTTON
(see instructions below)
TONE CONTROLS - BASS/TREBLE
CONDENSER MIC POWER
INPUT LEVEL BUTTON
BALANCED INPUT - JACK
(see “Balanced XLR” below)
COMPANION SPEAKER OUT
Biamped output jack (separate amplifier
for the high & low frequencies) intended
for use with the XTR-6001 Xtreme
unpowered companion speaker
BALANCED XLR INPUT
The balanced XLR, low impedance input jack can be used for either a balanced line level input or a
balanced microphone input. The Input Level & Condenser Mic Power features are user selectable.
Condenser Mic Power Button: For condenser microphones, set the Condenser Mic Power button
to “ON” (button in); the “ON” setting supplies +12VDC at the input. Setting the button to “OFF”
(button out) supplies 0V for all other input applications.
Input Level Button: For a microphone level input set the Input Level button to “MIC” (button in).
For line level sources set the Input Level button to “LINE“ (button out).