Mounting the fan, Step 2 – sizing requirements, Step 3 – positioning of the solar fan – U.S. Sunlight 9912TR Solar Powered Attic Fan User Manual
Page 2: Step 4 – marking the hole, Step 5 – cutting the hole, Step 6 – lifting the shingles, Step 7 – installing the solar fan
Mounting the Fan
Step 2 – Sizing Requirements
See sizing chart on the product box or visit our website at www.ussunlight.com to assure that you select the correct number of
fans for your situation. Some attics have walled off or chambered areas that will require additional fans to properly vent the space.
If you have any questions or concerns please call our customer service specialists at: 1-877-50-USSUN
south or southwest
mid-day summer sun
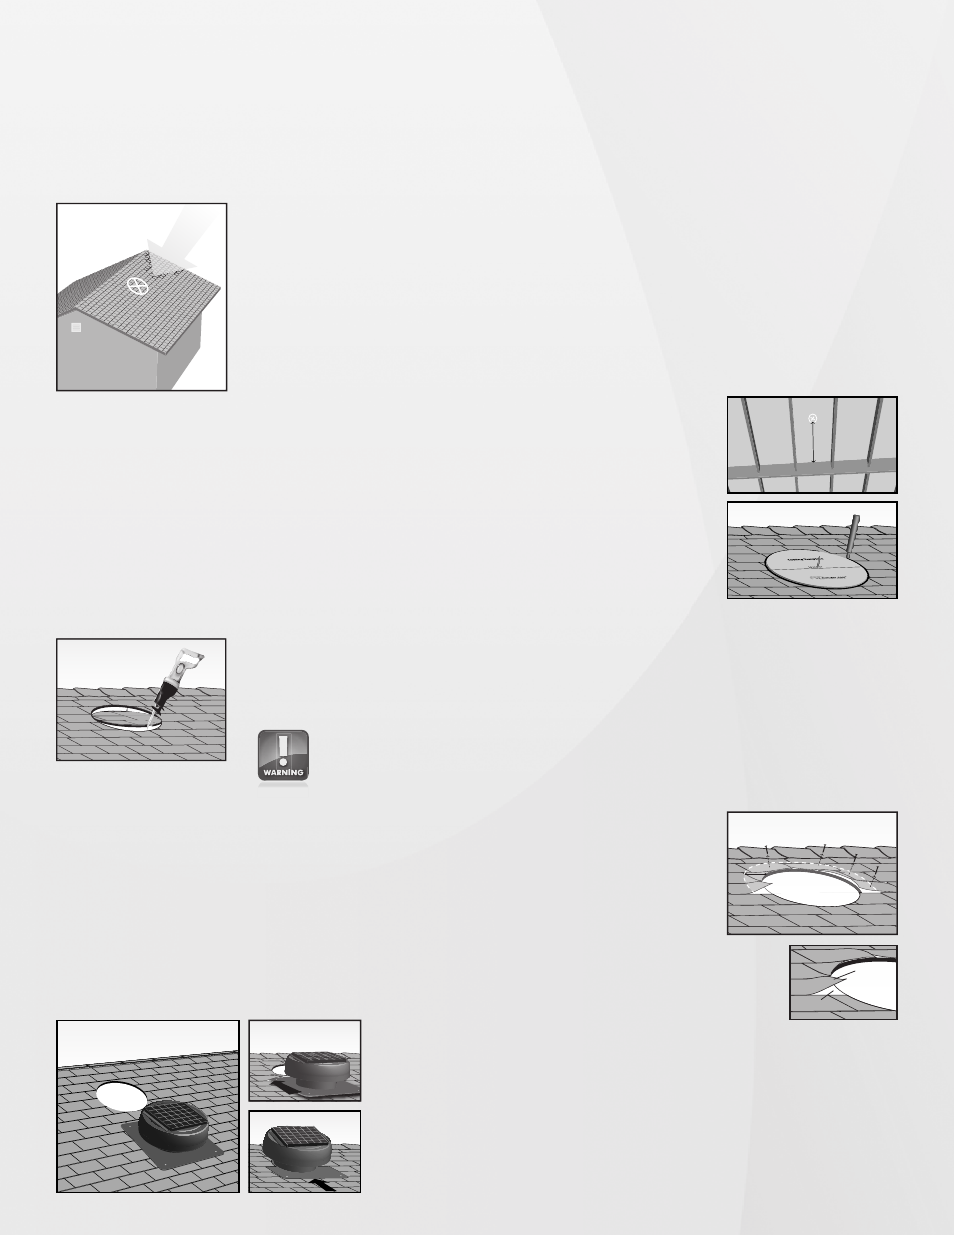
Step 3 – Positioning of the Solar Fan
The solar fan should be positioned to face south or southwest for optimum performance
and should be positioned on an area of the roof that is not shaded or otherwise blocked
from the sun for extended periods throughout the day. The solar fan should be installed
18 – 24 inches from the top of the roof peak and as close to the mid-point of your house
as possible. In the case that 2 or more fans are getting installed you should separate the
fans by at least 15 feet to optimize ventilation.
(fig. 4)
Step 4 – Marking the Hole
From inside the attic, measure down from the roof peak approximately 18 to 24 inches and
center this spot between two rafters. Drill a screw through this mark into the plywood and
roof shingle so it will be easily located from on top of the roof.
Included in the box is a template for cutting out the hole. It is printed on the cardboard
protecting the base of the fan. Punch out the template. From on top of the roof, locate the
screw and place the cardboard template over the top of the screw aligning it in the center
hole of the template. Using a pen or marker, trace a circle around the outer edge of the
template, resulting in a circle with a 14” diameter.
(fig. 5)
fig. 4
fig. 5
Step 5 – Cutting the Hole
Using a power drill equipped with a ½ - 1” drill bit, drill a pilot hole anywhere along the
inside of the circle. Insert the saw blade into the pilot hole and follow the circle pattern to
cut the hole into the roof.
(fig. 6)
fig. 6
Do not cut through any roofing rafters or framing members! Only cut and remove the roof sheeting and
shingles. Prior to cutting the hole, make sure you do not have any wires or waterlines in the area that
you are cutting. Before completely cutting out the circle, try to secure the removed material so it does
not fall into the attic space.
5”
Shingle
Felt Paper
Step 6 – Lifting the Shingles
The nails located 5” above and to the side of the hole will need to be removed for the solar
fan flashing to slip between the felt paper and the shingles – (fig. 7) You should use a pry
bar or reciprocating saw to loosen or cut any nails and/or staples.
Do not attempt to force the unit into place. If it does not slide easily into place, a nail is most
likely obstructing the flashing. In some cases the builder may have used large washers to
install the felt paper. In this case lift up on the flashing as you are sliding it under the shingles.
fig. 7
24”
roof peak
Step 7 – Installing the Solar Fan
Position the Solar Fan so that it is directly below the hole (fig. 8a) using
the “Up” label as a guide for orientation.
Begin sliding the flashing of the
Solar Fan underneath the shingles and on top of the felt paper at the mid-
point of the hole (fig. 8b). Continue sliding the solar fan upward (making
sure that the top of flashing is facing toward the top of the roof) until it is
positioned directly over the attic hole (fig. 8c).
fig. 8a
fig. 8b
fig. 8c