Construction, Power capacity, Parts – Tomlinson 515FC DELUXE 16 PIZZA & SNACK User Manual
Page 3: Handle assembly, Warning
4
5
Your FUSION COMMERCIAL oven is a professional restaurant quality oven
designed to fit on a countertop in your kitchen, office, bar or recreation room.
With the oven’s dual baking elements, you will be able to bake most frozen
pizza, single serve entree snack foods, and appetizers in 30 minutes or less.
We recommend preheating the oven for 5 minutes. Actual baking times could
vary from each product’s recommendations, so check food often to avoid
over-baking.
Construction
Your FUSION COMMERCIAL oven outer case and food rack cover are made
of 22 gauge brushed 430 stainless steel. The inner case and internal case
parts are made from aluminized steel to protect against corrosion.
Power Capacity
Your FUSION COMMERCIAL oven operates on 120 volts, draws 14.2 amps
and processes 1700 watts of power. For best results, operate your pizza
oven on an individual outlet or circuit branch.
Parts
Model #515FC FUSION COMMERCIAL Deluxe 16" Pizza & Snack Oven
includes the following pieces:
Model #
Description
QTY
PN# PO-515
Pizza Oven
1
PN# CT-515
Crumb Tray
1
PN# SS-501 - 1923487
Small Screw
1
PN# BN-501 - 1923488
Black Knob
1
PN# FR-515
Food Rack
1
PN# FRC-515
Food Rack Cover
1
PN# HA-508 - 1923248
Handle Assembly
1
PN# LS-501 - 1923454
Large Bolt
1
PN# LTN-501-1923455
Large Thumb Nut
1
PN# CB-501 - 1923491
Cleaning Brush
1
Handle Assembly
Included with your oven is a parts bag containing an rgonomically designed
cool-touch handle, large bolt and large thumb nut. Follow the steps listed
below to assemble the handle to the food rack and food rack cover.
Step 1: Remove food rack cover PN# FRC-515 and food rack
PN# FR-515 from the oven.
Step 2: Lay food rack on a stable counter top with loop facing
up and slightly over the edge of the counter.
Step 3: Slip the slot on the front of the food rack cover over the loop so
the food rack cover rests flat against the food rack.
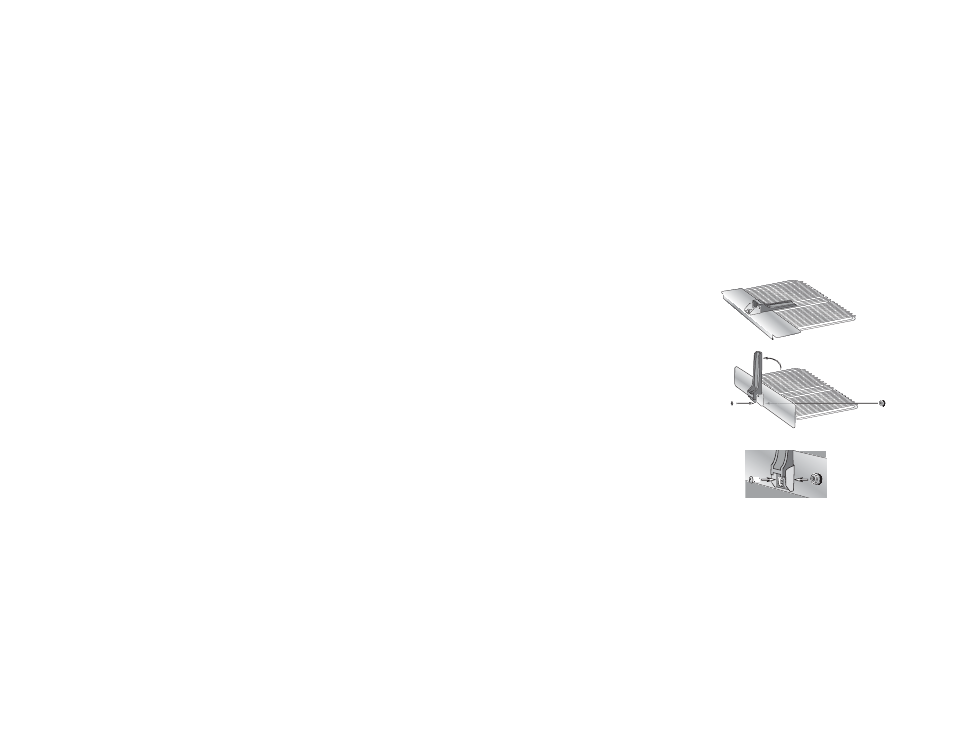
Step 4: Take handle assembly PN# HA-508 and rotate the
handle and bracket so they lie
flat. Lay the bracket slot over
the food rack loop on top of the
food rack cover as shown (Figure
1).
Step 5: Rotate handle and food rack
cover towards you together as a
single unit (Figure 2).
Step 6: Using attaching hardware found
in the parts bag, take one large
bolt PN# LS-501 and one large
thumb nut PN# LTN-501. Slide
large bolt through the round
hole, capturing the loop, handle
bracket and the food rack cover.
Thread the nut onto the large bolt from the opposite of the food
rack and tighten (Figure 3).
Step 7: Rotate the assembled handle down and slide the completed food
rack back into its original position in the oven.
Warning:
Improper assembly of the handle to the food rack could cause the food rack
to rotate and fall when food is removed from the oven. Do not attempt to
grab HOT foods with bare hands when removing food from the oven.
Figure 1.
Figure 2.
Figure 3.