Tomlinson 508 SERIES PIZZA OVEN Timer Replacement User Manual
Page 2
2
2. Remove the oven’s bottom panel (2) by removing five sheet metal screws (1). One screw is located below
the front panel and the other four are found in pairs on opposite sides of the oven. DO NOT remove the
sheet metal screw (3) from the back of the
oven, located near the 120V power cord
(4). When removing the bottom panel (2),
make note of its orientation, as
reinstallation of the panel is the reverse.
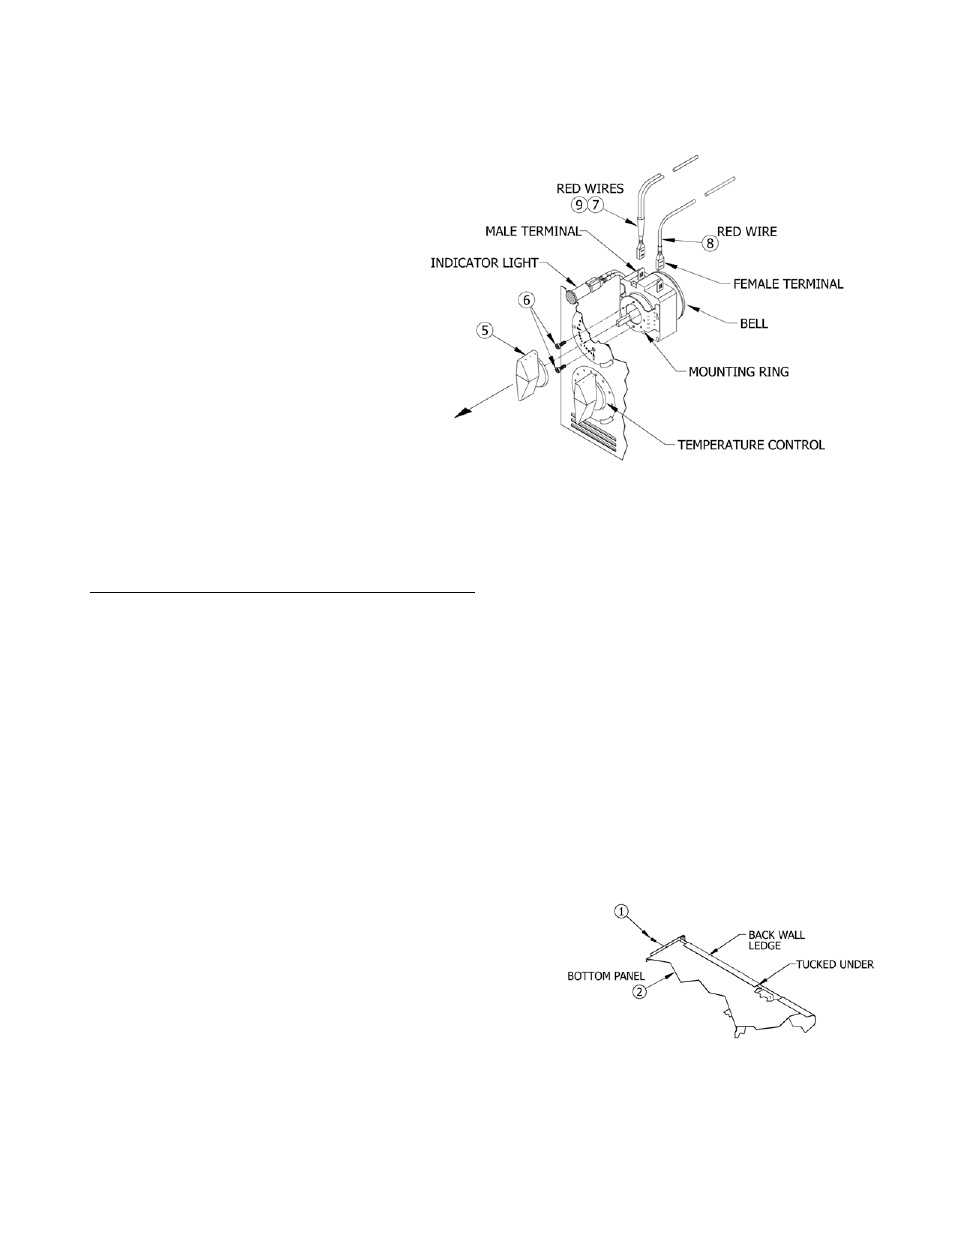
3. Remove the timer knob (5) from the timer
shaft and retain it for use in reassembly.
4. Remove the two timer screws (6).
5. Disconnect the red wires (7 and 8) from
the male switch terminals. When removing
the red wires, only apply force to the
female terminal located at the end of each
wire. Also, when disconnecting the wire
(7) from the timer’s left terminal, ensure that you DO NOT detach the wire (9) that connects to either the red
power-on light or the temperature control, both located below the timer.
6. Discard the defective timer.
Installing the New Timer and Oven Reassembly
7. Orient the new timer so that the male switch terminals face upward.
8. Reconnect the red wires (7 and 8) to the new timer’s two male switch terminals, ensuring that the wires are
attached to the proper terminals as observed in the above diagram. Verify that the wires are securely
fastened to the terminals.
9. Orient the timer within the oven so that the connected red wires face upward and the mounting ring makes
contact with the inner oven wall. Align the holes on the timer’s mounting ring with the holes on the front
panel.
10. Fasten the timer to the inside of the oven wall by using the two timer screws (6) removed in Step 4.
11. Securely attach the timer knob (5) to the timer shaft. Ensure that the pointed end of the timer knob faces the
“0” minute mark on the front panel.
12. Reinstall the bottom panel (2), ensuring that the back side of
the bottom panel is tucked under the ledge on the oven’s back
wall. Secure the bottom panel (2) by using the five sheet metal
screws (1) removed from the oven in Step 2.
13. Turn the oven over and replace the crumb tray, food rack, and
food rack cover.
14. Plug power cord into a 120V AC outlet. Rotate timer knob (5)
and check for heat-up to verify proper operation.