Powermate 024-0089CT User Manual
Page 4
4 - ENG
OPERA
OPERA
TING INSTRUCTIONS
TING INSTRUCTIONS
TYPICAL
TYPICAL
INST
INST
ALLA
ALLA
TION
TION
To begin using the tool:
1.
As a standard practice, drain water from the air
compressor tank and air lines prior to use each day
(reference your compressor operators manual for
detailed instructions).
2.
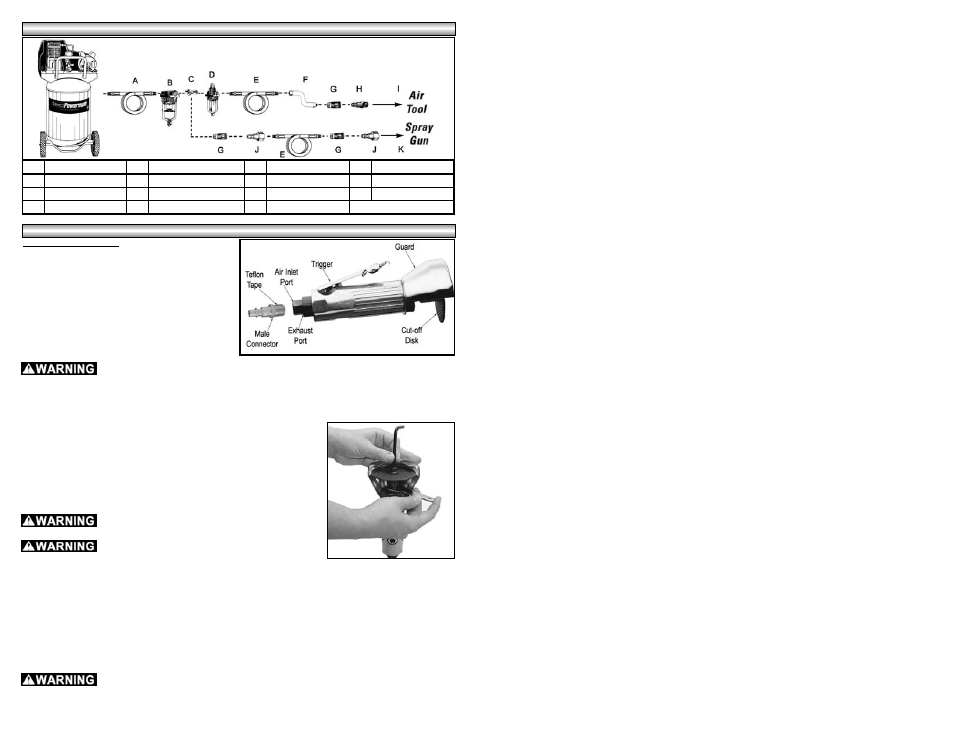
Install a 1/4” NPT male connector (not included)
into the air inlet port on the tool (see Figure 2).
Note: Use Teflon® Tape on all threaded
connections.
3.
Turn on the air compressor and allow it to build up
pressure.
Always disconnect the tool from the air source before changing cut-off disks. Do not
operate the tool if the cut-off disk is not tightened to the cut-off tool.
4.
Assemble the cut-off disk to the cut-off tool (see Figure 3):
NOTE: Use only 3” maximum diameter cut-off disks rated at no less than 20,000 RPM. For
replacement aluminum oxide cut-off disks, call the Coleman® Powermate® number listed on the
back page of this manual.
a.
Place the allen wrench (included with tool) in the allen head screw at
the end of the tool and the spanner wrench (included with tool) on
the body of the tool to hold it from turning. Turn the allen wrench
counterclockwise to loosen.
b.
Remove the allen head screw and washer.
c.
Place a cut-off disk, rated for the tool, onto the arbor and replace the
washer and allen head screw.
d.
Tighten the allen head screw clockwise with the allen wrench.
Never use a damaged disk! Inspect the cut-off disk
for cracks or chips before using.
Never operate this tool without the guard attached or
if the guard is damaged. Serious injury may occur if
used without the guard in place. Position the guard between yourself and the part
being cut.
5.
Adjust the air compressor’s regulator or the supply line regulator to 90 PSI.
6.
Connect the tool to the air hose quick coupler. NOTE: It is recommended that a whip hose with a swivel
(P012-0079SP - not included) be used to prevent twisting, kinking, and excessive wear to the air hose
(see figure 1 for recommended connections).
7.
Squeeze trigger gently. Start the tool off the work. Do not put extreme pressure on the tool. This slows down
the speed of the cut-off disk, reducing cutting efficiency and puts additional burden on the air tool motor.
8.
When finishing cutting, lift the tool off the work before releasing the trigger.
This tool will produce sparks when cutting metal. Always wear ANSI Z87.1 approved
safety goggles when using this tool.
Key
Description
Key
Description
Key
Description
Key
Description
A
Air hose
D
In-line Oiler
G
Quick Coupler
J
Female Connector
B
In-line Filter
E
Air Hose
H
Male Connector
K
Spray Gun
C
Tee Fitting
F
Whip Hose
I
Air Tool
Figure 1
Figure 2
Figure 3