Powermate 024-0082CT User Manual
Page 5
5 - ENG
USER-MAINTENANCE INSTRUCTIONS
USER-MAINTENANCE INSTRUCTIONS
TROUBLESHOOTING GUIDE
TROUBLESHOOTING GUIDE
SYMPTOM
POSSIBLE CAUSE(S)
CORRECTIVE ACTION
Grease gun fails to work
or is slow
Air pockets in the gun
Air hose leaks
Low air pressure
Plunger is sticking
Cartridge is empty
Grease gun is too cold
1. Draw back the plunger handle fully and release by
pressing the handle release. Repeat several times. This
will help exert force to move the rubber ring into the car-
tridge tube, which is essential for the grease gun to work.
Push the plunger handle all the way in.
2. Press the air vent valve several times to free the air.
Tighten and seal hose fittings with Teflon® tape if leaks are
found.
Adjust compressor regulator to 90 PSI.
Lubricate plunger (see “user maintenance” section).
Refill the container tube
The grease gun needs to be at room temperature (65° -
80° F).
T
T
OOL
OOL
SPECIFICA
SPECIFICA
TIONS
TIONS
Average SCFM Requirements
4.0 SCFM @ 90 PSI
Air Inlet
1/4” NPT (female)
Recommended Hose Size
3/8”
Maximum Working Pressure
90 PSI
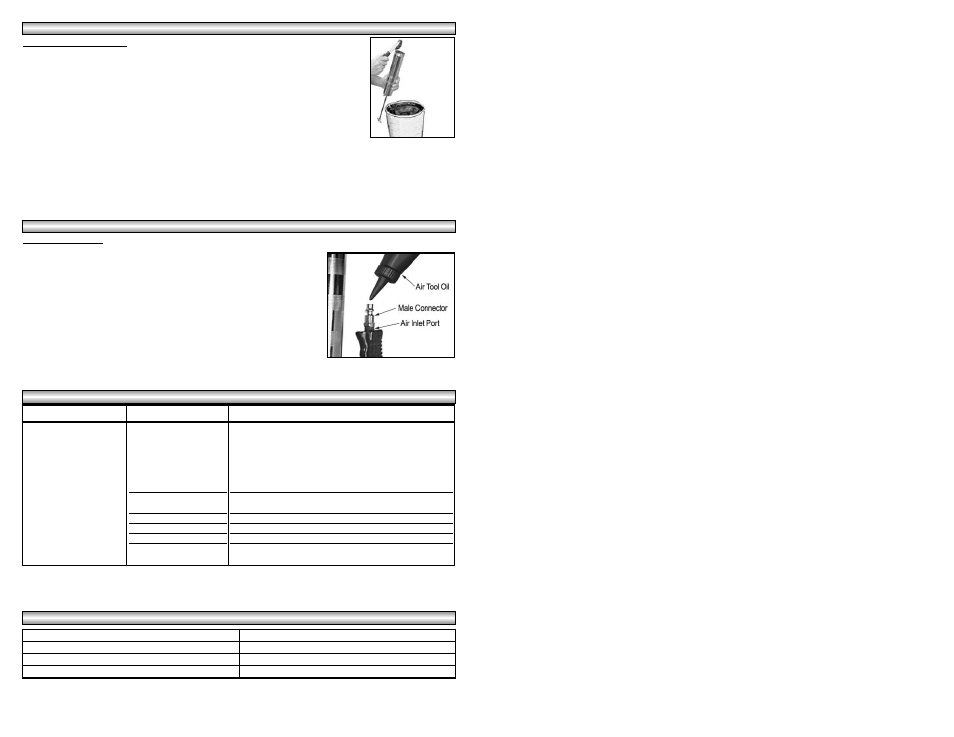
Plunger Lubrication
To maintain the maximum performance of the air too, it must be lubricated
each time it is used. Dust, dirt, rust and oil residue will build up inside the tool
and reduce the performance. An in-line oiler is recommended for proper auto-
matic lubrication (see Figure 1). If an in-line oiler is not available, the tool can be
lubricated manually through the inlet port (see Figure 6).
1.
Disconnect the air tool from the air supply.
2.
Turn the tool upside down and while depressing the trigger, add 1-2 drops
of Coleman Powermate® air tool oil #018-0059SP or SAE10 nondetergent
oil into the air inlet. NOTE: Depressing the trigger helps circulate oil on
the plunger within the grease gun head.
3.
Reconnect the tool to the air supply.
Figure 6
OPERA
OPERA
TING INSTRUCTIONS
TING INSTRUCTIONS
Bulk fill loading (Figure 5)
a.
Remove the head of the grease gun from the container tube.
b.
Pull the plunger handle on the container tube completely out.
c.
Fill the container tube with bulk grease.
d.
Reassemble the head of the grease gun to the container tube.
e.
Press the handle release to release the plunger handle.
f.
Press the air vent valve to release any excess air trapped inside.
5.
Connect the tool to the air hose quick coupler. NOTE: It is recommended that a whip hose with a swivel
(P012-0079SP - not included) be used to prevent twisting, kinking and excessive wear to the air
hose (ref. item “F” in figure 1 for recommended connections).
6.
Depress the trigger completely to operate the grease gun (the grease is applied in shots, not in a continous
flow).
7.
Release the trigger to stop the tool.
Figure 5