Cooking guide, Using your rice cooker, White rice /water measurement chart – Aroma ARC-1616 User Manual
Page 8: Brown rice /water measurement chart
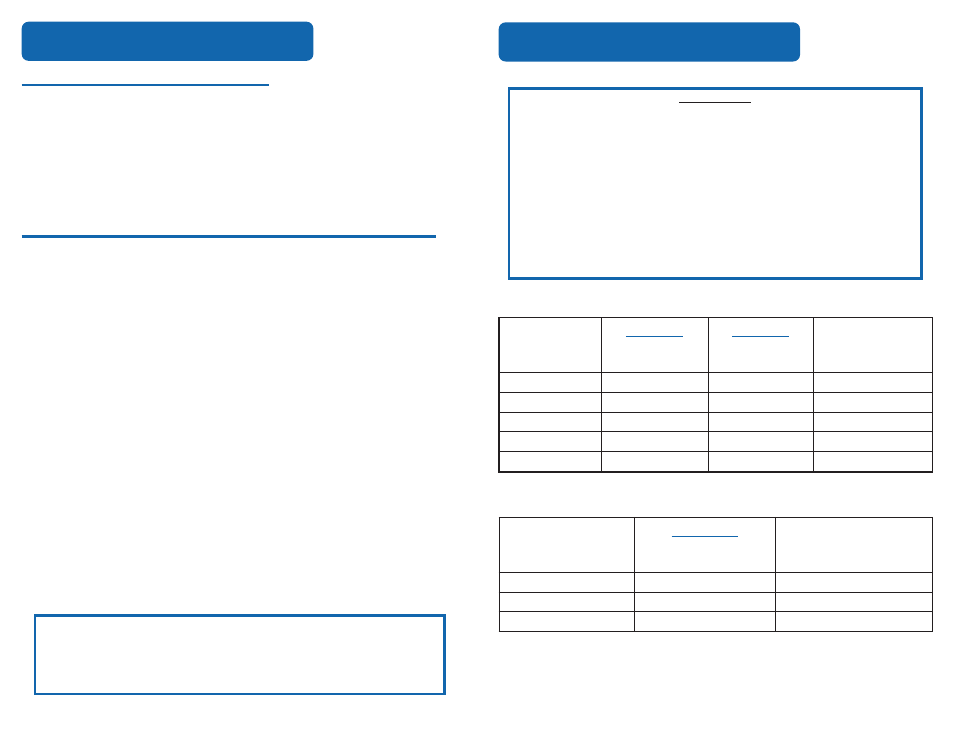
HELPFUL HINTS
1. Rinse rice before placing it into the inner pot to remove excess bran and
starch. This will help reduce browning and sticking to the bottom of the
pot.
2. If you have experienced any sticking with the type of rice you are using,
try adding a light coating of vegetable oil or non-stick spray to the
bottom of the inner pot before adding rice.
3. This is only a general measuring guide. As there are many different kinds
of rice available (see About Rice on page 13), rice/water measurements
may vary slightly.
4. For softer rice, allow it to soak for 10-20 minutes prior to cooking.
COOKING GUIDE
UNCOOKED
RICE
WHITE RICE
WATER WITH
MEASURING CUP
WHITE RICE
WATERLINE
INSIDE POT
APPROX COOKED
RICE YIELD
2 Cups
2-1/2 Cups
Line 2
4 Cups
3 Cups
3-1/2 Cups
Line 3
6 Cups
4 Cups
4-1/2 Cups
Line 4
8 Cups
5 Cups
5-1/2 Cups
Line 5
10 Cups
6 Cups
6-1/2 Cups
Line 6
12 Cups
White Rice
/Water Measurement Chart:
UNCOOKED
RICE
BROWN RICE
WATER WITH MEASURING
CUP
APPROX COOKED RICE YIELD
2 Cups
3 Cups
4 Cups
3 Cups
4-1/4 Cups
6 Cups
4 Cups
5-1/2 Cups
8 Cups
Brown Rice
/Water Measurement Chart:
*
Due to the extra water needed to cook brown rice, the maximum amount
of brown rice that may be cooked at one time is 4 cups.
7
6
USING YOUR RICE COOKER
To Steam Food And Cook Rice Simultaneously
One of the most convenient features of this rice cooker is the ability to both cook
rice and steam food simultaneously, ideal for creating delicious all-in-one meals.
1. Begin cooking the desired amount of rice. See “To Cook Rice” on page 4 for
detailed instructions. Do not attempt to cook more than 4 cups (uncooked) of
rice if trying to use the steam tray simultaneously, or the steam tray will not fit.
2. Place the inner pot into the unit, close the lid and press ‘START/REHEAT’.
3. Refer to the steaming guides for vegetables (page 9) or meat (page 10) for
hints and approximate steaming times. It is best to insert the food to be
steamed toward the end of the rice cooking cycle so that your meal is fresh
and warm all at once.
4. Place your choice of vegetables or meat into the steam tray. Open the lid,
using caution as steam escaping will be extremely hot, and place steam tray
into the rice cooker.
5. Close the lid and allow the cooker to resume cooking.
6. Once food has been steamed for the appropriate time, open the lid. Use
caution when opening lid as steam escaping will be extremely hot. Remove
the steam tray and check food to be sure it has been thoroughly cooked.
Exercise caution when removing the steam tray as well; it will be hot.
7. Close the lid of the rice cooker and allow rice to continue to cook until
finished. The unit will chime when rice is ready and switch to keep warm
mode. The digital display will indicate the number of hours food has been
warming.
8. Press ‘WARM/OFF’ to turn off the rice cooker. Always unplug the rice cooker
when not in use.
CAUTION:
• Use caution when opening lid as steam escaping will be extremely hot.
• If cooking pot is returned to cooker when wet it will damage this product,
causing it to malfunction.
NOTE
It is possible to steam at any point during the rice cooking cycle.
However, it is recommended that you steam during the end of the cycle
so that steamed food does not become cold or soggy before the rice is
ready.
To Use Warm Mode:
Although the rice cooker automatically switches to warm mode after cooking
finishes, you may also use this function independently to keep a meal warm for
serving.
1. Add food to be warmed to inner pot and place in the rice cooker. Close the
lid.
2. Press “WARM/OFF” button until the indicator light illuminates.
3. The digital display will indicate the amount of time food has been warming.
4. Press “WARM/OFF” button until the light turns off when finished warming.
5. Unplug the rice cooker when not in use.