Innovative Tools & Technologies Innovative Octopus Paint Rack™ User Manual
Octopus paint rack • assembly instructions
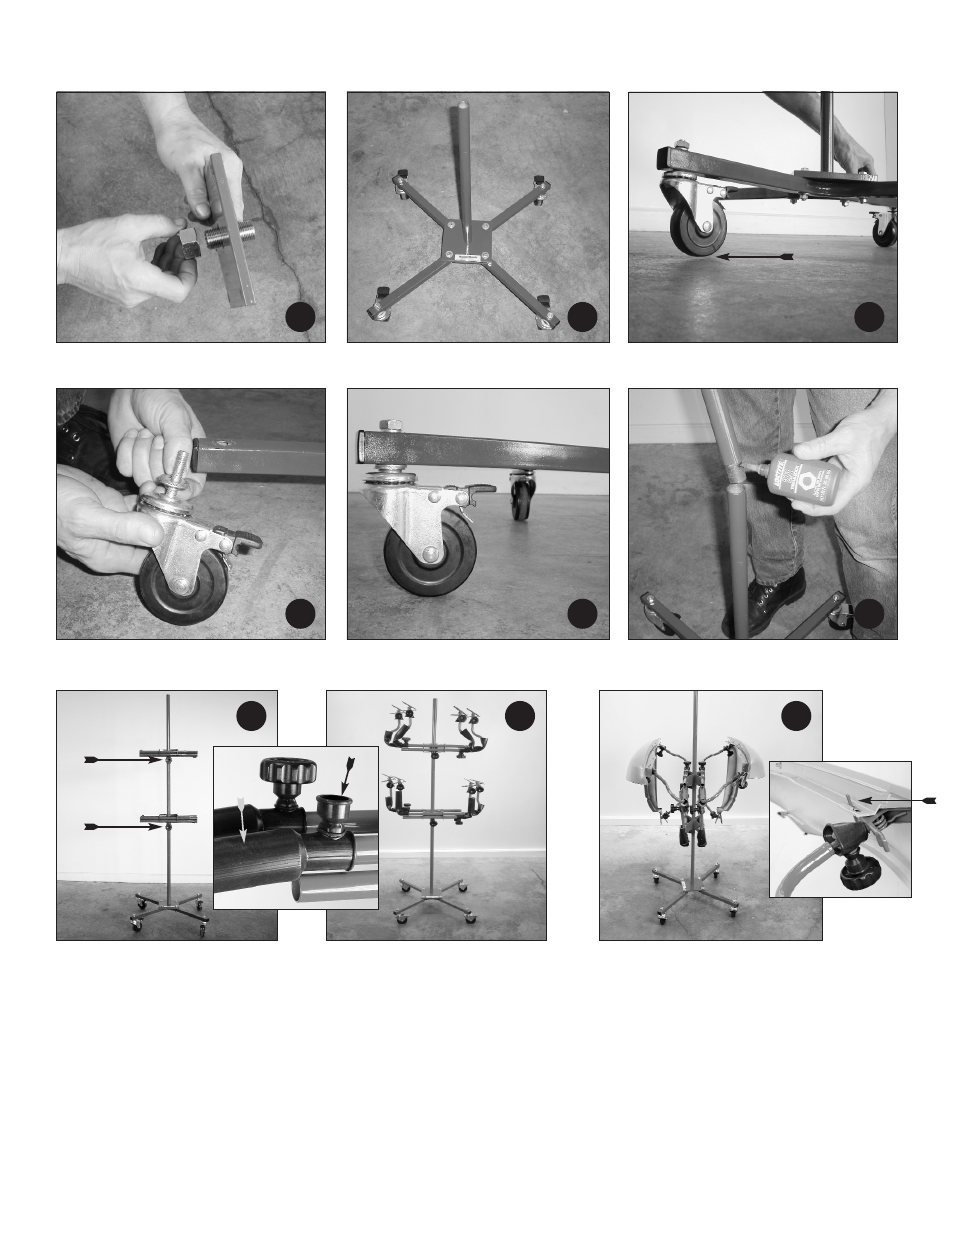
Octopus Paint Rack • Assembly Instructions
Screw connector into base plate 5/8� through other
side, then tighten large nut firmly. Install bottom
post tube. Note: use Loctite on all threads.
Install wheels to base tubes, then mount to base plate.
Note: tighten all nuts and bolts firmly.
Check to see if all wheels are making contact to floor.
Photo shows wheel slightly off of floor.
1
2
3
Tube bending during manufacturing can not be exact
every time; 3/8� washers may be needed to shim wheel.
Photo shows installed shims
(the 3/8� washers).
I
nstall the last two post tubes. Note: Loctite is recom-
mended on all post tube threads. Tighten firmly.
4
5
6
Slide both support cradles onto center post tube. Note: cradle tightening knobs should be on the
underside of the cradle assembly as shown. Install long boots, then slide knob boots over the top
(see inset photo). Slide support arms into place. There are two support arm styles. The four “S”
curved arms work best on the top cradle, with the “L” shaped arms on the bottom, but you can
quickly and easily mix arms as needed.
Hold part to desired position, then move cradle support
and support arms into position and tighten.
Inset photo shows use of clamp pins.
The arrow points to the clamp pin.
7
8
9
Cradle
tightening
knobs
Knob boot
Long boot
Octopus Maintenance and Troubleshooting
amount of baby powder inside of boot.
up and down the center post.
to minimize overspray accumulation.
1. Maintain rubber boots by blowing off overspray with a high pressure air gun.
2. If rubber sleeve (P/N 250-029) sticks to support arm, simply apply a small
3. Center post overspray can be cleaned off by sliding cradle supports
4. Keep support arms not in use slid all the way in and in an upright position
5. To protect against overspray, we recommend using 3M Booth Coating P/N 06840.
US Patent 7,445,184