Using your rice cooker, Cooking guide, Guiasde coccion – Aroma ARC-150SB User Manual
Page 9: Comousar suaparato, Inner pot water lines, Lín eas de agu ain ter ior ese nla olla, Par au sar elp rog ram ado rd elt iem po
NO
TE:
NOTE:
To Use Delay Timer:
1. Follow steps 1 through 6 of “To Cook Rice” on page 4.
2. Press the DELAY TIMER button (in 1-hour increments) until the digital display
shows the number of hours in which you would like your rice to be finished
cooking.
3. Press the POWER button once at any time to cancel your choice and reset.
4. Press WHITE RICE or BROWN RICE button, depending upon the rice being
cooked, to begin the delayed cooking cycle.
5. The COOKING INDICATOR LIGHT will illuminate once the rice cooker begins
cooking the rice.
6. When cooking has completed, the rice cooker will beep and automatically
switch to “Keep-Warm” mode. The digital display will show how many hours
the rice cooker has been on “Keep-Warm” mode
.
7. Press the POWER button twice to turn off the rice cooker. If the POWER button is
not pressed, the rice cooker will remain in “Keep-Warm” mode. It is not
recommended to leave rice on “Keep-Warm” mode for more than 12 hours.
USING YOUR RICE COOKER
The digital display on this unit is for the
“Delay Timer” and “Steam” functions only.
When using the “White Rice,” “Brown Rice”
or “Keep-Warm”functions, the display will
show two blue lines (See illustration).
7
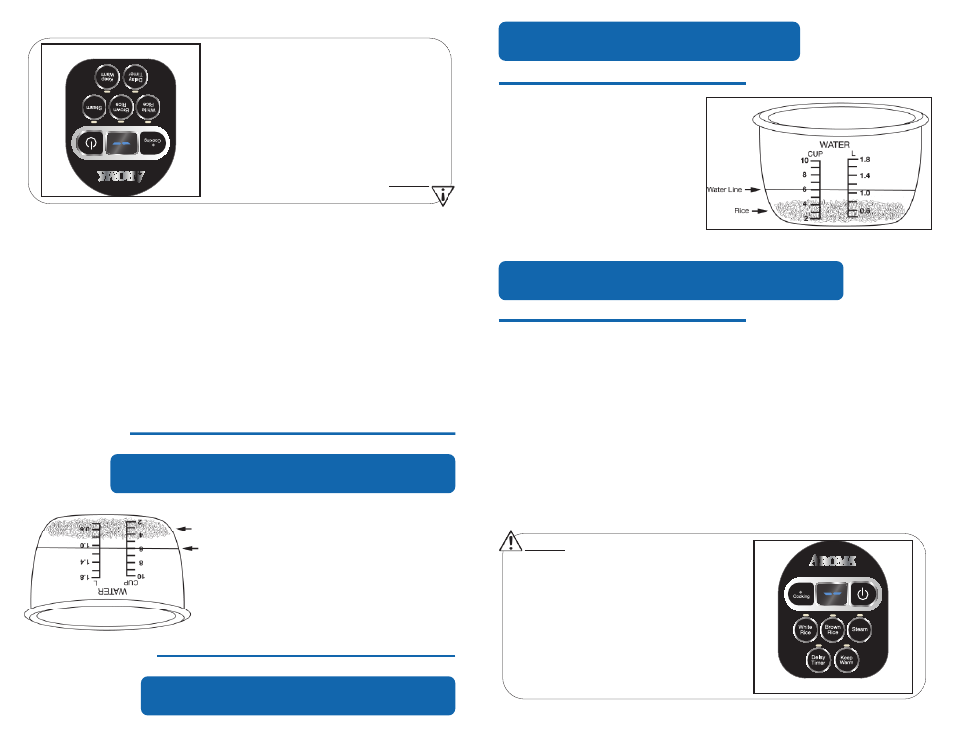
The water lines in the inner cooking
pot may be used to measure the
correct amount of water for rice. Be
sure to add the desired amount of
rice first. Then fill the inner cooking
pot with water to the corresponding
line in the inner cooking pot (i.e. 6
cups of uncooked rice would be filled
to line 6 in the inner pot). This is a
quick and easy way to achieve
perfect rice results.
Inner Pot Water Lines:
COOKING GUIDE
Digital Display Illustration
Laslíneas
deagua
enla
ollainterior
pueden
usarsepara
medirla
cantidadcorrecta
de
aguasegún
lacantidad
dearroz.
Cerciórese
deprimero
colocarla
cantidaddeseada
de
arroz;después
llenela
ollainterior
conla
correspondientecantidad
deagua,
(Ej.:6
tazasde
arrozcrudo
deberíande
llenar
hastala
línea6
dela
ollainterior).
Estees
un
métodorápido
ysencillo
paraobtener
perfectosresultados
enel
arroz.
Lín
eas
de
agu
ain
ter
ior
ese
nla
olla
:
Arroz
Lineade
agua
GUIASDE
COCCION
Par
au
sar
elP
rog
ram
ado
rd
elT
iem
po:
1.Siga
lospasos
del1
al6
enla
páginaNo.
4del
folleto“Para
CocinarArroz.
”
2.Presione
elbotón
deDelay
Timer(temporizador
deretraso)
enincrementos
deuna
hora,
hastaque
enla
pantalladigital
aparezcael
númerode
horasen
lasque
Ud.desea
haber
terminadode
cocinar.
3.Presione
elbotón
depoder
(Power)una
solavez
encualquier
momentopara
cancelar
suelección
yvolver
aprogramar.
4.Presione
elbotón
deARROZ
BLANCOo
ARROZINTEGRAL,
dependiendode
cualestá
cocinando,
para
iniciarel
ciclode
cocimientoretardado.
5.La
LUZINDICADORA
DECOCIMIENTO
seiluminará,
unavez
quela
ollacocinadora
haya
empezadoa
cocinarel
arroz.
6.Cuando
elciclo
decocimiento
haterminado,
laolla
avisarámediante
unsonido
bipy
cambiaráautomáticamente
ala
modalidadde
“Keep-Warm”(Manténgase
Caliente).
Lapantalla
digitalindicará
cuántashoras
seha
mantenidola
ollaen
estamodalidad.
7.Presionedos
vecesel
botónde
poderpara
apagarla
olla.Si
no
sepresiona
elbotón
de
poder,la
arrocerapermanecerá
enla
modalidadde
“KeepWarm”
yno
recomendamos
sedeje
elarroz
enesta
modalidadpor
másde
12horas.
COMOUSAR
SUAPARATO
La
pan
tal
la
dig
ita
le
ne
sta
su
nid
ade
se
ssó
lo
par
ala
sfu
nci
one
sd
e“
Del
ay
Tim
er”
(te
mpo
riza
dor
de
ret
ras
o)y
“St
eam
”(A
lV
apo
r)
Cua
ndo
se
esté
nu
tiliz
and
ola
sfu
nci
one
sd
e
ARR
OZ
BLA
NC
O,A
RRO
ZIN
TEG
RA
L,o
MA
NTE
NG
ASE
CA
LIE
NTE
(Ke
ep-
War
m)d
os
brill
ant
esl
íne
asa
zul
esa
par
ece
rán
en
la
pan
tal
la
(Ve
ala
ilu
stra
ció
n).
7
IlustraciónVisual
Digital