Dynasonics WT-1 ULTRASONIC THICKNESS GAUGE User Manual
Page 2
MEASURING PROCEDURE
1. Press the Power Key to turn on the unit.
2. Press the Material Selection Key. Display will show
the code 'Cdxx' or 'xxxx'. 'Cd' is abbreviation for
'code' and 'xx' is one number among 01-11.
'xxxx' is a 4-digit number which is the sound
velocity of material defined by the user. (Refer to
Material Selection Chart).
3. Press the Up (+) Key or Down (-) Key to select the
material code to measure. Then press Material
Selection Key to confirm. Display will show '0'.
4. Press the Unit of Measure Key to select the right
measurement unit.
5. Place a BB-sized drop of couplant on the material
to measure and lightly press Ultrasonic Sensor
onto the material surface. Be sure the sensor is
secure and the Coupling Indicator (
(
•
)
) is on. The
reading on display is the measurement value.
6. The reading is held until a new measurement
value is measured. The last value is held on the
display until the power is off.
7. Two modes to turn off the power:
Manual off at any time by pressing the power key
or Auto power off after 1 minute from last key
operation.
MATERIAL SELECTION NOTES
lf you select a material code but do not confirm the
selection, the code will automatically change to '0'
after several seconds. In such case, the meter will
still reserve the material code before exiting.
A 4-digit custom sound speed velocity value
(meters/second) will be shown on the display if item
12 on the Material Selection Chart is selected.
To view the material code selected, press the
Material Selection Key. To exit, press the Material
Selection Key again or wait until the code
automatically changes to '0' after several seconds.
MEASURING NON-STANDARD MATERIALS
If the pipe wall material is not listed in the "Material
Selection Chart", the sound speed velocity can be
entered manually in m/s (meters/second).
1. Press Velocity Key and display will show one of the
material codes shown in the "Material Selection
Chart" or a 4-digit number (selection 12 in chart)
which is a user adjustable sound speed velocity value.
2. How to measure pipe wall thickness by the
velocity known?
The velocity can be changed by pressing the Up
(+) Key or Down (-) Key to the value of known
velocity. The increment is 10m/s every short Up
(+) Key or Down (-) Key press. Faster increments
will occur if the Up (+) or Down (-) Key is pressed
and held for more than 4 seconds.
3. Place a BB-sized drop of couplant on the material
to measure and lightly press Ultrasonic Sensor
onto the material surface. Be sure the sensor is
secure and the Coupling Indicator (
(
•
)
) is on. The
reading on display is the measurement value.
4. If the sound speed velocity of the pipe material is
unknown and a sample of the material is available,
the sample can be utilized to configure the WT-1.
Measure the thickness of the sample piece and
repeat steps 2 and 3 above (higher sounds speed
velocity inputs will result in greater thickness
measurements - lower sound speed inputs in
thinner measurements) until the WT-1 indicates
the correct thickness. Record the velocity for
future use. Just get a sample of known thickness.
Then repeat Step 2 and 3 until the measurement
value is same as the known thickness. In such a
case, the set value is the velocity of the material to
measure, by which you can measure any
unknown thickness of same material.
5. To view the present configured sound velocity,
press the Velocity Key. To quit browsing, press the
Velocity Key again or wait until the meter
automatically shows '0'.
6. By use of velocity measurement, it is easy to
measure the thickness of any hard materials.
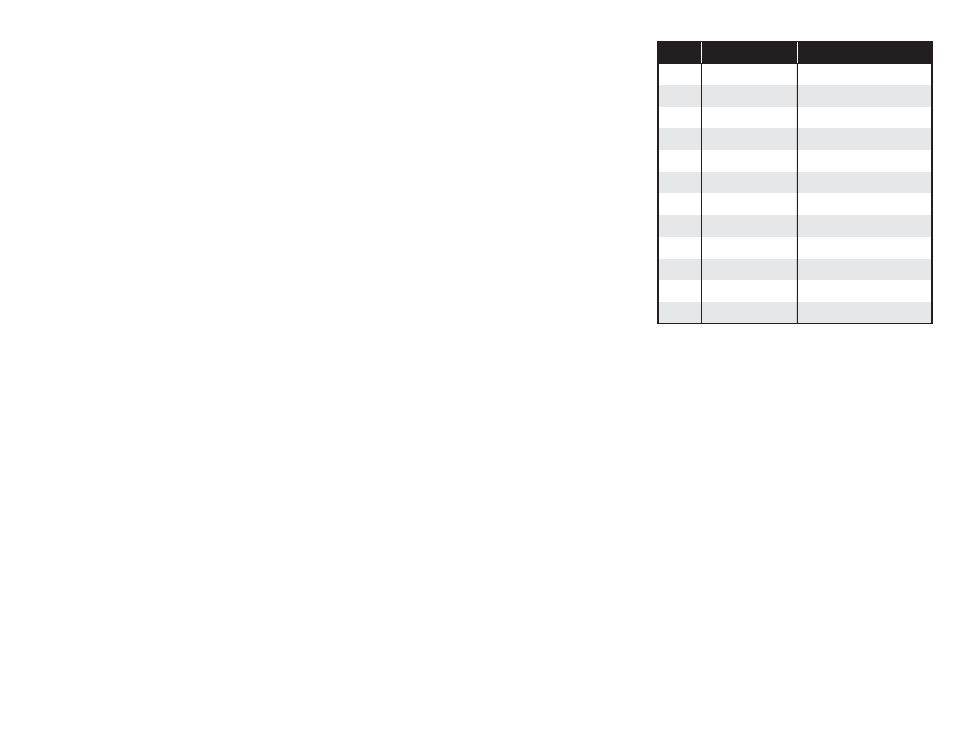
Code
Material
No.
Cd01
Steel
1
Cd02
Cast Iron
2
Cd03
Aluminum
3
Cd04
Copper
4
Cd05
Brass
5
Cd06
Zinc
6
Cd07
Quartz Glass
7
Cd08
Polyethylene
8
Cd09
PVC
9
Cd10
Gray Cast Iron
10
Cd11
Ductile Cast Iron
11
xxxx
Sound Velocity
12
MATERIAL SELECTION CHART
04/12 Form No. 06-SEN-UM-00465