Speaker set-up, Sw230a wireless microphone set-up – AmpliVox SW230A User Manual
Page 6
6
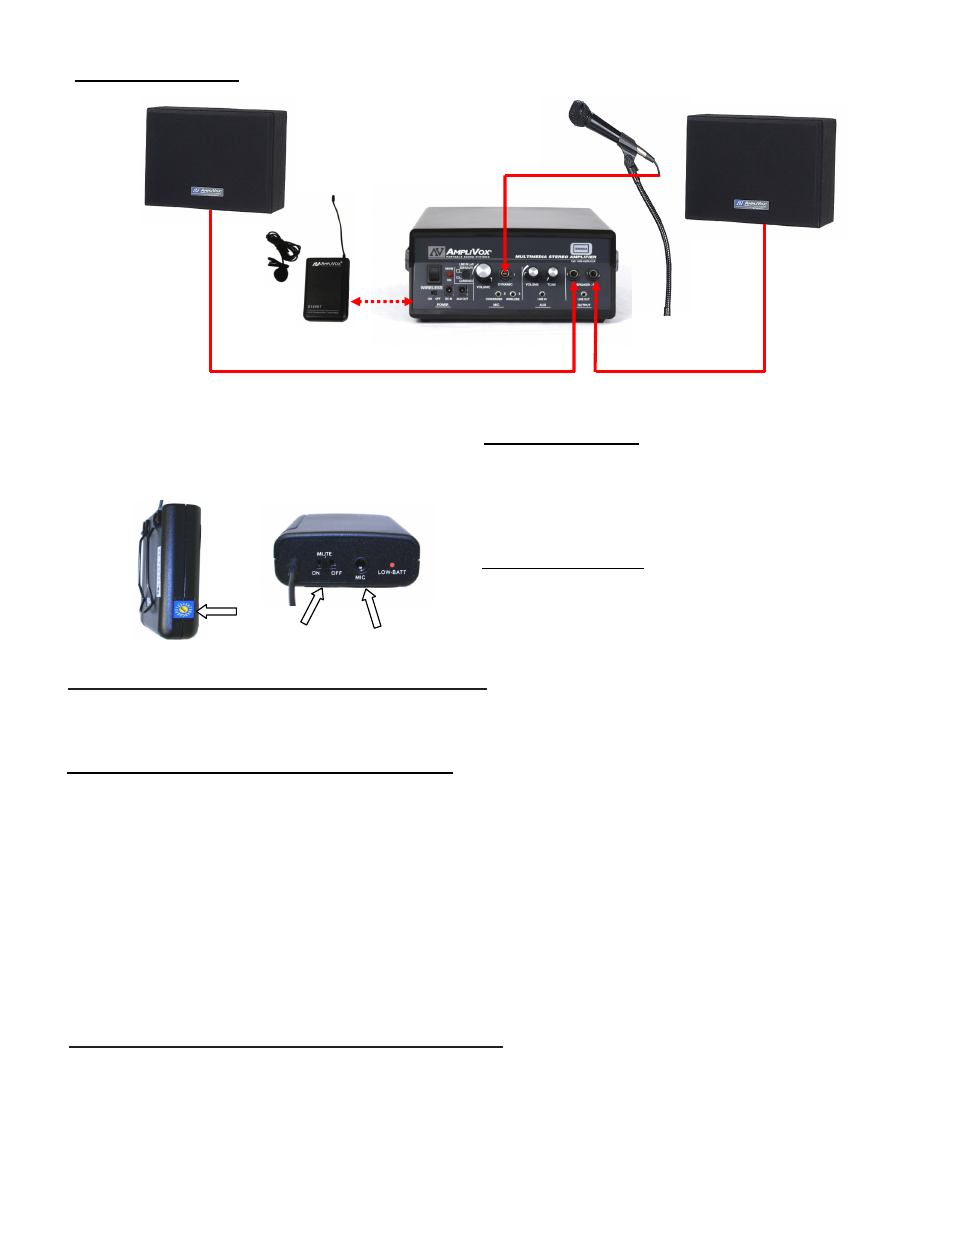
SPEAKER SET-UP
To Operate Model S230A with Dynamic Microphone
Make sure that both speakers are plugged into the “LEFT / RIGHT SPEAKER” jacks . Plug microphone into the “DYNAMIC” jack.
Turn amplifier on. Turn microphone on and talk into microphone. Rotate “VOLUME” control knob to obtain desired loudness level.
Speaker Connection (as shown above)
Do for both set of speakers. Take a 40 Ft. speaker cable and
plug one end into the S1401 Speaker and the other end into
the “LEFT / Right” speaker jack on front panel.
W
IRELESS
M
ICROPHONE
T
RANSMITTER
(S1690T) :
Belt clip on the back of the unit clips the transmitter onto a belt or the transmitter simply can be put into a pocket. Plug the lapel / head-
set microphone into the Mic Input Jack (C). The lapel microphone can be clipped to a necktie or other clothing, using the supplied
clip. The lapel mic should be placed under the chin, as close to the center of the body as possible.
Rotate the Channel Selector Switch (B) on the wireless microphone transmitter to the same channel selected on receiver (
A
).
Slide the power ON/OFF switch
(D)
to the ON position (the LED indicator light will illuminate green). If you are on the same channel
number as the wireless receiver, the LED light on the side panel
(A) of the amplifier will light when amplifier is turned “ON”.
SW230A WIRELESS MICROPHONE SET-UP
I
NTERNAL
W
IRLESS
M
ICROPHONE
R
ECEIVER
(
ON
SIDE
OF
AMPLIFIER
)
:
Select channel (1-16) on panel (A). Channel number must match channel number on wireless microphone transmitter (S1690T).
Use supplied screwdriver to select channel number.
Channel Selector
Top Panel
Model SW230A
S1690T Microphone
Transmitter
B
C
D
A
B
Dynamic Microphone (as shown above)
Plug 1/4” plug end of microphone cable into the
“DYNAMIC” jack on front panel of amplifier.
To Operate Model SW230A with Wireless Microphone
Insure that both speakers are plugged into the “LEFT / RIGHT SPEAKER” jacks . Turn amplifier “ON”. The wireless receiver has a
separate “ON-OFF” switch and is located just below main power switch of amplifier. Slide to “ON” position. Insure both transmitter
and receiver are on the same frequency channel. On the S1690T wireless transmitter, move the power switch to “ON”. RF LED on
side of amplifier will light, meaning that it is receiving signal. If RF LED does not light, check channel numbers. Speak into Lapel /
Headset microphone and rotate “VOLUME” control knob to obtain desired loudness level.