J&M 750SD User Manual
Page 11
11
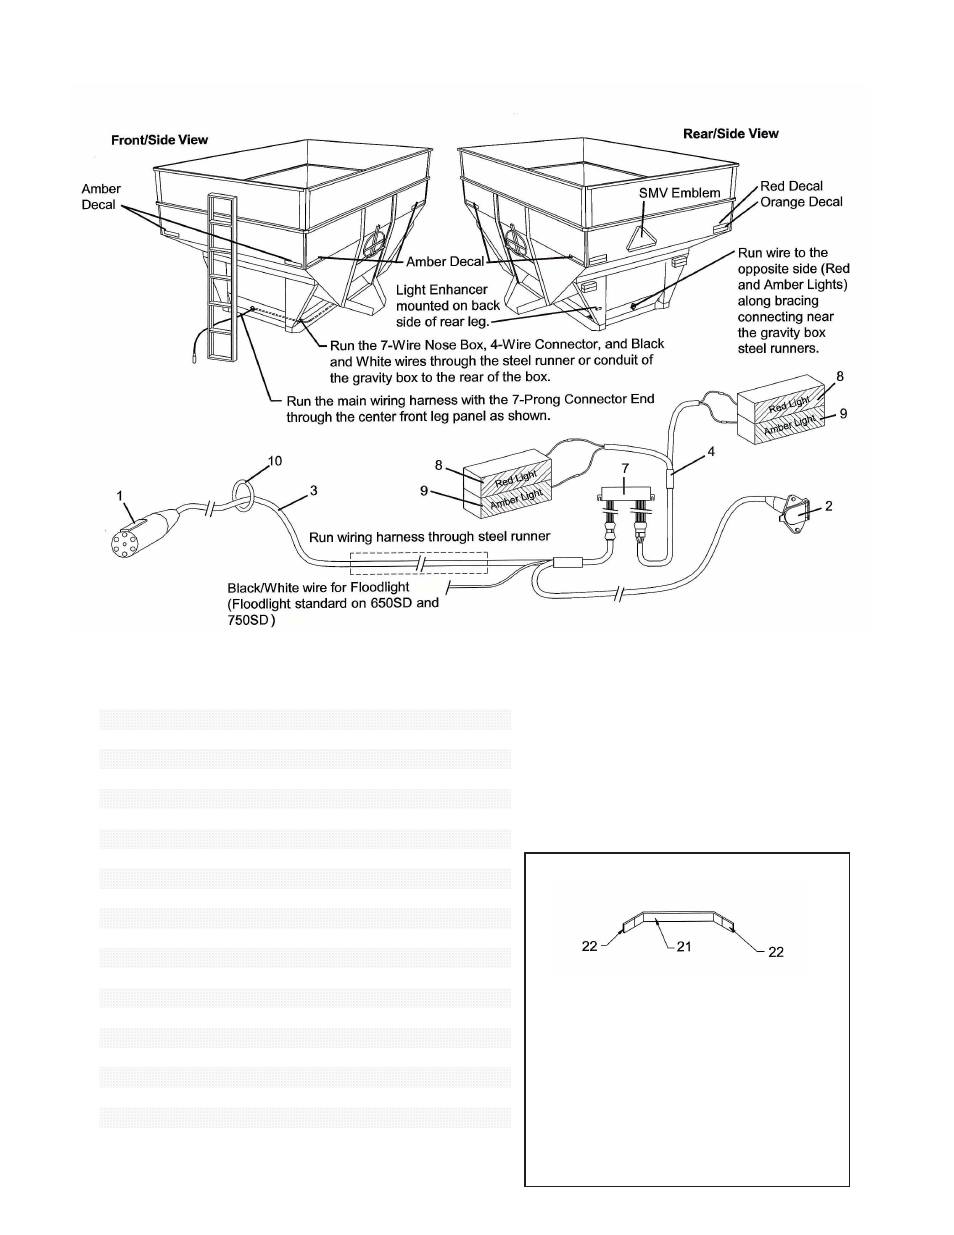
GRAVITY BOX LIGHT INSTALLATION GUIDE
GRAVITY BOX LIGHT KIT PARTS LIST
* Assembled as one unit
IMPORTANT: Position the SMV Emblem with
a point of the triangle upward and as near to
the rear and centered or as near to the left of
center of the unit as practicable. The SMV
Emblem should be located two to ten feet
above the ground measured from the lower
edge of the emblem.
#
Part #
Description
Qty
1
7-WCE
7-Wire Connector End
1*
2
7-WNB
7-Wire Nose Box
1*
3
WH-1N
Main Wiring Harness
1*
4
LH-1
Light Harness
1
5
------
----------
---
6
------
----------
---
7
LE-1B
Light Enhancer
1
8
LT-R1
Red Light
2
9
LT-A1
Amber Light
2
10
PG-1L
Plastic Grommet
1
11
RD-A1
Amber Reflective Decal
6
12
RD-R1
Red Reflective Decal
2
13
RD-O1
Orange Reflective Decal
2
14
141-CB
1/4" x 1" Carriage Bolt
8
15
14-FN
1/4" Flange Nut
8
16
181-HB
1/8" x 1" Hex Bolt
2
17
18-HN
1/8" Hex Nut
2
18
1434-SDST
1/4" x 3/4" Self-Tapping Screw
7
19
WLC-1
Wire Loom Clamp
3
20
SMV-2
Slow Moving Vehicle Emblem
1
21
WHB-1
White Harness Storage Bracket
1
22
RCW-1
Rubber Cap for Bracket
2
23
OFL-1
Flood Light
1
SECURING THE WIRE HARNESS
STORAGE BRACKET
Place the wire harness storage bracket
against the front face of the gravity box.
Secure the bracket using two 1/4” x 3/4”
Self-Tapping Screws. Slide the Rubber
End Caps over each end of the Wire
Harness Storage Bracket. Securely wrap
the Main Wiring Harness around the
bracket for storage. To prevent injury, do
NOT secure the storage bracket along the
side of the ladder.