Baldwin Renssalear Entrance Trim User Manual
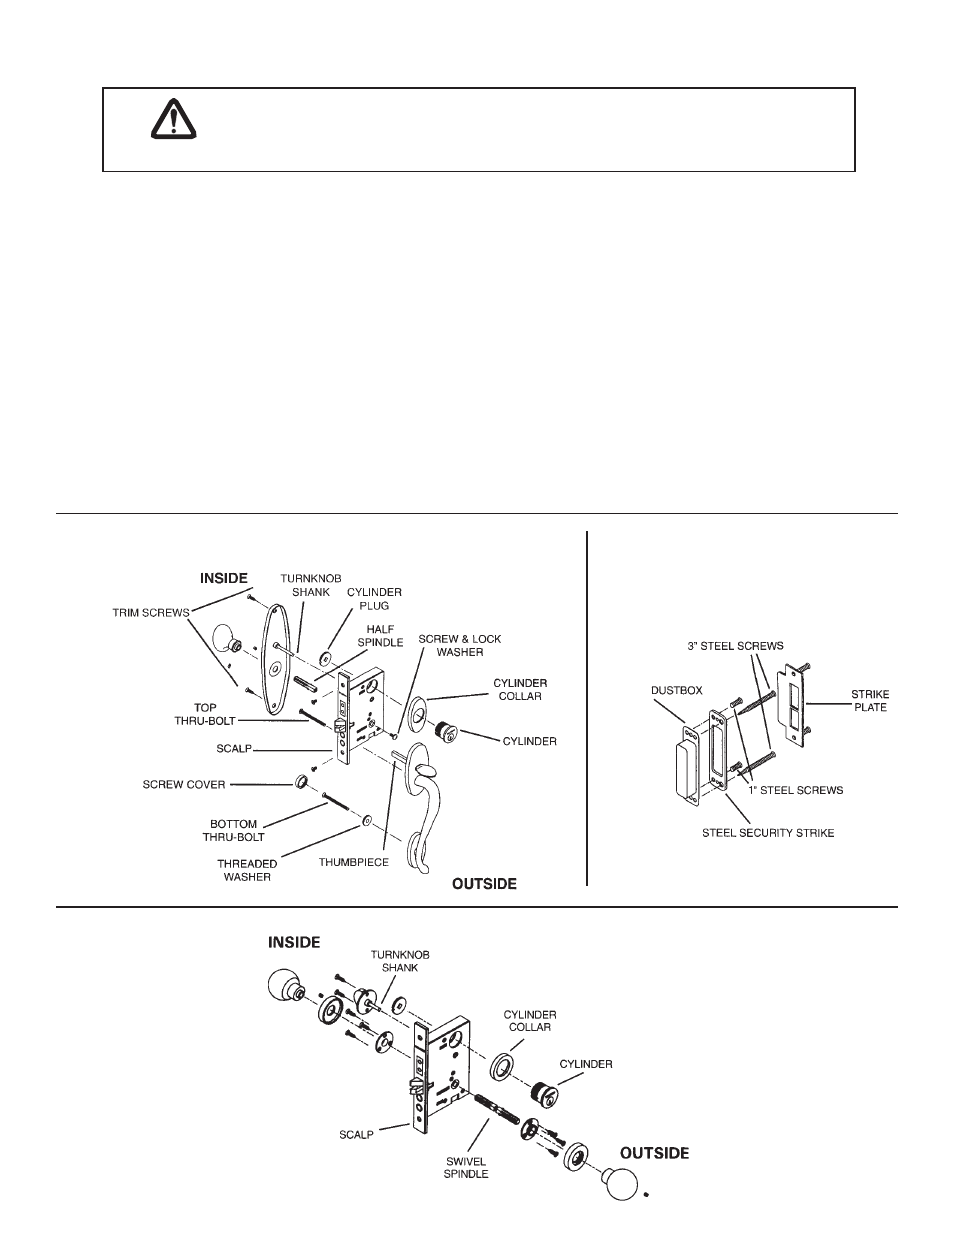
Diagram a diagram b, Caution
Baldwin Hardware Corporation
Mortise Lock Installation Instructions
TOOLS REQUIRED
1
Pencil
2
No. 2 and No. 3 Phillips Head
Screwdrivers
3
No. 1 and No. 2 Slotted Screwdrivers
4
1/8" Allen Head Wrench
5
3/4" Wood Chisel or Corner Chisel
6
Measuring Device
7
Lock Mortising Tool (Recommended)
8
Router and Lock Face Template
Note: In order to successfully install a mortise lock and trim, a minimum of average skill level is required with use of the above listed tools.
Read and understand the provided instructions BEFORE attempting to mark or cut the door and/or frame. If there are any questions
before you begin the installation, phone or visit your nearest Baldwin Distributor or contact the Technical Service Department at Baldwin
at 610.777.7811.
Diagram A
Diagram B
ENTRANCE HANDLESET
ENTRANCE LEVER/KNOB SET
9
Combination Square
10
Awl
11
Hacksaw
12
File (Wood Rasp and Metal)
13
Baldwin Aligning Tool
14
Drill and assorted Drill Bits (1/16", 1/8",
5/16", 3/8", 3/4", 1", 1-1/4")
15
Screw Wax or Soap
16
Powder Chalk, Graphite or Lipstick
CAUTION
Baldwin 2-1/2 and 2-3/4 backset Mortise locks are designed for residential use in UL-listed
fire-rated openings rated for 3-hour maximum. Meets U.S. UL10C (positive pressure) and
CANS-104M80. In the event of fire, lock will be permanently disabled when mechanism reaches
temperatures above 400˚F. Use in accordance with local fire code regulations.
PK 1076A 8/05
- Plymouth Entrance Trim Vancouver Entrance Trim Princeton Entrance Trim Charleston Entrance Trim Empire Entrance Trim Wilmington Escutcheon Entrance Set Dallas Entrance Trim Westminster Escutcheon Entrance Set Stanford Escutcheon Entrance Set Republic Escutcheon Entrance Set Lakeshore Escutcheon Entrance Set Houston Escutcheon Entrance Set Fenwick Escutcheon Entrance Set Detroit Escutcheon Entrance Set Bristol Escutcheon Entrance Set Boulder Escutcheon Entrance Set Atlanta Escutcheon Entrance Set Bethpage 3_4 Escutcheon Trim Boulder Full Escutcheon Trim Boulder 3_4 Escutcheon Trim Cody Full Escutcheon Trim Cody 3_4 Escutcheon Trim Richland Entrance Trim Minneapolis Entrance Trim Lakeshore Entrance Trim Houston Entrance Trim Bristol Entrance Trim Fenwick Entrance Trim Westminster Entrance Trim Edinburgh Entrance Trim Stanford Entrance Set Kensington Entrance Trim Victoria Entrance Trim Pasadena Entrance Trim Bismark Entrance Trim Denver Entrance Trim Mobile Entrance Trim Lakewood Entrance Trim Versailles Entrance Trim Springfield Entrance Trim Concord Entrance Trim Atlanta Entrance Trim Trenton Entrance Trim Monterey Entrance Trim Chicago Entrance Trim New York Entrance Trim Lexington Entrance Trim Richmond Entrance Trim Boston Entrance Set Barclay Entrance Trim Baltimore Entrance Trim Reading Entrance Trim Georgetown Entrance Trim Williamsburg Entrance Trim Detroit Entrance Trim Nashville Entrance Trim Wilmington Entrance Trim Hamilton Entrance Set Lancaster Entrance Trim Tremont Entrance Trim San Francisco Entrance Trim San Diego Entrance Trim