Ultimate Support IQ-200 User Manual
Page 2
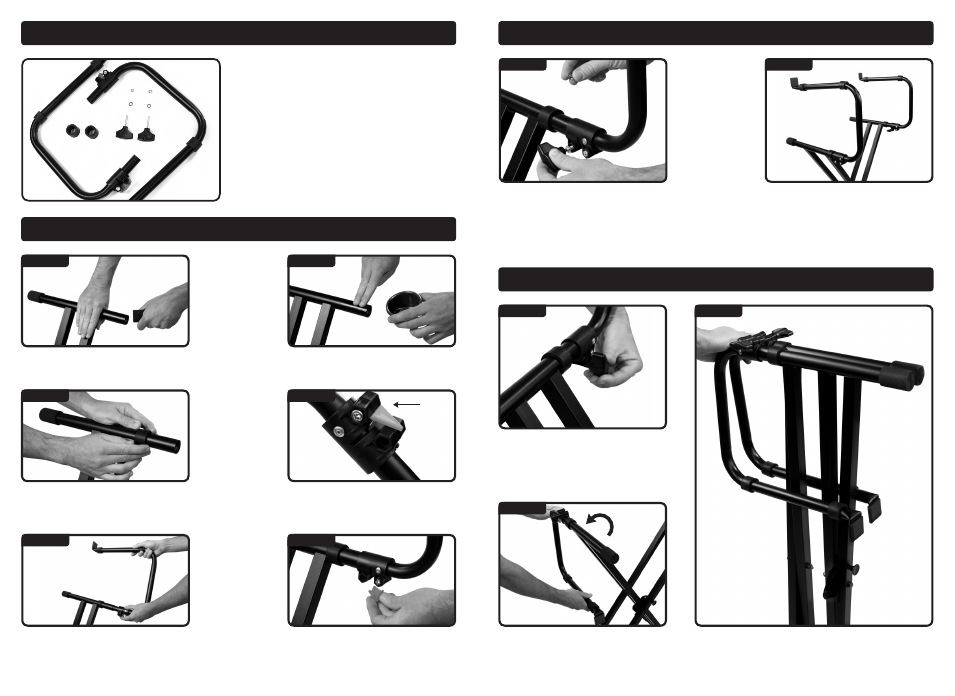
3
2
STEP 1
STEP 1
STEP 2
STEP 3
STEP 3
STEP 5
STEP 5
STEP 7
Remove rubber sleeves from back side of the
two top tubes of the IQ-1000 or IQ-2000.
Slide on Small Friction Sleeve to desired
position. Leave at lest 1.25” clearance from the
end of the tube for the 2nd Tier Assembly.
A. (2) Tier Assemblies
B. (2) Small Friction Sleeves
C. (2) Z-nobs
D. (2) Washers
E. (2) Hex Nuts
Make sure the plastic red triangle is at the joint.
This helps keep the joint open for sliding the 2nd
Tier Assembly into place.
Loosen z-knob until resistance is gone. You do
not have to completely unscrew for hex nut to
adjust second tier.
Pull tier to the outside of the IQ-1000
or IQ-2000.
Fold stand into closed position and push 2nd tiers in. Tighten
2nd tier z-knobs.
While holding the plastic red triangle, slide the
2nd tier into the top tube.
Remove the plastic red triangle when Tier
Assembly is fully in.
Install hand z-knob, washer, and hex nut. It
is important to place the hand knob on the
inside or stand will not fold fully. Also, be
careful not to over-tighten the hand knobs
because over-tightening may case cracking
of the collar.
Repeat steps 1-7 with other 2nd Tier Assembly.
In preparation for STEP 3, use water and soap to
lubricate tube.
A.
B.
C.
D.
E.
IQ-200 SETUP INSTRUCTIONS
IQ-200 TEAR DOWN INSTRUCTIONS
PARTS INCLUDED
IQ-200 SETUP INSTRUCTIONS
(Continued)
STEP 8
Z-nobs, washer, and hex nuts are assembled together. Remove
hex nuts when adding to tier assemblies.
STEP 2
STEP 4
Plastic red
triangle