Air Suspension 90-05 Town Car Coil Spring Conversion User Manual
0coil-conversion, Lincoln towncar, Coil spring conversion
A
DWG. NO.
SIZE
0
COIL-CONVERSION
REV.
MATERIAL
ARNOTT, INC. ANY
ARNOTT, INC. IS
PROPRIETARY AND CONFIDENTIAL
RLS
FINISH
DO NOT SCALE DRAWING
APPLICATION
USED ON
DRAWING IS THE SOLE PROPERTY OF
REPRODUCTION IN PART OR AS A WHOLE
PROHIBITED.
COMMENTS:
SHEET 1 OF 1
Q.A.
MFG APPR.
ENG APPR.
CHECKED
DRAWN
1990-2005
WITHOUT THE WRITTEN PERMISSION OF
NEXT ASSY
LINCOLN TOWNCAR
06/13/06
NAME
THE INFORMATION CONTAINED IN THIS
DATE
COIL SPRING CONVERSION
DIMENSIONS ARE IN INCHES
TOLERANCES:
FRACTIONAL
ANGULAR: MACH BEND
TWO PLACE DECIMAL
THREE PLACE DECIMAL
SCALE: n/a
3
1
7
6
8
4
13
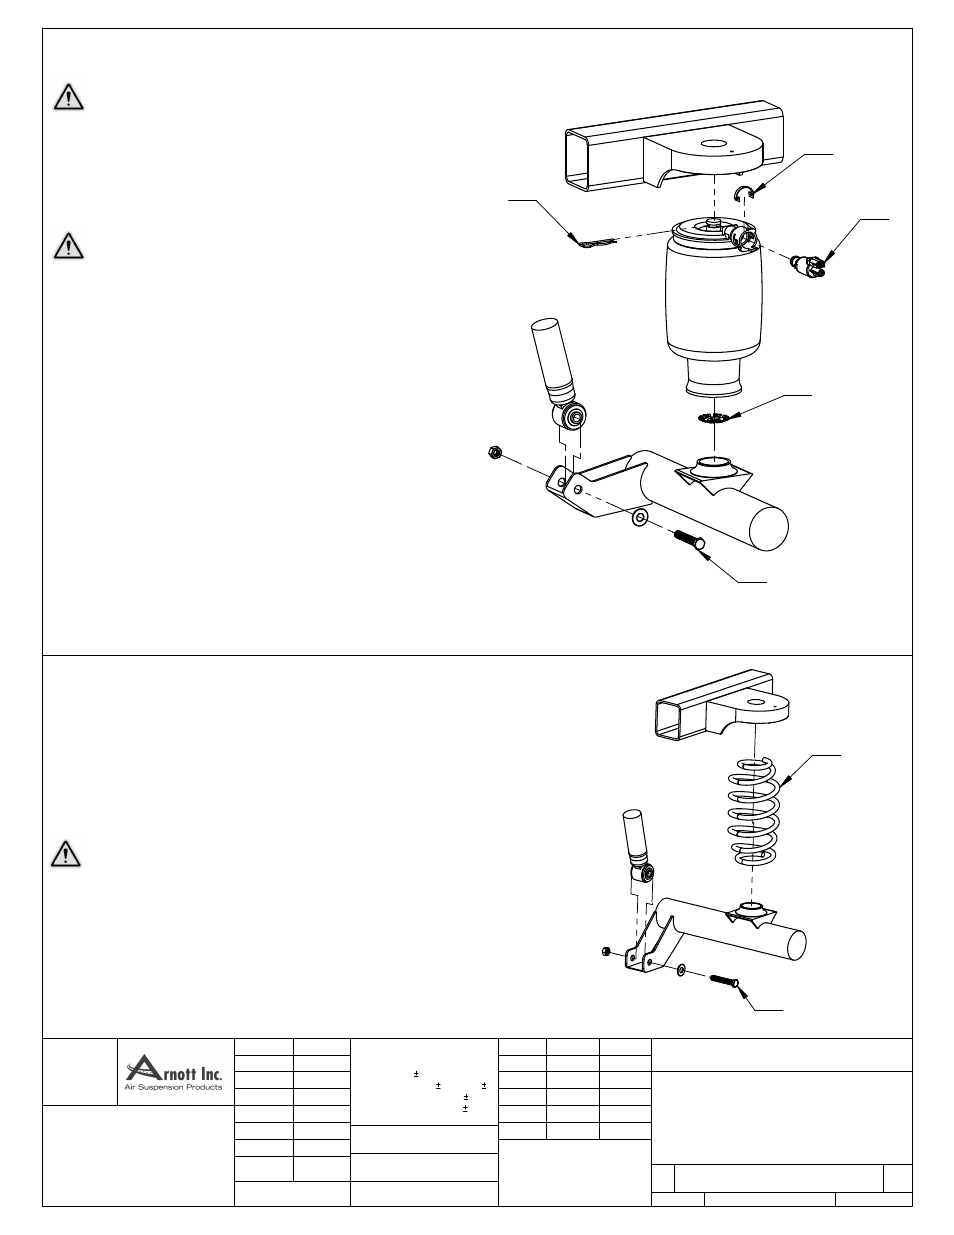
90-05 Town Car Coil Spring Conversion
Air Spring Removal
WARNING: The air suspension system is under pressure (up to 10 bar, or
150 lbf/in²). Do not allow dirt or grease to enter the system. Always wear standard
protective hand, ear, and eye protection when servicing the air suspension system.
Removal
1. Turn the air suspension switch to the OFF position. (Switch is located on the passenger
side of the trunk)
2. Raise the vehicle on a hoist or with the proper lifting equipment. Suspension must be at
full rebound with no load.
WARNING: Always support the chassis on safety stands. Refer to your
vehicle’s Owner’s Manual for correct lifting instructions.
3. Remove both rear tires.
4. Remove air spring solenoid retaining clip.
5. Remove electrical connector and air line from air spring solenoid valve.
6. Rotate solenoid counterclockwise to the first stop, and then carefully pull out to vent the
air pressure from the air spring. After air spring is deflated, turn again and completely
remove solenoid from air spring.
7. With pliers, or a suitable hooked tool, remove the clip that secures the top of the air
spring to the chassis. NOTE: To access the clip, go under the wheel arch, between the
body of the vehicle and the chassis.
8. Remove the piston-to-axle spring seat clip. (Air Spring is held in place with a round
retainer clip under the piston cap. To unsnap clip, gently pry between the piston and the
axle. Clip will unsnap when pressure is applied)
9. Carefully remove air spring from the vehicle.
10. Unplug the air spring solenoid power supply, and remove the air hose by pushing down
on the orange quick release ring while pulling outward on the hose.
11. Remove the air spring solenoid.
NOTICE: It’s important to unplug and remove the air spring solenoid. Removing
the solenoid will prevent the air suspension system from operating after the
conversion is installed.
12. Seal off hose to prevent dirt or grease from entering system.
13. Remove both lower shock bolts. Allow axle to hang free unsupported. This will give you
extra clearance for the coil spring.
Coil Spring Installation
Tie the wires and air hose back away from any hot or moving parts. Do not cut the wires.
Leave the system whole in case you ever want to reinstall air suspension on the vehicle.
1. Install the coil springs onto the rear axle.
2. Using a floor jack, raise the rear axle.
3. Install the lower shock absorber retaining nut and bolt to the rear axle. Tighten the lower
shock absorber retaining nut and bolt to 95 N-m (70 lb-ft).
4. Remove the rear axle support.
5. Replace tire and wheel assembly. Tighten wheel hub bolt nuts to 115-142 N-m (85-105
lb-ft).
6. Remove all safety stands and lower vehicle.
WARNING: Make sure to tighten all wheel hub bolt nuts to 115-142 Nm
(85-105 lb-ft). Failure to heed to this warning could result in serious bodily and
vehicular damage.
Disarming the Air Suspension System
1990-1994 Town Car
The module is located in the trunk, behind the air suspension switch. Pull back the trunk carpet
and remove the 2 nuts that mount the air suspension module. Unplug the air suspension module
and bolt it back in place.
1995-1997 Town Car
The module is located behind the glove box. Flip the glove box down and locate the air
suspension module mounted on the heater core directly in front of you. Unplug the module and
close glove box.