Wall mounting, English – Asus GX1108B User Manual
Page 8
7
English
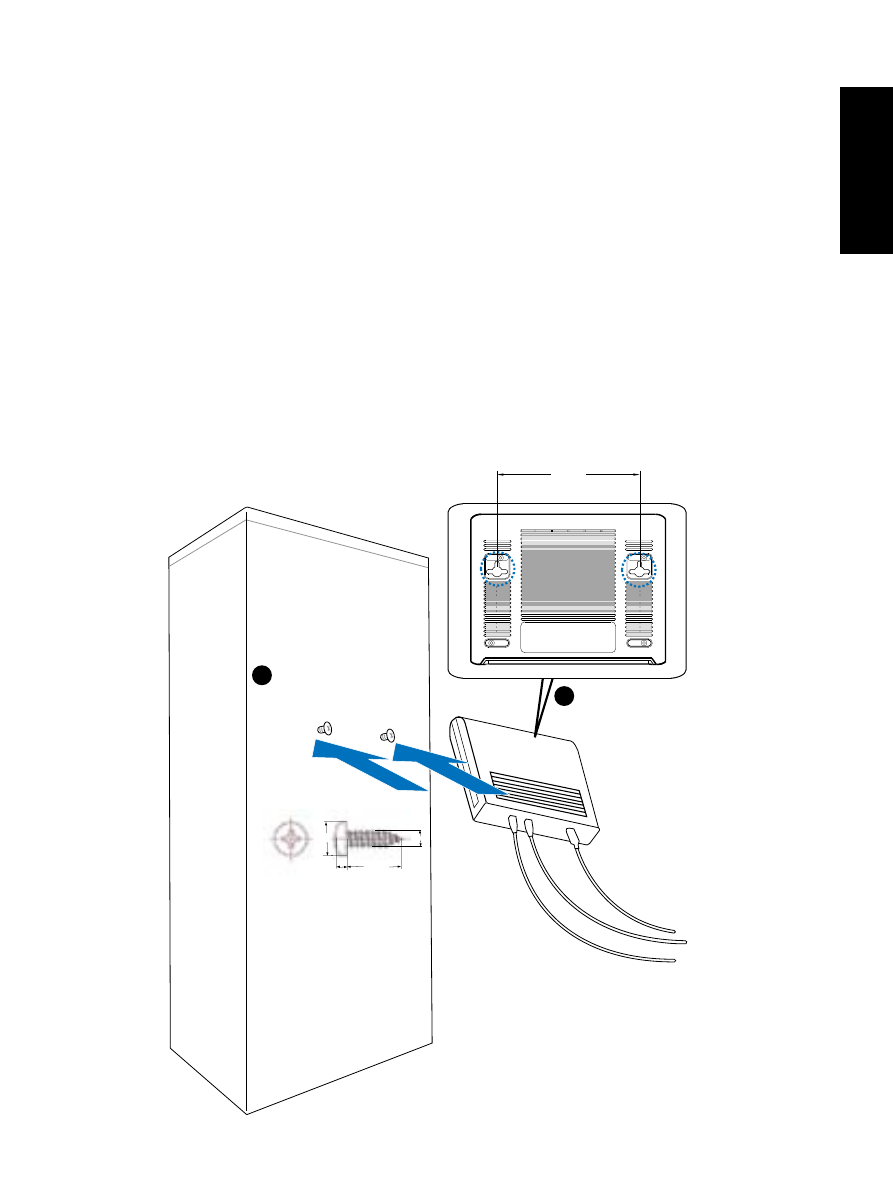
Bottom Side
Secure two screws on the wall
Latch the switch
onto the screws.
1
2
18.75mm
2mm
117.0mm
2.95mm
5.3mm
Wall mounting
You can mount the GX1105B/ GX1108B switch on a wall with the supplied
mounting screws.
To mount the switch on a wall:
1. Measure the distance between the two hooks on the bottom of the switch.
2. Mark the screw position on the wall with the same distance in between.
3. Secure the supplied screws on the wall until only 1/4 is showing.
4. Latch the hooks of the GX1105B/ GX1108B onto the screws.
Ethernet ports
Power
Ethernet ports
Power
VIP port
VIP port
This manual is related to the following products:
See also other documents in the category Asus Communication:
- GX1026i (26 pages)
- GX-D1241 (48 pages)
- GX1026 (73 pages)
- GX-D1081 (8 pages)
- GigaX1024X (41 pages)
- GigaX1024X (57 pages)
- FX-D1162 (103 pages)
- RX3041_B (36 pages)
- GigaX3124 (326 pages)
- SL200 (52 pages)
- SCSI/PCI-L3C920 (16 pages)
- GigaX3024X (137 pages)
- RX3041H (143 pages)
- SL1000 (8 pages)
- RX3041 (63 pages)
- GigaX1008B (46 pages)
- GigaX1005B (46 pages)
- GigaX1005N (60 pages)
- GigaX2024X (119 pages)
- GigaX1105N (57 pages)
- GigaX1108N (8 pages)
- GigaX1105N (41 pages)
- SL1200 (18 pages)
- SL1200 (175 pages)
- EI-102 (41 pages)
- GigaX1116 (12 pages)
- AX-112 (26 pages)
- GigaX2124X/C (112 pages)
- GigaX2124X (116 pages)
- PL-X31M/PL-X32M (105 pages)
- NX1001 (44 pages)
- NX1001 (47 pages)
- GX1105N (145 pages)
- GigaX1124 (10 pages)
- GigaX3112F (118 pages)
- RX3042H (129 pages)
- GigaX1105 (10 pages)
- GigaX2008EX (71 pages)
- GigaX2024SX (370 pages)
- CX200 (94 pages)
- CX200 (5 pages)
- GigaX2024 (115 pages)
- GigaX2024 (169 pages)
- GigaX2124 (122 pages)
- GigaX1116B (97 pages)