Caution, Warning – Aqua-Pure CWS150MECJ User Manual
Page 8
2-2
Step 1)
Remove unit from shipping box, inspect for damage and ensure all parts needed for installation are present. If parts are missing please contact
our customer service department for help @ 1-800-222-7880. Remove the packing from unit and discard according to local, state and federal
regulations. Locate the parts package and install the bypass and adapter fi ttings on the control valve to facilitate the connection to the customer’s
water supply.
CAUTION
To reduce the risk associated with property damage due to water leakage:
• On plastic fi ttings, never use pipe sealant or pipe dope. Use PTFE thread tape only, pipe dope properties may deteriorate plastic;
• Take care when using pliers or pipe wrenches to tighten plastic fi ttings, as damage may occur if over tightening occurs.
Step 2)
NOTE: Extension legs should be installed only whenever a salt dosage on any model water softener is more than 15 lbs. Models utilizing 15”
x 15” x 34” brine tanks require salt grid extension legs when salting the water softener above 15 lbs. of salt or more. Grid legs extension kits
are provided for CWS200 units. All other models requiring extension leg kits can be ordered through your Dealer/Installer or our Customer
Service Department at 1-800-222-7880.
Verify all packaging materials have been removed from the brine tank. On all units, legs rest on bottom of the brine tank.
Step 3)
Shut off all water at main supply valve. On a private well system, turn off power to the pump and drain the pressure tank. Make certain pressure is relieved
from the complete system by opening the faucet closest to the system.
CAUTION
To reduce the risk associated with property damage due to water leakage:
• SHUT OFF FUEL OR ELECTRIC POWER SUPPLY TO WATER HEATER after water is shut off.
Step 4)
Cut main supply line as required to fi t plumbing to inlet and outlet of unit.
Step 5)
Attach plumbing. DO NOT apply heat to any fi tting connected to bypass or control valve as damage may result to internal parts or connecting
adapters. Make certain water fl ow enters through inlet and discharges through outlet.
WARNING
To reduce the risk associated with a hazardous voltage:
• If the home electrical system requires use of the cold water system as an electrical safety ground, a jumper must be used to ensure a suffi cient ground connection
across the water softener installation piping — refer installation to qualifi ed personnel.
CAUTION
To reduce the risk associated with property damage due to water leakage:
• Do not apply heat to any fi tting connected to bypass or control valve as damage may result to internal parts or connecting adapters.
To reduce the risk associated with property damage due to plugged water lines:
• Pay particular attention to correct orientation of control valve. Water fl ow should match arrow on control valve. The Inlet and Outlet of other water treatment
equipment products will vary depending on the control valve brand used.
Step 6)
The control valve allows for either a 3/4” NPT connection or 5/8” poly tubing for use as a drain line connection.
CAUTION
To reduce the risk associated with property damage due to water leakage:
• On plastic fi ttings, never use pipe sealant or pipe dope. Use PTFE thread tape only, pipe dope properties may deteriorate plastic;
• Take care when using pliers or pipe wrenches to tighten plastic fi ttings, as damage may occur if over tightening occurs.
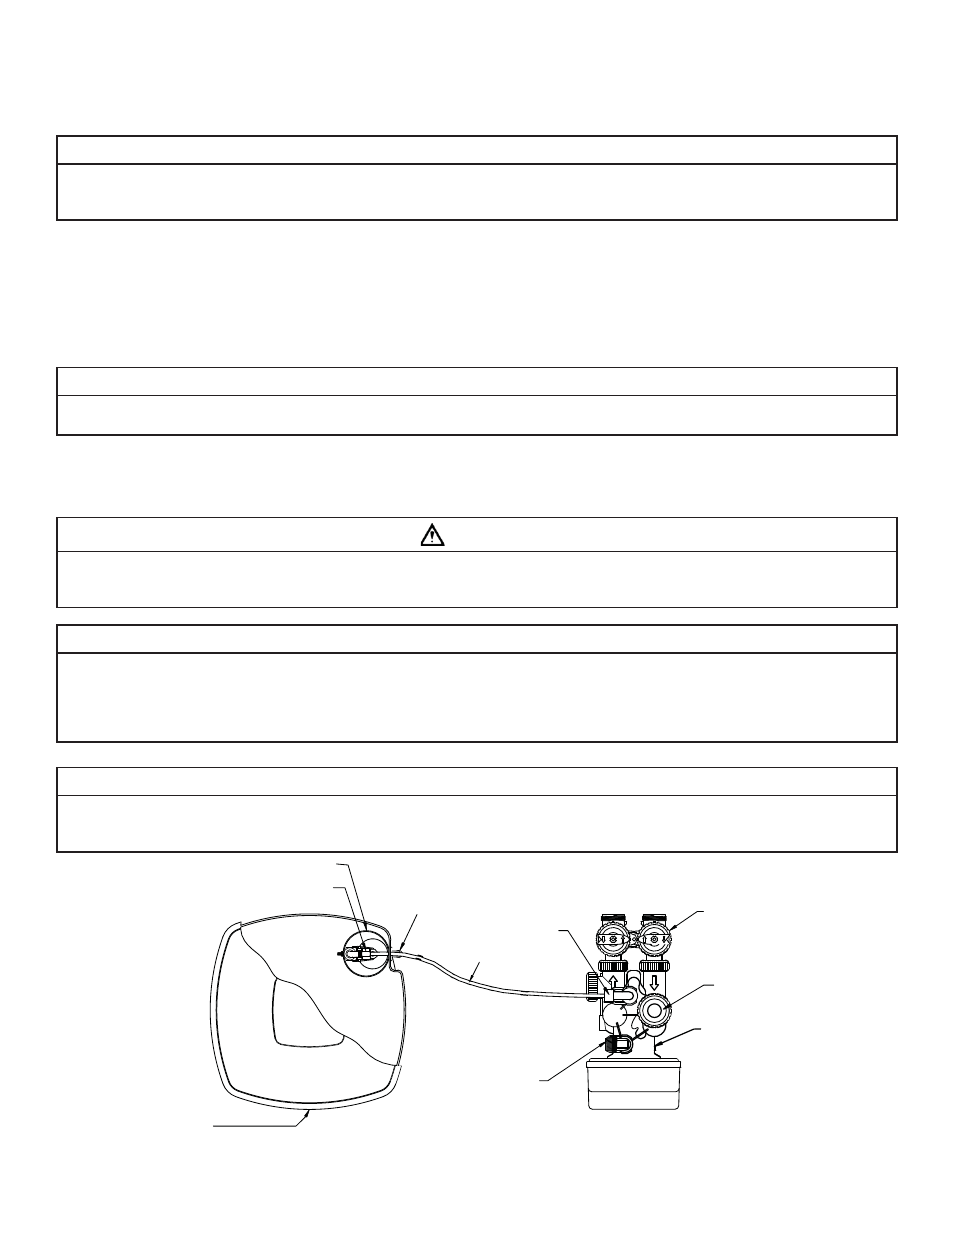
Figure 2.
SOFTENER AND BRINE TANK ASSEMBLY, TOP VIEW
BRINE LINE
FITTING
BRINE LINE
BYPASS VALVE
INLET
OUTLET
CONTROL VALVE BODY
DRAIN LINE FLOW
CONTROL ASSEMBLY
BRINE TANK
BRINE WELL
SAFETY BRINE
VALVE ASSEMBLY
BRINE LINE
ELBOW
INJECTOR COVER
OFF
OFF
OFF
OFF