RocketFish RF-P2USB3 - Quick Setup Guide User Manual
Quick setup guide, Guide d’installation rapide, Installing the hardware
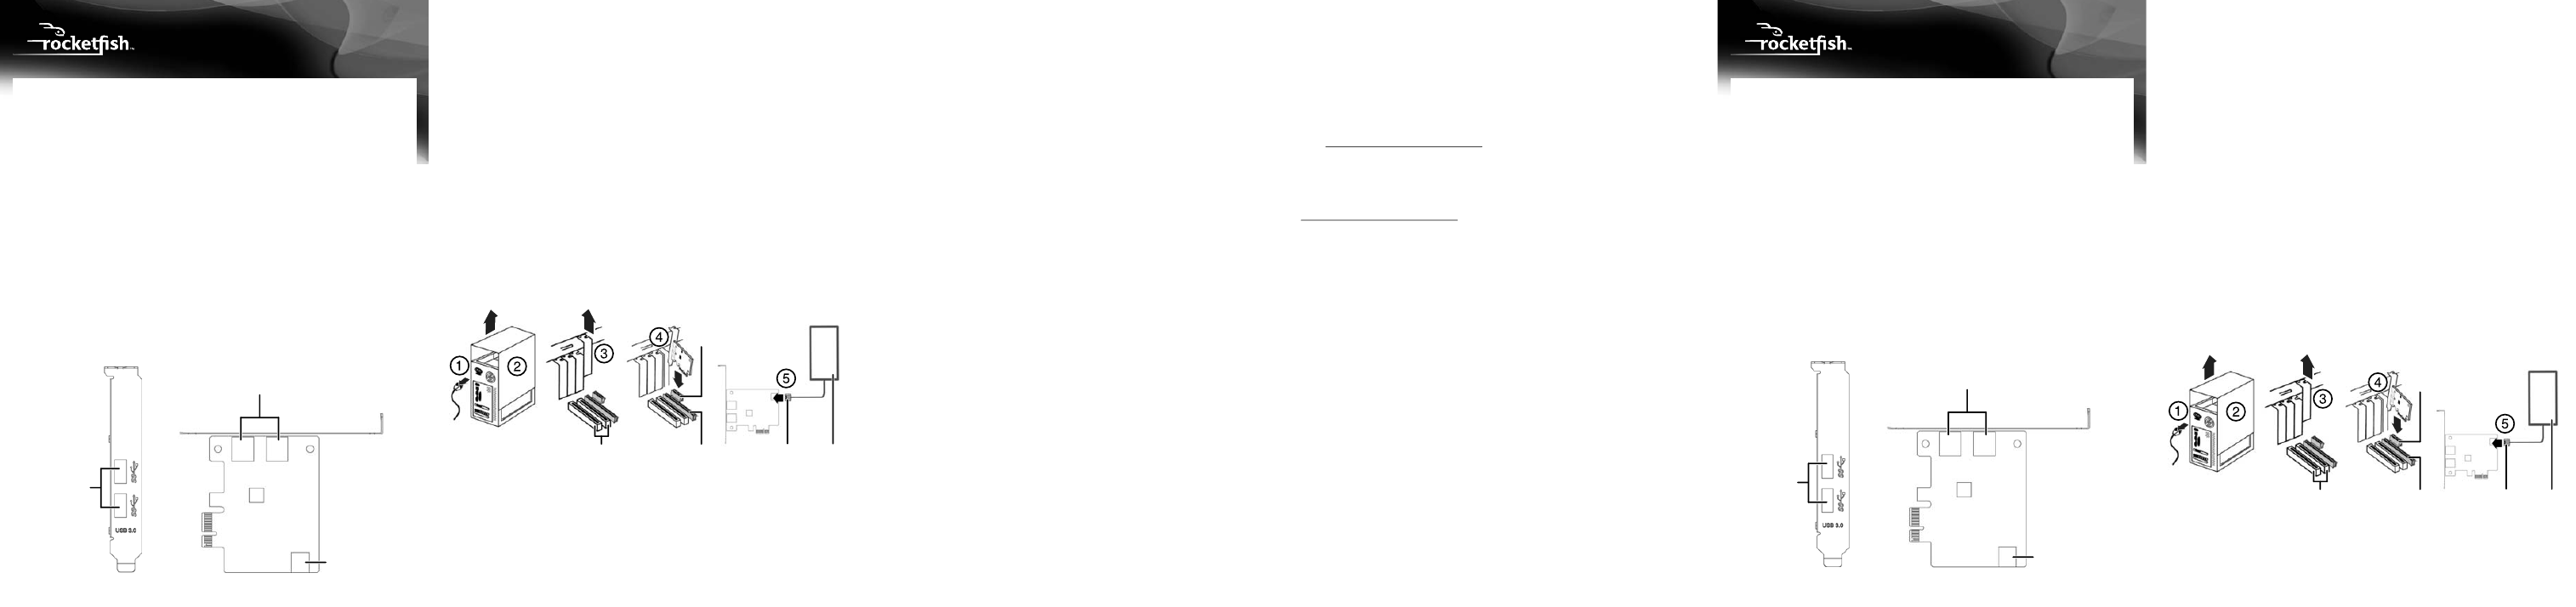
Alimentation
Prise pour lecteur de
disquette à 4 broches
Connecteur
PCIe × 1
Connecteur
PCIe × 16
Connecteur
PCI × 16
Ports
USB 3.0
Ports USB 3.0
Connecteur d’alimentation
à 4 broches
USB 3.0
ports
USB 3.0 ports
4-pin power connector
QUICK SETUP GUIDE
USB 3.0 PCI Express Card
RF-P2USB3
Installing the hardware
Warning: PC components often include sharp metal edges. To prevent
injury, exercise caution when removing/installing components from your
PC, especially when exerting force.
1 Turn off your computer and unplug the power cord and all cables.
2 Remove your computer’s case cover. See your computer’s user guide.
3 Locate an available PCI Express slot, remove the screw that secures the
backplate (the small piece of metal that covers the opening for the PCI card
on the back panel of your computer), and then remove the backplate.
If you are using a slim desktop computer, attach the included short
backplate prior to installation.
To change backplates, remove the screws that secure the standard
backplate to the PCI card, remove the standard backplate, then attach
the short backplate with the screws you removed.
4 Carefully insert the adapter into the PCIe ×1 slot, seating it firmly into the
slot. Do not touch the metal connector on the adapter.
5 Connect an available floppy 4-pin power plug from your PC’s power
supply to the adapter card’s 4-pin power connector.
6 Secure the adapter to the case using the screw you removed from the
backplate.
7 Reinstall your computer’s case cover.
8 Plug in the power cord and other cables, and then turn on your
computer.
To install the Windows driver:
Note: The USB 3.0 driver is only for the Windows operating system. (Only
Windows XP through Windows 7 requires the driver, Windows 8 does not.)
It does not support MAC and Linux operating systems.
1 Save all files and close all programs, then insert the included driver CD
into your optical drive. The driver home page opens.
2 Click Install Driver. The installation wizard opens.
3 Click Next, then follow the on-screen instructions to install the driver.
FCC Statement
This device complies with Part 15 of the FCC Rules. Operation is subject to the
following two conditions: (1) this device may not cause harmful interference, and
(2) this device must accept any interference received, including interference that may
cause undesired operation.
This equipment has been tested and found to comply with the limits for a Class B
digital device, pursuant to Part 15 of the FCC Rules. These limits are designed to
provide reasonable protection against harmful interference in a residential installation.
This equipment generates, uses and can radiate radio frequency energy and, if not
installed and used in accordance with the instructions, may cause harmful interference
to radio communications. However, there is no guarantee that interference will not
occur in a particular installation. If this equipment does cause harmful interference to
radio or television reception, which can be determined by turning the equipment off
and on, the user is encouraged to try to correct the interference by one or more of the
following measures:
• Reorient or relocate the receiving antenna.
• Increase the separation between the equipment and receiver.
• Connect the equipment into an outlet on a circuit different from that to which the
receiver is connected.
• Consult the dealer or an experienced radio/TV technician for help.
Warning: Changes or modifications not expressly approved by the party responsible
for compliance could void the user's authority to operate the equipment.
IC Statement
This device complies with Industry Canada licence-exempt RSS standard(s).
Operation is subject to the following two conditions: (1) this device may not cause
interference, and (2) this device must accept any interference, including interference
that may cause undesired operation of the device.
“Le présent appareil est conforme aux CNR d'Industrie Canada applicables aux
appareils radio exempts de licence. L'exploitation est autorisée aux deux conditions
suivantes : (1) l'appareil ne doit pas produire de brouillage, et (2) l'utilisateur de
l'appareil doit accepter tout brouillage radioélectrique subi, même si le brouillage est
susceptible d'en compromettre le fonctionnement.”
This equipment complies with IC radiation exposure limits set forth for an
uncontrolled environment.
“Cet équipement est conforme à l'exposition aux rayonnements IC limites établies
pour un environnement non contrôlé.”
One-year limited warranty
Visit www.rocketfishproducts.com for details.
Contact Rocketfish:
For customer service please call 1-800-620-2790
www.rocketfishproducts.com
ROCKETFISH is a registered trademark of BBY Solutions, Inc. Registered in some countries.
Distributed by Best Buy Purchasing, LLC, 7601 Penn Ave South, Richfield, MN 55423 U.S.A.
©2013 BBY Solutions, Inc. All Rights Reserved.
Thank you for purchasing this high-quality dual-port USB 3.0 PCI Express
Card adapter. The USB Express Card is ideal for external storage devices,
digital cameras, card readers, MP3 players, and all other USB devices.
USB 3.0 supports transfer speed up to 5Gbps, it is also backwards
compatible with USB 2.0/1.1 devices
Package contents
• USB 3.0 PCI Express Card
• Windows Driver CD
• Short backplate
• Quick Setup Guide
Minimum system requirements
• PCI Express-enabled system with an available PCI Express slot.
(Recommend PCI Express 2.0)
• Windows® 8, Windows® 7, Windows Vista®, or Windows® XP
Features
Edge view
Side view
GUIDE D’INSTALLATION RAPIDE
Carte PCI Express USB 3.0
RF-P2USB3
Merci d'avoir acheté cette carte PCI Express USB 3.0 à double port. La
carte PCI Express USB est parfaite pour les périphériques de stockage de
masse externes, les appareils photo numériques, les lecteurs de cartes,
les lecteurs MP3 et tous les autres périphériques USB.
USB 3.0 permet des transferts à des débits qui atteignent 5 Gbit/s, et est
également rétro-compatible avec les appareils USB2.0/1.1.
Contenu de l’emballage
• Carte PCI Express USB 3.0
• CD avec pilote pour Windows
• Cache
court
•
Guide d’installation rapide
Configuration système minimale requise
• Système compatible PCI Express doté d’un connecteur PCI Express
libre (PCI Express 2.0 recommandé)
• Windows
MD
8, Windows
MD
7, Windows Vista
MD
ou Windows
MD
XP
Caractéristiques
Vue sur
Vue latérale
la tranche
Before using your new product, please read these instructions to prevent any damage.
Power
supply
4-pin floppy
power plug
PCIe
slot × 1
PCIe slot × 16
PCI slot × 16
Avant l’utilisation de ce produit neuf, lire ces instructions afin d'éviter tout dommage.
Installation du matériel
Attention : Les composants de PC comportent souvent des bordures en
métal coupant. Pour éviter des blessures, s'entourer de précautions lors du
retrait ou l'installation des composants du PC, surtout lorsqu'il faut forcer.
1 Arrêter l’ordinateur, puis débrancher le cordon d’alimentation et tous les
câbles.
2 Retirer le couvercle du boîtier de l’ordinateur. Se reporter au guide de
l’utilisateur de l’ordinateur.
3 Repérer un connecteur PCI Express disponible, enlever la vis de fixation du
cache (la petite pièce métallique qui masque l’ouverture de l’emplacement
de la carte PCI, sur la face arrière de l’ordinateur), puis le retirer.
En cas d’utilisation d’un ordinateur de bureau plat, utiliser le cache court
(inclus).
Pour modifier les caches, retirer les vis qui fixent le cache à la carte PCI et
retirer le cache standard, puis fixer le cache court avec les vis retirées
précédemment.
4 Insérer délicatement la carte dans le connecteur PCIe en appuyant
fermement. Ne pas toucher le connecteur métallique sur la carte.
5 Brancher une prise d’alimentation à 4 broches (pour lecteur de disquette)
disponible de l’ordinateur sur le connecteur d’alimentation à 4 broches de
la carte.
6 Fixer l’adaptateur sur le châssis en utilisant la vis qui tenait le cache.
7 Replacer le couvercle du boîtier de l’ordinateur.
8 Connecter le cordon d’alimentation et les autres câbles, puis mettre
l’ordinateur sous tension.