Velleman PROMIX902 User Manual
Page 4
PROMIX902
VELLEMAN
4
b.
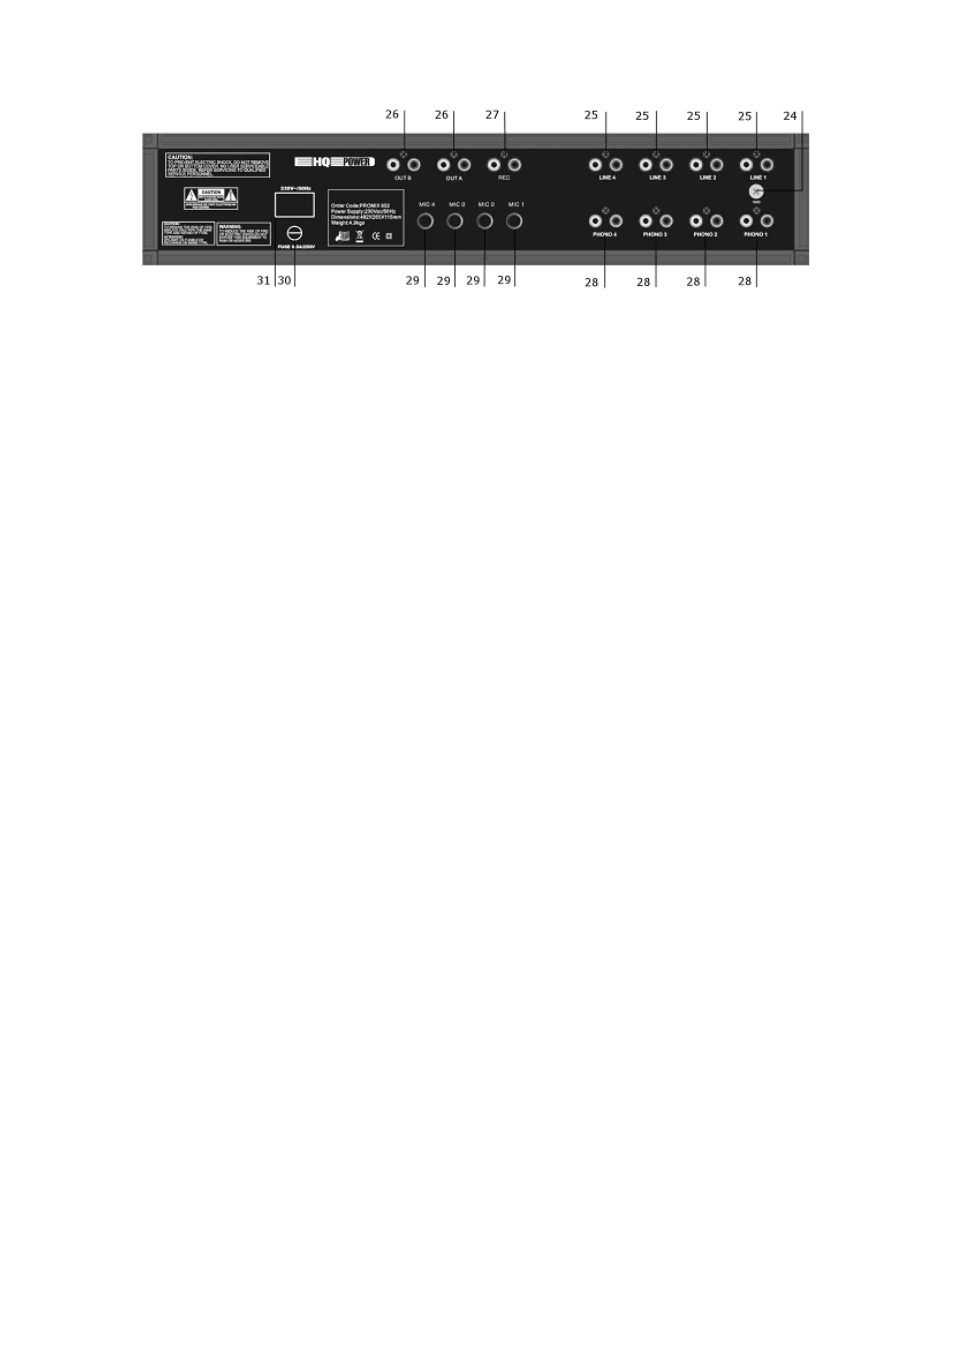
Back Panel (fig. 2)
24. Ground connector:
With this screw you can connect the ground of the turntables 1-4.
25. Input connectors LINE 1-4:
RCA connectors can be connected to one of the 4 CD / LINE.
26. MASTER outputs:
Unbalanced RCA connectors can be connected to any power amplifier and this output voltage is enough to drive
any power amplifier.
27. RECORD connector:
Stereo output (RCA connectors) to connect with an extensional recorder.
28. Input connectors PHONO 1-4:
RCA connectors can be connected to one of the 4 PHONO.
29. MIC inputs:
1/4” – 6.35mm jacks to connect 1-4 microphones.
30. Fuse holder:
This fuse is to protect the mixer against all kind of AC problems. If the fuse is broken, replace with a new one of
the same range.
31. POWER input:
AC input connector to connect the power cable. Be sure you have the right power supply before plug in the
socket.
6. Cleaning and Maintenance
1. All screws should be tightened and free of corrosion.
2. The electric power supply cables must not show any damage. Have a qualified technician maintain the device.
3. Disconnect the device from the mains prior to maintenance activities.
4. Wipe the device regularly with a moist, lint-free cloth. Do not use alcohol or solvents.
5. Contact your dealer for spare parts if necessary.
7. Specifications
Power supply
230VAC / 50Hz
Fuse
20mm fuse 250V 500mA slow (order code: FF0.5N)
Frequency response
10-20.000Hz ± 0.5dB (RLAA ±2dB)
S/N Ratio:
MIC
70dB
PHONO
70dB
CD/LINE
80dB
Micro inputs
1.5mV @ 10kΩ
Line/CD inputs
150mV @ 22kΩ
Phono inputs
3mV @ 47kΩ
Record output
775mV @ 600Ω
Talk-over
max. 200mW / 8 ohms
Tone controls
+/-12dB @ 10 kHz / 1Khz / 100Hz