Ohaus ADVENTURER PRO PHARMACY BALANCES Manual Supplement for NTEP Certified Models User Manual
Introduction, Setting the balance, Sealing the balance
Adventurer Pro Balances
Instruction Manual Supplement for
NTEP Certified Models
OHAUS Corporation
7 Campus Drive
Suite 310
Parsippany, NJ 07054 USA
Tel: +1 973 377 9000
Fax: +1 973 944 7177
www.ohaus.com
With offices worldwide
P/N 80103490 C © Ohaus Corporation 2013, all rights reserved.
Printed in USA
Certificate of Conformance 05-118 has been issued by the National Conference on Weights and Measures, confirming
that the Adventurer Pro models listed in this manual conform to the requirements in NCWM Publication 14 and NIST
Handbook 44.
Before this balance can be used in commercial trade, it must be inspected by local weights and measure authorities.
It is the responsibility of the purchaser to ensure that all pertinent legal requirements are met. Please contact your local
weights and measures office for further details.
Item Number
AV64N AV64CN
AV114N AV114CN
AV264N AV264CN
AV213N AV213CN
AV313N AV313CN
AV413N AV413CN
AV2102N AV2102CN
AV3102N AV3102CN
AV4102N AV4102CN
Max (g)
65
110
260
210
310
410
2100
3100
4100
Min (g)
0.1
0.1
0.1
0.2
0.2
0.2
5
5
5
d=(g)
0.0001
0.0001
0.0001
0.001
0.001
0.001
0.01
0.01
0.01
e=(g)
0.001
0.001
0.001
0.01
0.01
0.01
0.1
0.1
0.1
Class
I
I
I
II
II
II
II
II
II
Repeatability (g)
0.0001
0.0001
0.0001
0.001
0.001
0.001
0.01
0.01
0.01
Linearity (g)
+
0.0002
+
0.0002
+
0.0003
+
0.002
+
0.002
+
0.002
+
0.02
+
0.02
+
0.02
Weighing Units
mg, g, ct, dwt, oz, ozt, GN
g, ct, dwt, oz, ozt, lb
g, kg, dwt, oz, ozt, lb
Application Modes
Weighing, Animal Weighing, Parts Counting, Percent Weighing, Check Weighing, Totalize
Tare Range
To capacity by subtraction
Stabilization Time
3
Power Requirements
AC Adapter (included)
Calibration
Digital with external weight
Display Type
2-line LCD with Backlight
Display Size (mm / in)
100 x 25 / 4 x 1
Pan Size (mm / in)
90 / 3.5
120 / 4.7
168 x 180 / 6.6 x 7.1
Dimensions WxDxH (mm / in)
220 x 300 x 300 8.7 x 12 x 11.8
220 x 190 x 300 8.7 x 7.5 x 11.8
220 x 85 x 300 8.7 x 3.3 x 11.8
Net Weight (kg / lb)
4.0 / 8.7
3.3 / 7.3
2.8 / 6.1
Net Weight (with InCal) (kg / lb)
4.4 / 9.6
3.7 / 8.2
3.2 / 6.9
AV...CN models are equipped with internal calibration.
Introduction
This document is a supplement to the Instruction Manual provided with the Adventurer Pro balance. It is intended to
provide information specific to the NTEP Certified models. For all other information, refer to the Instruction Manual.
Setting the Balance
Press and hold the
Menu-Cal button until MENU is displayed. Move to the Setup Sub-menu using the No button.
When SETUP is displayed, press the
Yes button to enter the Setup Sub-menu. When LEGAL TRADE is displayed,
press the
Yes button to view the setting OFF. Press the Yes button to change the setting to NTEP. Press the Yes but-
ton to store the setting. Press the
Exit button to return to the current weighing mode.
Note: Before setting the balance, enter the Menu to perform a calibration and make any desired balance setting
adjustments. Once the balance is set, the following conditions apply:
• The Calibrate Sub-menu is hidden and not available.
• In the Setup Sub-menu, the Legal Trade menu item is locked.
• In the Setup Sub-menu, the Auto Zero (AZSM) menu item is set to 0.5d and locked.
• In the Readout Sub-menu, the Gross Indicator menu item setting is locked.
• The Mode Sub-menu is locked.
• In the Unit Sub-menu, the Unit menu items are restricted to Systems International units.
• In the Print Sub-menu, the Output When Stable menu item is set to ON and locked.
• In the Print Sub-menu, the Continuous setting in the Auto Print menu item is hidden and not available.
• In the Reset Sub-menu, the Reset Readout, Reset Mode, Reset Unit and Reset Global menu items are
locked.
• In the Lockout Sub-menu, the Calibration menu item is locked.
To regain access to the locked Menu settings, turn the balance off. Turn the balance on and press the Lock Switch
while OHAUS is displayed during power up.
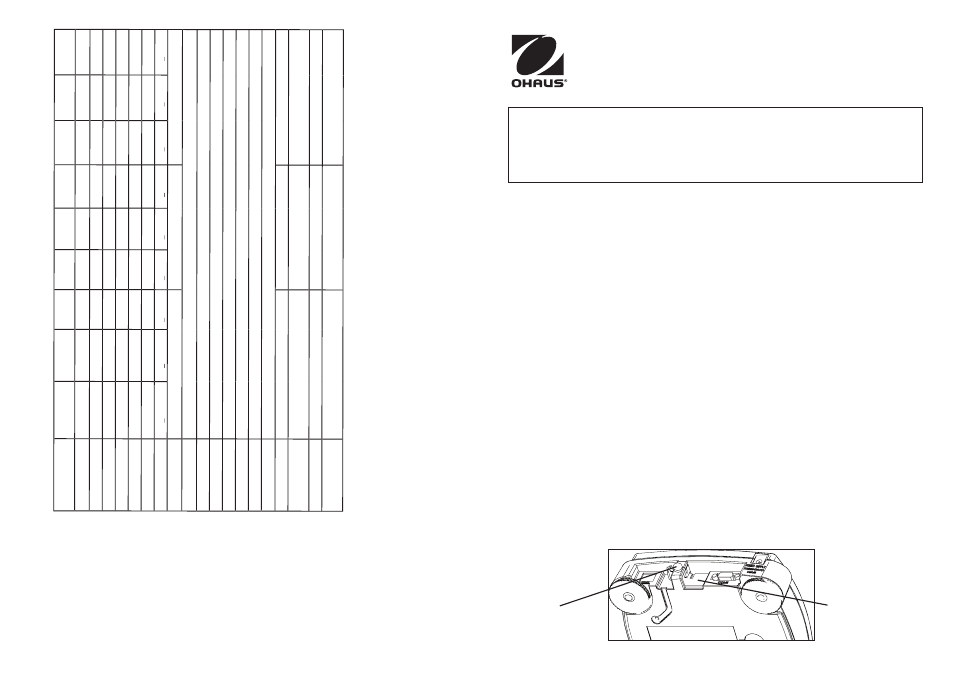
Sealing the Balance
To seal the balance, cover the Lock Switch access hole by sliding the Security Cover to the right. Then install a
wire through the holes in the tabs of the Security cover and Top Housing.
Security Cover
Wire Seal
*80103490*