Manhattan 424752 Universal Flat-Panel TV Tilting Wall Mount - Quick Install (Multi) User Manual
Page 2
2A
English — Mounting the wall plate to brick, solid concrete or concrete block:
• Use the wall plate (a) as a template to mark 6 hole locations on the wall: 3 in the top row of slots and 3 in the bottom row.
Make sure these marks are level and spaced at least 150 mm (6”) apart.
• Using a 10 mm (3/8”) masonry bit, drill holes at least 60 mm (2.4”) deep, then insert an anchor (x) into each hole. Make
sure the anchor is seated completely flush with the concrete surface even if there is a layer of drywall or other material in
front.
• Attach the wall plate to the wall using the 6 lag screws (v) and washers (w).
Deutsch — Anbringung der Wandplatte an Stein- oder (Massiv-)Betonwänden:
• Verwenden Sie die Wandplatte (a) als Schablone, um 6 Löcherpositionen an der Wand zu markieren: 3 in der oberen Reihe
und 3 in der unteren. Achten Sie darauf, dass sich diese auf derselben Höhe befinden und mindestens 150 mm auseinander
liegen.
• Mit einem 10-mm-Wandbohrerbit, bohren Sie mindestens 60 mm tiefe Löcher, dann führen Sie einen Dübel (x) in jedes
Loch ein. Achten Sie darauf, dass der Dübel vollständig eben mit der Betonoberfläche verläuft, selbst wenn darüber noch
eine Schicht aus anderem Material liegt.
• Befestigen Sie die Wandplatte mit den 6 Sechskantschrauben (v) und -muttern (w) an der Wand.
Español — Montaje de la placa de pared en ladrillo, concreto o bloques de concreto:
• Utilice la placa de pared (a) como una plantilla para marcar 6 hoyos en la pared: 3 en la fila superior y 3 en la inferior.
Asegúrese de que estas marcas están al nivel y separadas por lo menos 150mm (6”).
• Utilizando una broca de 10 mm (3/8”), taladre los hoyos por lo menos a 60 mm (2.4”) de profundidad, entonces coloque un
taquete (x) en cada hoyo. Asegúrese de que el taquete está completamente hundido en la superficie de concreto incluso si
hay una capa de yeso u otro material en frente.
• Sujete el soporte de pared al muro, utilizando los 6 tornillos de fijación (v) y arandelas (w).
Français — Montage de la plaque murale au mur en briques pleines ou en béton:
• Utilisez la plaque murale (a) comme modèle pour marquer 6 positions de trou: 3 dans la ligne supérieure et 3 dans la ligne
inférieure. Vérifiez que ces marquages sont au même niveau et séparés au moins 150 mm.
• Utilisez un foret à 10 mm, percez des trous avec un profondeur d’au moins 60 mm, puis insérez une cheville (x) dans chaque
trou. Vérifiez que la cheville est insérée complètement dans avec la surface de béton même s’il y a une assise d’un autre
matériel au dessus.
• Fixez la plaque murale au mur en utilisant les 6 vis (v) et écrous (w) à tête hexagonale.
Polski — Montaż uchwytu do ściany z cegły oraz betonowego muru:
• Użyj uchwytu jako szablonu, aby zaznaczyć na ścianie miejsca na 6 otworów - 3 w górnym rzędzie oraz 3 w dolnym. Otwory
powinny być w odległości co najmniej 150 mm (6”) od siebie.
• Przy użyciu wiertarki z wiertłem o średnicy 10 mm (3/8”) nawierć otwory o głębokości co najmniej 60 mm (2.4”), następnie
w każdy otwór włóż kołek rozporowy (x). Upewnij się, że kołki nie wystają poza płaszczyznę ściany, nawet jeśli z przodu
znajduje się warstwa z gips kartonu lub innego materiału.
• Przymocuj uchwyt do ściany używając 6 śrub (v) oraz podkładek (w).
Italiano — Montaggio della placca a muro di mattoni, cemento o mattoni di cemento:
• Usa la placca da muro (a) come una dima per segnare le posizioni dei 6 fori sul muro: 3 nella fila in alto e 3 nella fila
sottostante. Assicurarsi che questi segni siano a livello e distanziati almeno di 150 mm (6”) l’uno dall’altro.
• Usando una punta da muro da 10 mm (3/8”), fare dei fori di almeno 60 mm (2.4”) di profondità, quindi inserire un tassello
(x) in ciascun foro. Assicurarsi che il tassello sia inserito completamente e a livello con la superficie del muro di cemento
anche se c’è uno strato di cartongesso o di altro materiale superficialmente.
• Fissare la placca al muro utilizzando le 6 viti autofilettanti (v) e le rondelle (w).
English — Mounting the wall plate to wood studs:
• Use a stud finder (y) to locate two adjacent wood wall studs (z) spaced at least 406 mm (16”) apart. NOTE: You can confirm
the location of the studs by pushing an awl (aa) or nail through the wall surface.
• Using a 4 mm (5/32”) bit, drill holes at least 60 mm (2.4”) deep through the wall and into the studs at the desired height.
IMPORTANT: Be sure the holes are centered on the studs. Consult a qualified source if you need help determining the
centers. NOTE: You can use the wall plate (a) as a template to determine the final position of the mount and mark the hole
locations (top and bottom) before drilling.
• Attach the wall plate to the wall using 4 of the lag screws (v) and washers (w).
Deutsch — Anbringung der Wandplatte an Holzträgern:
• Verwenden Sie einen Trägerdetektor (y), um zwei nebeneinander liegende Holzträger (z) mit mindestens 406 mm Abstand
zu finden. HINWEIS: Sie können die Position der Leisten bestimmen, indem Sie einen spitzen Gegenstand (aa), z. B. einen
Nagel durch die Wandoberfläche drücken.
• Mit einem 4-mm-Wandbohrerbit, bohren Sie Löcher mit mindestens 60 mm Tiefe durch die Wand und in die Holzleisten
auf der gewünschten Höhe. WICHTIG: Achten Sie darauf, dass die Löcher in der Mitte des Trägers liegen. Wenden Sie sich
an einen Fachmann, falls Sie Hilfe bei der genauen Bestimmung benötigen. HINWEIS: Sie können die Wandplatte (a) als
Schablone verwenden, um die Position der Halterung sowie der Löcher (oben und unten) zu bestimmen und zu markieren,
bevor Sie mit der Bohrung zu beginnen.
• Befestigen Sie die Wandplatte mit den 4 Sechskantschrauben (v) und -muttern (w).
Español — Montaje de la placa de pared en postes de madera:
• Utilice un detector de materiales (y) para ubicar dos postes de pared adyacentes (z) espaciados por lo menos 406 mm (16”).
NOTA: Puede confirmar la locación de los postes presionando con un punzón (aa) o clavo a través de la superficie de la pared.
• Utilizando una broca de 4 mm (5/32”), taladre los hoyos por lo menos 60 mm (2.4”) de profundidad a través del muro y los
postes de madera de la pared a la altura deseada. IMPORTANTE: Asegúrese de que los hoyos están centrados en los postes
de madera. Consulte a una fuente calificada si necesita ayuda para determinar el centro. NOTA: Puede utilizar la placa de
pared (a) como una plantilla para determinar la posición final del montaje y marcar la ubicación de los hoyos (arriba y
abajo) antes de taladrar.
• Sujete el soporte de pared al muro utilizando 4 de los tornillos de fijación (v) con sus arandelas (w).
Français — Montage de la plaque murale au piliers en bois:
• Utilisez un détecteur de pilier (y) pour trouver deux piliers en bois adjacents (z), séparés au moins 406 mm. REMARQUE:
Vous pouvez vérifier la position des piliers en poussant une alêne (aa) ou un clou dans la surface du mur.
• Utilisez un foret à 4 mm, pour percer des trous avec un profondeur d’au moins 60 mm dans le mur et les piliers à l’hauteur
souhaité. IMPORTANT: Vérifiez que les trous sont centrés sur les piliers. Veuillez vous adresser à un spécialiste qualifié si
vous avez besoin d’aide. REMARQUE: Vous pouvez utiliser la plaque murale (a) comme modèle pour trouver la position
finale du support et marquer les positions de trous (en haut et en bas) avant de percer.
• Fixez la plaque murale au mur en utilisant les 6 vis (v) et écrous (w) à tête hexagonale.
Polski — Montaż uchwytu do ściany z drewna:
• Używając wykrywacza profili (y) zlokalizuj dwie sąsiadujące belki rozmieszczone w odległości co najmniej 406 mm (16”) od
siebie. UWAGA: Położenie belki można sprawdzić poprzez wciśnięcie szydła (aa) lub zwracając uwagę na gwoździe przechodzące
przez ścianę.
• Przy użyciu wiertarki z wiertłem o średnicy 4 mm (5/32”) nawierć w belce, na pożądanej wysokości otwory o głębokości co
najmniej 60 mm (2.4”). WAŻNE: Upewnij się, że otwory wywiercone są na środku belki. W razie wątpliwości zasięgnij porady
fachowca. UWAGA: Przed nawierceniem otworów należy użyć uchwytu jako szablonu, aby zaznaczyć odpowiednie miejsca
na dziury.
• Przymocuj uchwyt do ściany używając 4 śrub (v) oraz podkładek (w).
Italiano — Montaggio della placca a muro su una struttura intelaiata in legno:
• Utilizzare un rilevatore apposito (y) per individuare due intelaiature in legno adiacenti (z) distanziate l’una dall’altra di
almeno 406 mm. NOTA: E’ possibile verificare l’ubicazione dell’intelaiatura premendo con un punteruolo (aa) o un chiodo
attraverso la superficie del muro.
• Usando una punta da 4 mm (5/32”)t, effettuare dei fori con il trapano di almeno 60 mm (2.4”) di profondità sul muro e
all’interno dell’intelaiatura all’altezza desiderata. IMPORTANTE: Assicurarsi che I fori siano centrati nell’intelaiatura.
Consultare una fonte qualificata se è necessario un aiuto per determinare i centri. NOTA: Puoi utilizzare la placca a muro (a)
come una dima per determinare la posizione finale di montaggio e segnare le posizioni dei fori (in alto e in basso) prima di
forare con il trapano.
• Fissare la placca al muro usando le 4 viti autofilettanti (v) e le rondelle (w).
2B
y
z
aa
3
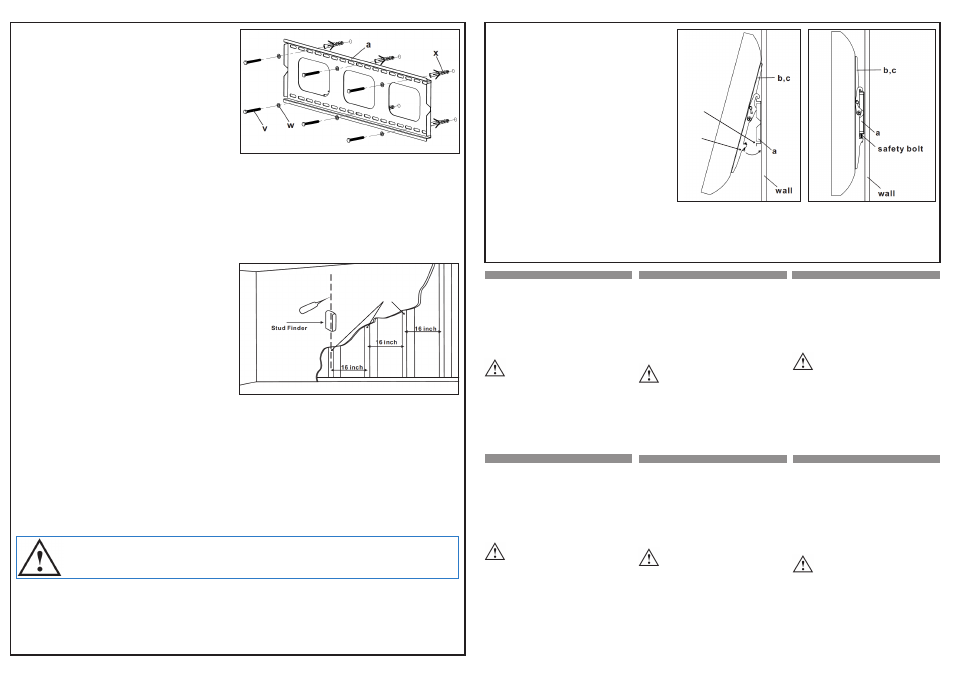
English — Attaching the monitor to the wall plate:
CAUTION! Always get assistance when lifting heavy objects such as your TV/monitor.
• Hook the monitor brackets (b, c) over the top of the wall plate (a) and gently allow the bottom of the
TV/monitor to swing onto the bottom of the wall plate.
• With the TV/monitor flat against the wall, use a screwdriver to tighten the 2 safety bolts (bb) located
on the monitor brackets (b, c) so that the brackets lock in place behind the lip (cc) of the wall plate.
bb
cc
Deutsch — Anbringung des Bildschirms an der Wandplatte:
ACHTUNG! Lassen Sie sich beim Heben von schweren Gegenständen wie Ihrem Fernseher oder Monitor
immer von einer weiteren Person helfen.
• Hängen Sie die Bildschirmhalterungen (b, c) an der Oberseite der Wandplatte ein (a) und lassen Sie
die Unterseite des Bildschirms vorsichtig an die Unterseite der Wandplatte herabgleiten.
• Liegt der Bildschirm flach an der Wand, befestigen Sie die beiden Sicherungsbolzen (bb) mit einem
Schraubenzieher, so dass die Halterungen (b, c) hinter der Wandplattenkante (cc) einrasten.
Español — Sujeción del monitor al soporte de pared:
¡PRECAUCIÓN! Siempre pida ayuda cuando levante objetos pesados como su TV/monitor.
• Enganche los soportes del monitor (b, c) al soporte de pared (a) y suavemente permita que la parte
inferior de la TV/monitor deslice hasta la parte inferior del soporte de pared.
• Con la TV/monitor contra la pared, utilice un destornillador para apretar los 2 tornillos de seguridad
(bb) localizados en los soportes (b, c) del monitor de tal forma que los soportes queden bloqueado
detrás de la muesca (cc) del soporte de pared.
Français — Fixer l’écran à la plaque murale:
ATTENTION! Laissez vous assister en élevant des lourds objets
comme votre écran/télé.
• Attachez les supports (b, c) en haut de la plaque murale (a) et
permettez la partie inférieure de l’écran à abaisser doucement.
• Après avoir positionné l’écran au mur, utilisez un tournevis pour
envisser les 2 boulons de sécurité (bb) sur les supports (b, c) afin
que les supports enclenchent derrière l’arrête (cc) de la plaque
murale.
Polski — Mocowanie monitora do uchwytu:
UWAGA! Poproś kogoś o pomoc podczas podnoszenia ciężkich przedmiotów
takich jak telewizor, czy monitor.
• Załóż uchwyty monitora (b, c) na górną część uchwytu ściennego (a) i pozwól,
aby spodnia część telewizora/monitora delikatnie opadła w stronę ściany.
• Gdy telewizor/monitor dobrze dolega, użyj wkrętaka, aby przykręcić 2 śruby
zabezpieczające (bb) znajdujące się na uchwytach monitora (b, c), uchwyt w
ten sposób zostanie zablokowany w wargach (cc) uchwytu ściennego.
Italiano — Fissare lo schermo alla placca a muro:
PRUDENZA! Richiedere sempre l’assistenza di qualcuno quando si devono sollevare oggetti
pesanti come TV/monitor.
• Agganciare le staffe del monitor (b, c) sulla parte alta della placca a muro (a) e permettere alla
parte bassa della TV/monitor di oscillare delicatamente sulla parte bassa della placca a muro.
• Con la TV/monitor appoggiato contro il muro, utilizzare un cacciavite per stringere le 2 viti di
sicurezza (bb) posizionate sulle staffe del monitor (b, c) così che le staffe siano bloccate dietro
il bordo (cc) presente sulla placca muro.
Sicherheitshinweise
•
Behandeln Sie die beiliegenden Teile vorsichtig und überprüfen
Sie anhand der Teileliste, dass keines fehlt.
•
Lesen Sie alle Anweisungen vor dem Zusammenbau sorgfältig
durch, teilweise können zusätzliche Sicherheits-hinweise
enthalten sein.
•
Wenn Sie sich beim Zusammenbau dieses Produkts oder bei der
Stützlast der tragenden Struktur unsicher sind, ziehen Sie einen
Fachmann hinzu.
•
Nutzen Sie dieses Produkt nicht für einen anderen Verwendungs-
zweck als in dieser Anleitung beschrieben. Manhattan übernimmt
keine Haftung für Sach- oder Personen-schäden, die durch
unsachgemäßen Zusammenbau, Montage oder Nutzung entstehen.
ACHTUNG! Diese Halterung muss sicher an der Wand befestigt
werden. Wird sie nicht ordnungsgemäß angebracht, kann sie
herunterfallen und Schäden und Verletzungen verursachen.
Die beiliegenden Teile und Montagekomponenten sind nicht
geeignet für die Montage auf Beton oder Stahlträgern. Sollte
Sie für die Installation spezielle Materialien benötigen, welche
nicht im Lieferumfang enthalten sind, so wenden Sie sich bitte an
Ihren lokalen Baumarkt
Benötigte Werkzeuge
•
Bohrmaschine
•
Kreuzschraubenzieher
•
Trägerdetektor
•
4-mm-Bohrerbit
•
Wasserwaage
•
10-mm-Bohrerbit
•
Sechskantschlüssel
Die Spezifikationen finden Sie auf manhattan-products.com.
Precauciones de Seguridad
•
Maneje todas las partes con cuidado y asegúrese que no falta
nada de la lista de contenido.
•
Antes de ensamblar, procure haber entendido todas las
instrucciones, así como las notas de seguridad que le presentamos.
•
Si no está seguro acerca de como ensamblar el producto o de
la fiabilidad de la estructura de soporte, consulte a una persona
calificada.
•
No utilice este producto para ningún otro propósito que el que se
pretende. Manhattan no se hace responsable de daños o lesiones
resultantes de un ensamble montaje o uso inadecuado.
!ADVERTENCIA! Este montaje de TV debe ser firmemente
asegurado al techo. Si el montaje no es instalado
apropiadamente puede causar daños o lesiones. El
hardware incluido y los componentes de montaje no están
diseñados para su instalación en techos con postes de acero.
Si el hardware necesario para la instalación no está incluido,
consulte a su tienda local por el hardware necesario.
Herramientas Requeridas
•
Taladro
•
Destornillador Phillips
•
Nivel
•
Broca de 10 mm (3/8”)
•
Detector de materiales
•
Llave inglesa
•
Broca de 4 mm (5/32”)
Para más especificaciones, visite manhattan-products.com.
Avvertenze di sicurezza
•
Maneggiare tutte le parti con cura e verificare la lista delle parti
per assicurarsi che nulla sia mancante.
•
Prendere visione delle istruzioni di montaggio ed assicurarsi di
averle comprese completamente prima di iniziare l’assemblaggio,
prestare attenzione anche alle note supplementari di sicurezza
che possono essere fornite.
•
Se non siete completamente sicuri in merito all’assemblaggio
del prodotto o all’affidabilità della struttura di supporto, consultate
un esperto.
•
Non utilizzato questo prodotto per scopi diversi da quelli per cui è
stato progettato. Manhattan non può essere ritenuta responsabile
per danni o lesioni provocati da un assemblaggio, un montaggio
o un uso improprio.
ATTENZIONE! Questo supporto per la TV deve essere
fissato al muro. Se il supporto non è installato correttamente,
potrebbe cadere e causare danni e lesioni. Il materiale
hardware incluso e i componenti di montaggio non sono progettati
per installazioni su mattoni di cemento o su muro con intelaiatura
in acciaio. Se l’hardware di cui necessitate per l’installazione non
è incluso, consultare un rivenditore locale per individuare il
materiale hardware di montaggio più adeguato.
Utensili richiesti
•
Trapano
•
Cacciavite
•
Rilevatore di intelaiatura in legno
•
Punta da 4 mm (5/32”) per trapano
•
Livella
•
Punta da 10 mm (3/8”) per trapano
•
Chiave
Per ulteriori specifiche, visitate il sito manhattan-products.com.
Środki bezpieczeństwa
•
Sprawdź wszystkie dostępne elementy z ulotką upewniając się,
że niczego nie brakuje.
•
Przed rozpoczęciem montażu upewnij się, że rozumiesz wszystkie
instrukcje oraz dodatkowe informacje dotyczące bezpieczeństwa.
•
Jeśli nie jesteś pewien co do montażu tego produktu lub
powierzchni do której produkt ma być przymocowany, zasięgnij
porady u autoryzowanego źródła.
•
Nie używaj tego produktu do jakichkolwiek innych celów niż
jest przeznaczony. Manhattan nie ponosi odpowiedzialności za
szkody powstałe w wyniku niewłaściwego montażu oraz za
szkody powstałe w wyniku wykorzystywania produktu niezgodnie
z przeznaczeniem.
UWAGA! Uchwyt musi być solidnie przymocowany do
ściany. Niewłaściwe zamontowany może spaść powodując
uszkodzenia oraz zagrożenie. Dołączone narzędzia oraz
elementy montażowe nie są przystosowane do mocowania
uchwytu w betonie oraz stali.
W razie potrzeby należy zaopatrzyć
się w odpowiedni sprzęt dla właściwego montażu uchwytu.
Wymagane narzędzie
•
Wiertarka elektryczna
•
Wkrętak Phillips
•
Wykrywacz profili
•
Wiertło 4 mm (5/32”)
•
Poziomica
•
Klucz
•
Wiertło 10 mm (3/8”)
Specyfikacja techniczna produktu dostępna jest na stronie
manhattan-products.com.
English
Safety Cautions
•
Handle all parts with care and check the parts list to ensure
nothing is missing.
•
Be sure that you understand all instructions before you begin
assembly, as additional safety notes may be presented.
•
If you are uncertain about this product’s assembly or the
reliability of any supporting structure, consult a qualified
source.
•
Do not use this product for any purpose other than that for
which it is intended. Manhattan cannot be held responsible for
damage or injury resulting from improper assembly, mounting
or use.
WARNING! This TV mount must be securely attached to
the wall. If the mount is not properly installed, it may fall
and cause injury and damage. The enclosed hardware
and mounting components are not designed for installation
on cinder blocks or steel wall studs. If the hardware you need
for your installation is not included, consult your local hardware
store for proper mounting hardware.
Required Tools
•
Power drill
•
Phillips screwdriver
•
Stud finder
•
4mm (5/32”) drill bit
•
Level
•
Wrench
•
10mm (3/8”) drill bit
For specifications, go to manhattan-products.com.
Deutsch
Español
Précautions de sécurité
•
Utilisez toutes les pièces avec soin et vérifiez avec la liste de pièces
que la livraison est complète.
•
Assurez-vous que vous comprenez toutes les instructions avant
de commencer l’assemblage car des consignes de sécurité
supplémentaires peuvent être présentées.
•
Si vous êtes incertain de l’assemblage du produit ou de la
fiabilité de la structure supportant, veuillez vous adresser à un
spécialiste qualifié.
•
Utilisez le support exclusivement en conformité avec l’usage
prévu. Manhattan ne se porte pas garante en cas de dommages
résultant d’un assemblage, montage ou utilisation non conforme.
ATTENTION! Ce support de montage doit être attaché
fermement au mur. S’il n’est pas installé correctement, il
peut tomber et causer du dommage. Le matériel et les
composants de montage inclus ne conviennent pas aux blocs
de béton ou structures en acier. Si le matériel vous avez besoin
pour votre installation n’est pas inclus, consultez votre quincaillerie
locale pour le matériel nécessaire.
Outils requis
•
Foreuse
•
Tournevis phillips
•
Détecteur de pilier
•
Foret à 4 mm
•
Niveau à bulle
•
Clé Allen
•
Foret à 10 mm
Vous trouvez les spécifications sur manhattan-products.com.
Français
Polski
Italiano
bb
English: Read all Safety Cautions listed in these instructions before proceeding with the installation of this product.
Deutsch: Bitte lesen Sie alle Sicherheitsanweisungen sorgfältig durch, bevor Sie mit der Installation dieses Produkts beginnen.
Español: Lea todas las precauciones de seguridad listadas en estas instrucciones antes de instalar el producto.
Français: Veuillez lire toutes les précautions de sécurité avant de commencer l’installation de ce produit.
Polski: Przed rozpoczęciem montażu produktu zapoznaj się ze wszystkimi informacjami dotyczącymi bezpieczeństwa, które zawarte są w niniejszym dokumencie.
Italiano: Leggere attentamente tutte le avvertenze e le precauzioni di sicurezza elencate in queste istruzioni prima di procedere all’installazione del prodotto.