Assembly – Bosch GKS 65 G Professional User Manual
Page 17
English | 17
Bosch Power Tools
1 609 92A 089 | (12.4.13)
Assembly
Mounting/Replacing the Saw Blade
Before any work on the machine itself, pull the mains
plug.
When mounting the saw blade, wear protective gloves.
Danger of injury when touching the saw blade.
Only use saw blades that correspond with the charac-
teristic data given in the operating instructions.
Do not under any circumstances use grinding discs as
the cutting tool.
Selecting a Saw Blade
An overview of recommended saw blades can be found at the
end of this manual.
Removal of the Saw Blade (see figure A)
For changing the cutting tool, it is best to place the machine
on the face side of the motor housing.
– Press the spindle lock button 5 and keep it pressed.
The spindle lock button 5 may be actuated only when
the saw spindle is at a standstill. Otherwise, the power
tool can be damaged.
– With the Allen key 18, unscrew the clamping bolt 19 turn-
ing in rotation direction
.
– Tilt back the retracting blade guard 12 and hold firmly.
– Remove the clamping flange 20 and the saw blade 21 from
the saw spindle 23.
Mounting the Saw Blade (see figure A)
For changing the cutting tool, it is best to place the machine
on the face side of the motor housing.
– Clean the saw blade 21 and all clamping parts to be assem-
bled.
– Tilt back the retracting blade guard 12 and hold firmly.
– Place the saw blade 21 on to the mounting flange 22. The
cutting direction of the teeth (direction or arrow on saw
blade) and the direction-of-rotation arrow on the blade
guard 16 must correspond.
– Mount the clamping flange 20 and screw in the clamping
bolt 19 turning in rotation direction
. Observe correct
mounting position of mounting flange 22 and clamping
flange 20.
– Press the spindle lock button 5 and keep it pressed.
– With the Allen key 18, tighten the clamping bolt 19 turning
in rotation direction
. The tightening torque is between
6–9 Nm, which corresponds to hand tight plus ¼ turn.
Dust/Chip Extraction
Before any work on the machine itself, pull the mains
plug.
Dusts from materials such as lead-containing coatings,
some wood types, minerals and metal can be harmful to
one’s health. Touching or breathing-in the dusts can cause
allergic reactions and/or lead to respiratory infections of
the user or bystanders.
Certain dusts, such as oak or beech dust, are considered
as carcinogenic, especially in connection with wood-treat-
ment additives (chromate, wood preservative). Materials
containing asbestos may only be worked by specialists.
– As far as possible, use a dust extraction system suita-
ble for the material.
– Provide for good ventilation of the working place.
– It is recommended to wear a P2 filter-class respirator.
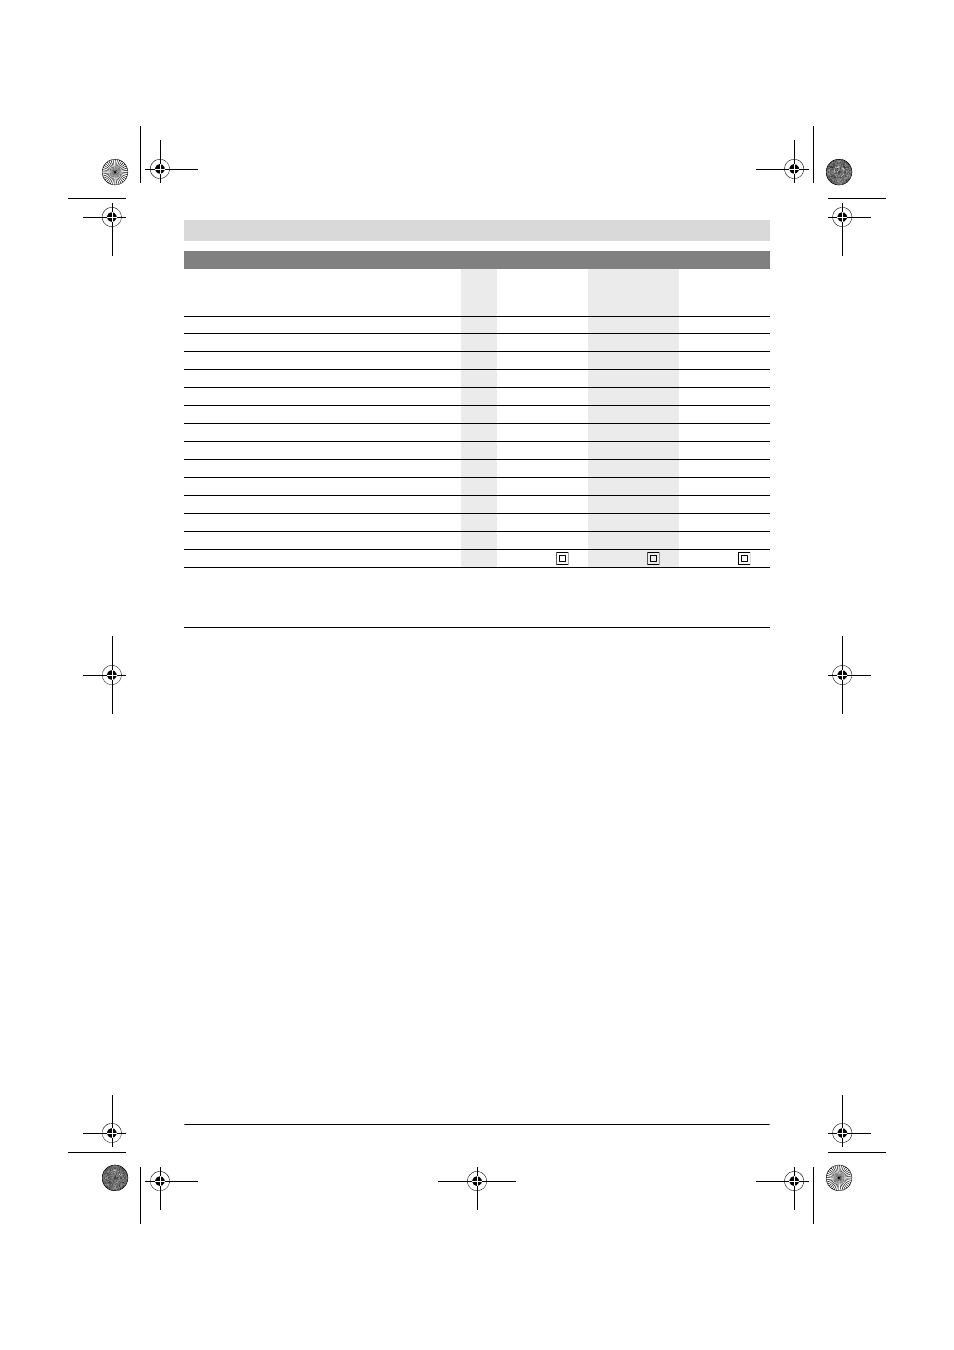
Cutting depth, max.
– for 0° bevel angle
– for 45° bevel angle
mm
mm
65
48
65
48
65
48
Spindle lock
Speed preselection
–
–
Constant electronic control
–
–
Temperature Dependent Overload Protection
–
–
Reduced starting current
–
–
Base plate dimensions
mm
170 x 305
203 x 327
203 x 327
Saw blade diameter, max.
mm
190
190
190
Saw blade diameter, min.
mm
184
184
184
Blade thickness, max.
mm
1.7
1.7
1.7
Tooth thickness/setting, max.
mm
2.6
2.6
2.6
Tooth thickness/setting, min.
mm
1.8
1.8
1.8
Mounting bore
mm
30
30
30
Weight according to EPTA-Procedure 01/2003
kg
4.8
5.1
5.2
Protection class
/
II
/
II
/
II
The values given are valid for a nominal voltage [U] of 230 V. For different voltages and models for specific countries, these values can vary.
Only for power tools without reduced starting current: Starting cycles generate brief voltage drops. Interference with other equipment/machines may
occur in case of unfavourable mains system conditions. Malfunctions are not to be expected for system impedances below 0.36 ohm.
Circular Saw
GKS 65
GKS 65 G
GKS 65 GCE
OBJ_BUCH-359-004.book Page 17 Friday, April 12, 2013 10:04 AM