Instructions – Olympus VF-2 User Manual
Page 2
4
EN
OLYMPUS NORGE AS
Postboks 119 Kjelsås, 0411 OSLO, Tel.: 23 00 50 50
OLYMPUS BELGIUM N.V.
Boomsesteenweg 77, 2630 Aartselaar, Tel.: (03) 870 58 00
OLYMPUS POLSKA SP. Z O.O.
ul. Suwak 3, 02-676 Warszawa
tel. 022 – 366 00 77, faks 022 – 831 04 53
OLYMPUS PORTUGAL, SA
Rua Santos Pousada, 552 Oliveira do Douro
4430-287 V.N.Gaia, Tel: +351 229 999 800
Rua Fernando Lopes Graça, 19 - L Telheiras
1600-805 Lisboa
Tel: +351 217 523 067
OLYMPUS ROMANIA
Str. Academiei, nr. 39-41, sc. A, et. 4, sector 1,
Bucureşti, cod poştal 010013,
tel/fax: 0314100032
ООО «ОЛИМПУС РУС»
г. Москва ул. Электрозаводская, д. 27, корп. 8 тел.: +7 495 926 70 71
OLYMPUS SVERIGE AB
Pyramidvägen 5, 169 56 Solna, Sweden
Tel.: +46 8 7353400, Fax: +46 8 7353410
OLYMPUS SLOVENIJA D.O.O.
Baznikova 2, SI-1000 Ljubljana, Tel.: +386 1 236 33 20
OLYMPUS SK SPOL. S R.O.
Slovnaftská 102, 821 07 Bratislava, Tel.: +421 2 4920 9411
e-mail: [email protected], [email protected]
OLYMPUS D.O.O. BEOGRAD
Đorđa Stanojevića 12 (Office Park)
11070 Beograd, Srbija
Tel.: (011) 2222 914, Fax: (011) 2222 910
www.olympus.rs
Olympus Türkiye Yetkili Teknik ServisiDatapro
Bilişim Hizmetleri San. ve Tic.A.Ş.
Çağrı Merkezi, Tel:+90 (212) 331 04
http://www.datapro.com.tr/
Olympus Türkiye
Perdemsaç Plaza Bayar Cad.Gülbahar Sok. No:17
34742 Kozyatağı Istanbul
Tel: +90 216 372 9393
Fax:+90 216 372 1070
www.olympus.com.tr
ABTOPИЗOBAHI CEPBICHI ЦEHTPИ
УKPAЇHA ТОВ «СOHIKO УKPAЇHA»,
м Київ, вул. Щусєва 10, тел. (044) 251-29-68
УKPAЇHA ТОВ «КPOK-ТТЦ», м Київ, пр-т
Маяковського 26, тел. (044) 459-42-55, 204-72-55
INSTRUCTIONS
Thank you for purchasing this Olympus product.
To ensure your safety, please read this
instruction manual before use, and keep it handy
for future reference.
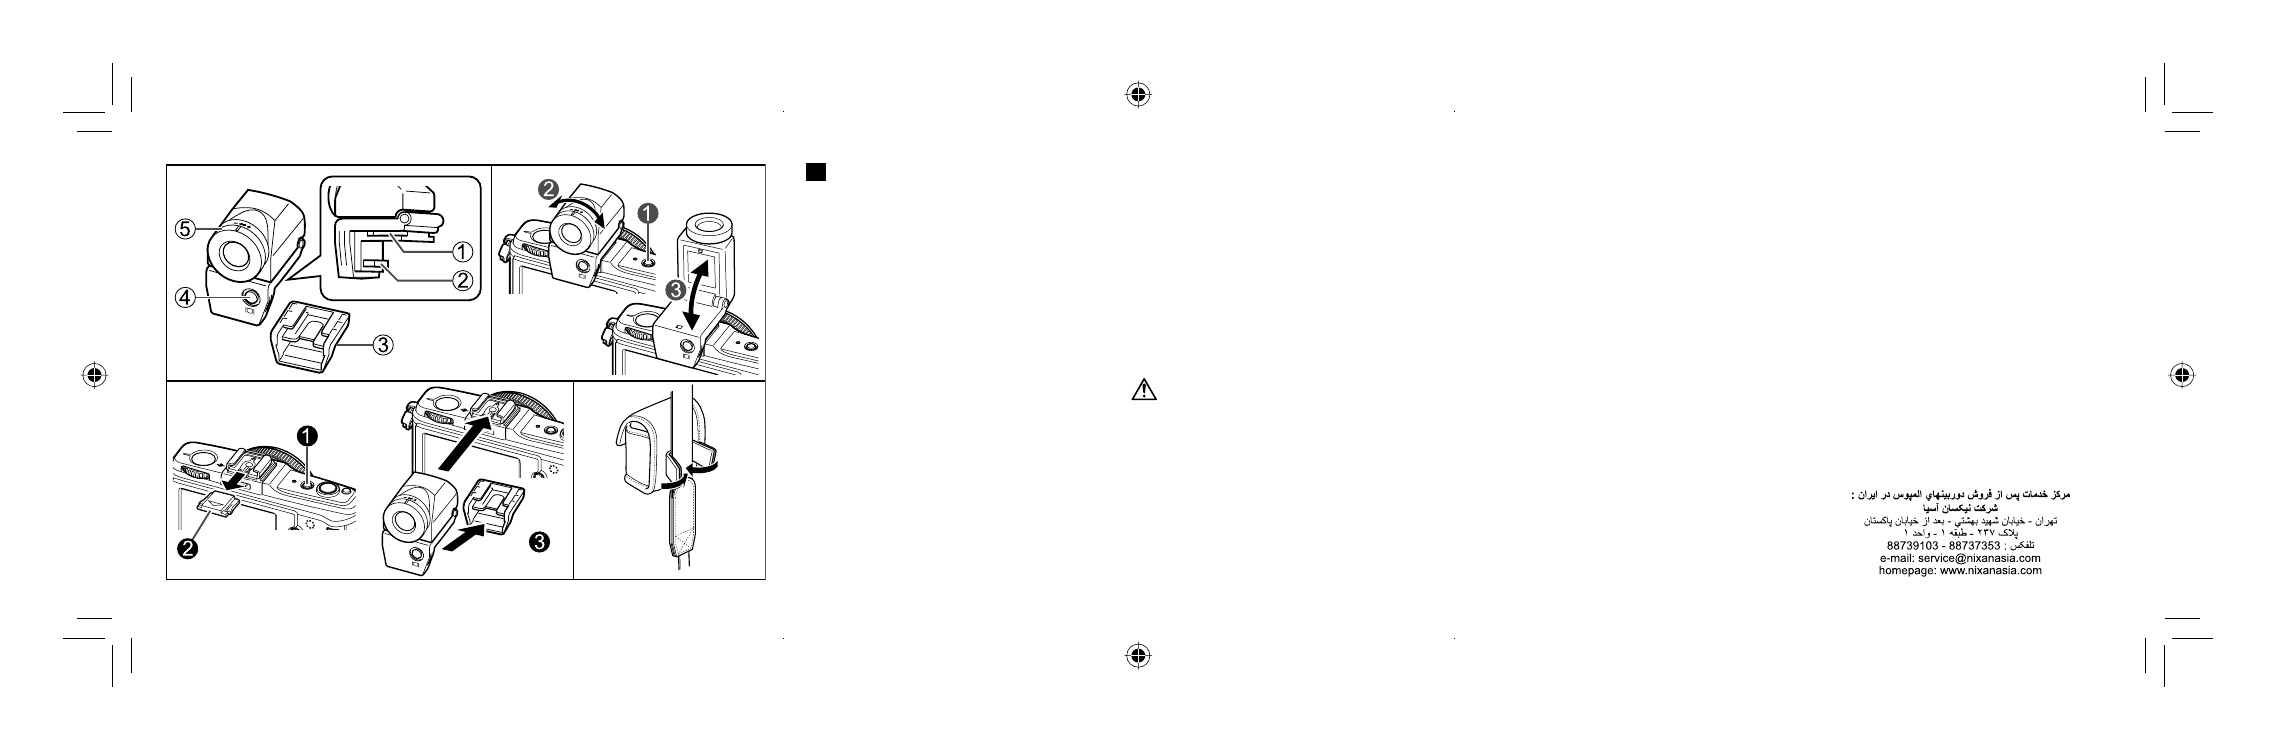
Names of Parts (Figure 1)
1
Electronic viewfinder mounting part
2
Connector
3
Connector cover
4
Display switching button (u)
5
Diopter adjustment ring
Attaching the Viewfinder (Figure 2)
1
Turn off the camera.
2
Slide off the hot shoe cover.
3
Remove the connector cover, align the
viewfinder with the hot shoe, and slide it in
until it stops.
To detach the viewfinder, turn off the
camera and follow the reverse procedure.
•
Using the Viewfinder (Figure 3)
1
Turn on the camera.
2
Turn the diopter adjustment ring to a position
where the image on the viewfinder can be
seen clearly.
3
Adjust the viewfinder to your preferred angle
(up to 90 degrees).
The display switches between the LCD
monitor and viewfinder with every press of the
display switching button (u).
Attaching the Case (Figure 4)
Warnings: Safety Precautions
When carrying the camera, do not hold it by
the electronic viewfinder.
You cannot use an external flash and the
electronic viewfinder at the same time.
*
•
•
1
3
4
2
EN
R2115_E_cover_en_cs2e.indd 2
R2115_E_cover_en_cs2e.indd 2
06/10/2009 09:57:25
06/10/2009 09:57:25