English – Remington MB4010 User Manual
Page 3
4
5
ENGLISH
ENGLISH
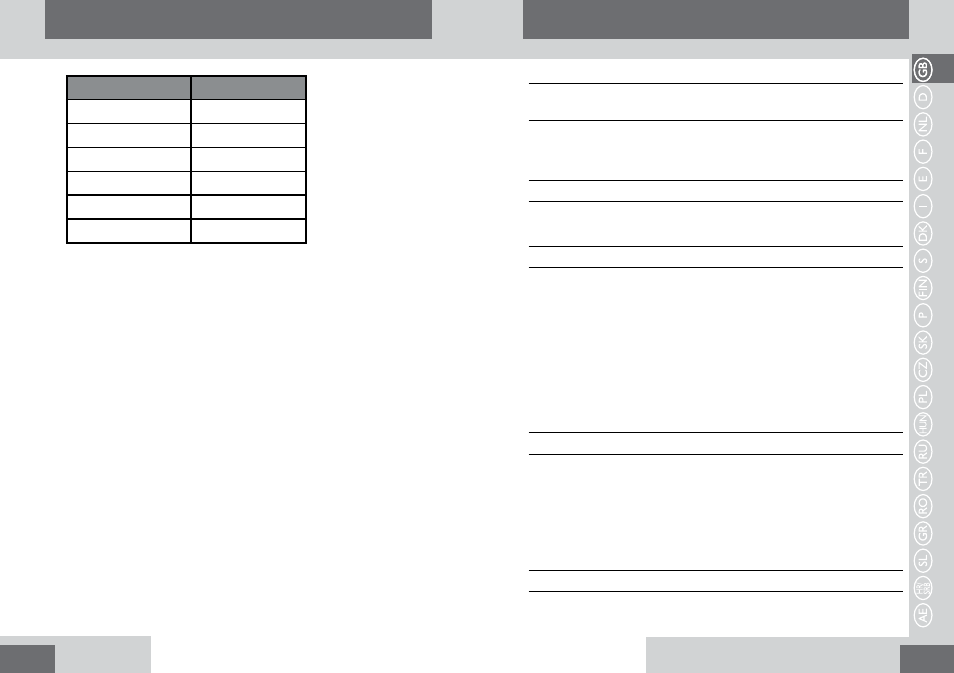
Comb Position
Cutting Length
1
1.5mm
2
4.5 mm
3
7.5mm
4
10.5 mm
5
13.5mm
6
16.5mm
0.5mm length is achieved without any combs
,To thin and taper beards or moustaches
• Attach the adjustable comb to the trimmer blade and select the desired length.
• The setting will appear on the length position indicator. If you are trimming for the first
time start with the maximum trimming length setting
• Turn the unit on.
• Place the flat top of the trimmer comb against the skin
• Slowly slide the trimmer through the hair. Repeat from different directions as necessary.
,To define the beard/moustache line
• Remove the trimmer comb attachment
• Start with edge of beard/moustache line and gently lower the trimmer blade onto
yourskin.
• Use motions towards edge of beard/moustache line to trim to desired locations in facial
area and away from beard in neck area.
,Trimming edge of sideburns
• Start with edge of sideburn, and with the trimmer blades resting lightly against your
skin, use motions towards edge of sideburn line to trim to desired locations in facial area.
,Trimming the nape of your neck
Note: You will need a hand mirror for this operation if performing it alone.
• Use your fingers to lift the hair at the base of your head up off the neck. Your index finger
should be covering the roots of the hairs you are lifting to prevent accidental removal by
trimmer.
• Using your other hand, hold the trimmer to the base of your neck with the cutting unit
facing up, and move the trimmer up the length of the neck until it touches your finger
covering the hair roots at the base of your head.
• Be sure to move the unit slowly when performing this operation and to keep the hair
roots at the base of your head out of the way of the trimmer.
C
REMOVING THE TRIMMER COMB, ATTACHMENT AND CUTTING
ASSEMBLY
• Hold the trimmer in one hand, with your other hand, gently pull the trimmer comb
attachment off the trimmer.
• Remove the cutting assembly by firmly pushing up on the
blade with your thumb.
C
REPLACING THE CUTTER ASSEMBLY
•
Hold the trimmer in one hand. With your other hand, insert the lower part of the cutter
assembly into the trimmer, push down the cutter until firmly attached.
C
REPLACING THE TRIMMER COMB
• Hold the trimmer in one hand.
• Slide the comb/shaver down the grooves until it clicks into place.
Note: The trimmer comb attachment can only be placed on the trimmer one way; if it
does not fit properly remove and reverse it.
E
Tips for best results
• Beard, moustache and sideburn hairs should be dry.
• Avoid using lotions before using your trimmer. Comb your hair in the direction that it
grows.
• Remove trimmer comb attachment if you are: defining hairline edges such as
sideburns, trimming the nape of your neck, trimming your beard line on front of neck
C
CARE FOR YOUR TRIMMER
Care for your trimmer to ensure a long lasting performance Your trimmer is fitted with
high-quality, cutting blades that are permanently lubricated.
Cleaning should only be done with a soft brush.
E
After each use
• Turn the trimmer off.
• Remove trimmer comb attachment and cutter assembly.
• Gently brush the remaining hairs away.
A
CLEANING CAUTIONS
• Only the trimmer comb attachment and trimmer blade may be removed from the
product for cleaning.