System connection, 3 setting off fade time, 5 playing back scenes – Acclaim Lighting AL Fade 6 II User Manual
Page 3: 6 restoring scenes, Page 3
4.3 Setting OFF Fade time
4.3.1 Recording Scene mode enables.
4.3.2 Adjust the "Master Control Fader" all ways up to 600s to set the desired level.
4.3.3 Once you're satisfied with the setting, tap the "O/P" button to save it. All LED indicators will flash repeatedly 3 times.
4.3.4 Exit the Recording Scene mode.
4.4 Setting the Total Number of Controllable Channels
4.4.1 Disconnect the main power of AL-Fade-6 II.
4.4.2 Select the channel total number which you wish to control. When using the "Channel Fader 1", the channel total which you wish
to control is "1"; when using the "Channel Fader 2", the channel total which you wish to control is "2", the rest can be deduced
and in the function, the channel total which you wish to control is up to "6".
4.4.3 Should adjust the "Master Control Fade" over 5 position when selecting the channel number.
4.4.4 Keep and hold the "O/P" button, and power on the AL-Fade-6 II, all LED indicators will come on. Release the "O/P" button, and all
LED indicators will flash repeatedly 3 times.
4.5 Playing back Scenes
4.5.1 Only the stored scenes can be played back.
4.5.2 Directly tap the "Scene" button to select the scene which you wish to play back.
4.5.3 Users can use the Infrared Remote to operate your AL-Fade-6 II.
4.6 Restoring Scenes
4.6.1 Power off the AL-Fade-6 II.
4.6.2 Keep and hold down the "Scene1" button which you wish to restore, and power on the main power of AL-Fade-6 II, until all
Scenes' LED indicators will illuminate. Then release the "Scene" button to restore, and all Scenes' LED indicators will flash
repeatedly 3 times
-Page 3-
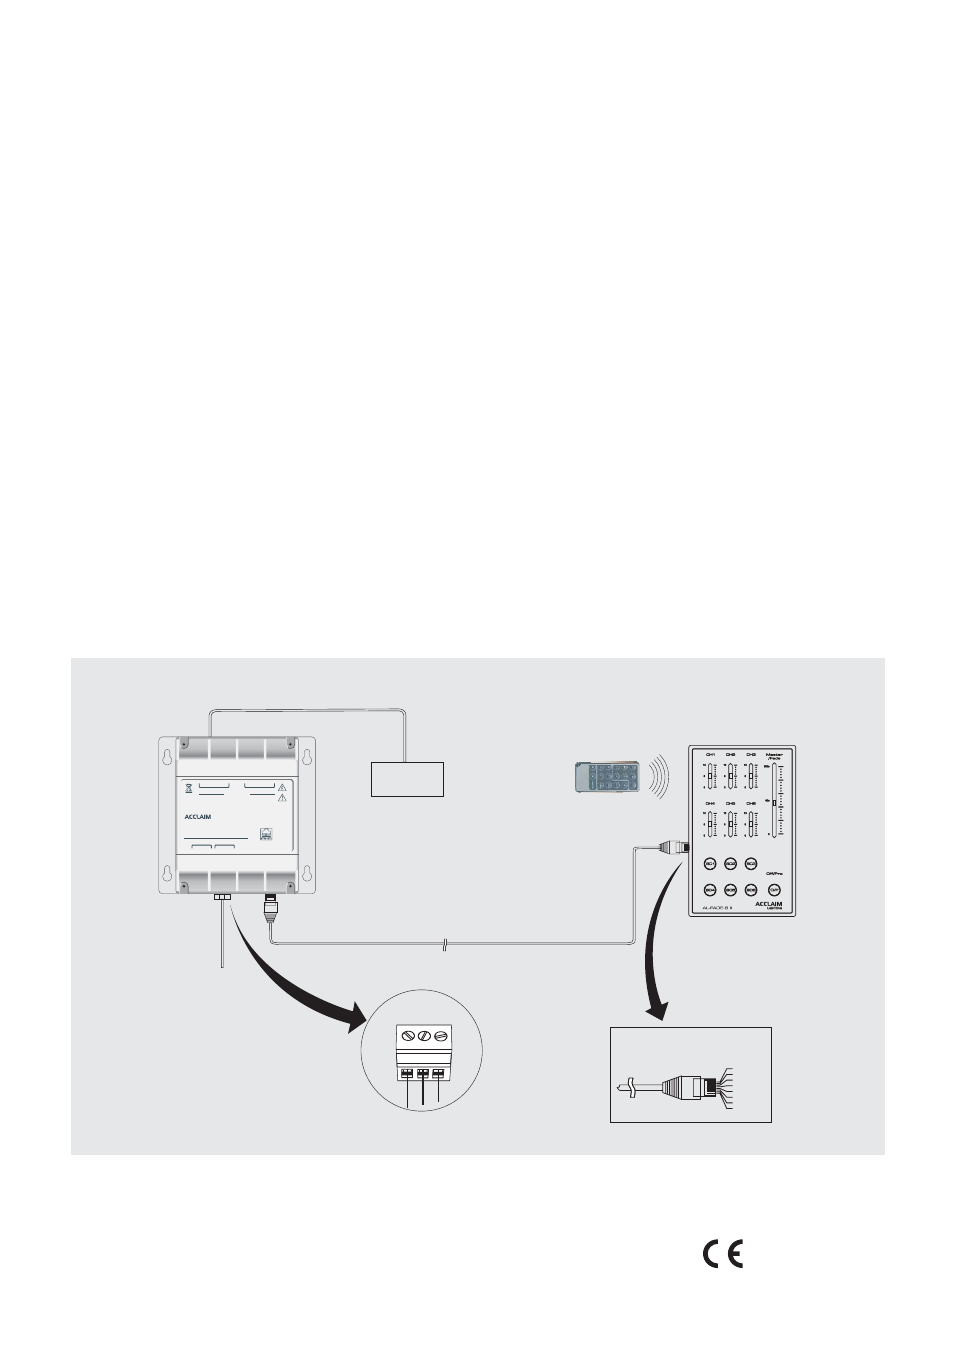
5.System Connection
24-004-2772-00
Rev1.0
CAT-5 data cable, 5 meters Max.
POWER IN
GND
D-
D+
1. DMX OUT +
2. DMX OUT -
3. DMX IN +
4. GND
5. GND
6. DMX IN -
7. +12V
8. +12V
CAT-5 / RJ45 PIN CONNECTION
Remote Control
JUNCTION BOX 1
JUNCTION BOX 1
TO PANEL
1. DMX OUT +
2. DMX OUT -
3. DMX IN +
4; 5. GND
6. DMX IN -
7; 8. +12V
CAUTION
Before Opening
N'ouvrez Pas:
Warning:
Risk Of Electric Shock Disconnect Input Power
risque De Choc Electrique
This Apparatus Must Be Earthed
Made in P.R.C.
RoHS
DMX OUT
DMX IN
GND D- D+
GND D- D+
AC 120V~ 60Hz
IN
E
N
L
THRU
E
N
L
DMX OUT