Setting up + installation, Technical data – Candy GO L User Manual
Page 15
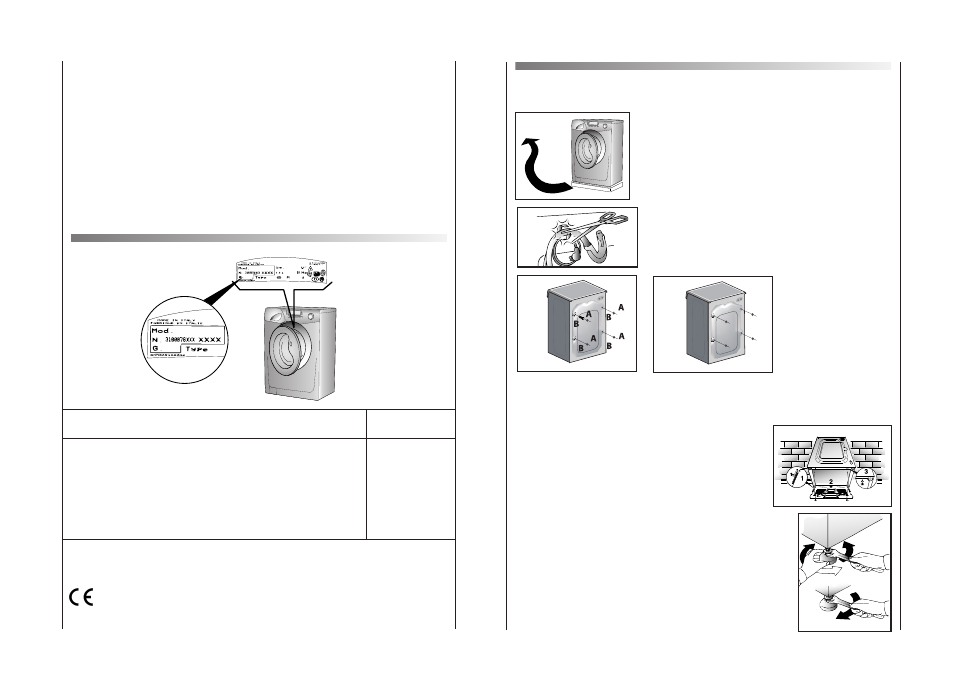
SETTING UP + INSTALLATION
Remove the polystyrene base and place the machine near
its permanent position (diagram 1).
Carefully cut through the hose retaining clip at the rear of
the appliance (diagram 2).
Remove the 4 fixing screws marked (A) and remove the 4
spacers marked (B) (diagram 3).
Cover the 4 holes using the caps provided in the instruction
booklet pack (diagram 4).
WARNING:
DO NOT LEAVE THE PACKAGING WITHIN REACH OF CHILDREN AS IT IS A POTENTIAL
SOURCE OF DANGER.
Apply the insulation sheet of corrugated material to the base
as shown.
Use the 4 feet to level the machine with the floor:
a) Turn the nut clockwise to release the screw adjuster on the foot.
b) Rotate the foot to raise or lower it until it stands firmly on the
ground.
c) Lock the foot in position by turning the nut
anti-clockwise until it comes up against the bottom of the machine.
A
B
C
1
2
29
3
4
Note:
The use of environmentally-friendly, phosphate-free detergents can have the following effects:
-
waste water from rinsing may be cloudier because of the presence of zeolites held in
suspension, without the rinse performance being adversely affected;
-
presence of white powder (zeolites) on laundry after washing, which is not absorbed by
the fabric and does not alter the colour of the fabric.
-
The presence of foam in the final rinsing water is not necessarily an indication of poor
rinsing.
-
Anionic surfactants used in washing detergent formulae often prove to be difficult to
remove from the laundry itself and, even in small quantities, can still cause considerable
foam production.
-
Carrying out more rinse cycles does not serve any purpose in such cases.
28
Appliance complies with European Directives 73/23/EEC and 89/336/EEC, replaced
by 2006/95/EC and 2004/108/EC, and subsequent amendments.
Technical data
■
Max. load of dry laundry
■
Water pressure
Measurements
■
Width
■
Depth
■
Height
NB: For specifications regarding electrical data, see the data panel on the front of the washing
machine (porthole area) - as shown in diagram above.
Fig. 2
10,5 kg
0,05 ÷ 0,8 MPa
60 cm
64 cm
85 cm