Whistler features feature descriptions, Installation, Xtr-420 – Whistler XTR-420 User Manual
Page 2
WHISTLER FEATURES
FEATURE DESCRIPTIONS
Battery Installation
Unit requires 3 AA rechargeable batteries
(included)
.
U
Un
niitt m
ma
ayy n
ne
ee
ed
d tto
o b
be
e p
pllu
ug
gg
ge
ed
d iin
ntto
o a
a lliivve
e lliig
gh
htte
err
sso
occkke
ett tto
o ffu
ullllyy cch
ha
arrg
ge
e tth
he
e b
ba
atttte
erriie
ess o
ovve
errn
niig
gh
htt
b
be
effo
orre
e ffiirrsstt u
usse
e!! Remove the battery
compartment cover by sliding the cover to the
edge of the unit and lift up. Insert batteries and
reinstall battery compartment cover.
Ni-MH rechargeable batteries should be used
and are included with the unit.
N
No
otte
e:: DO NOT mix battery types as this can
damage the batteries.
IIm
mp
po
orrtta
an
ntt:: Use only NiMH batteries. Ni-Cd
batteries should not be used. These batteries
will not provide enough capacity to be useful.
C
Ca
au
uttiio
on
n:: Only use rechargeable batteries.
Charging non-rechargeable batteries can
damage the unit or possibly cause the batteries
to explode. See battery charging section
(page 6) to charge batteries with the power cord.
Mounting Guidelines
• Mount the unit as low as possible near the
center of the windshield.
• Do not mount your unit behind wipers,
ornaments, mirrored sunscreens, etc. These
obstructions have metal surfaces which can
affect radar and laser signals and reduce
critical warning time. (Regular tinted glass
does not affect reception)
• Some windshields have an Instaclear
™
or
Electriclear
™
type coating, which affect radar
signals. Consult your dealer or the vehicle’s
owner’s manual supplied with your vehicle to
determine if your windshield has this coating.
• Avoid placing unit in direct contact with the
windshield.
• To reduce the possibility of theft, unplug and
conceal your unit when not in use.
INSTALLATION
4
5
3
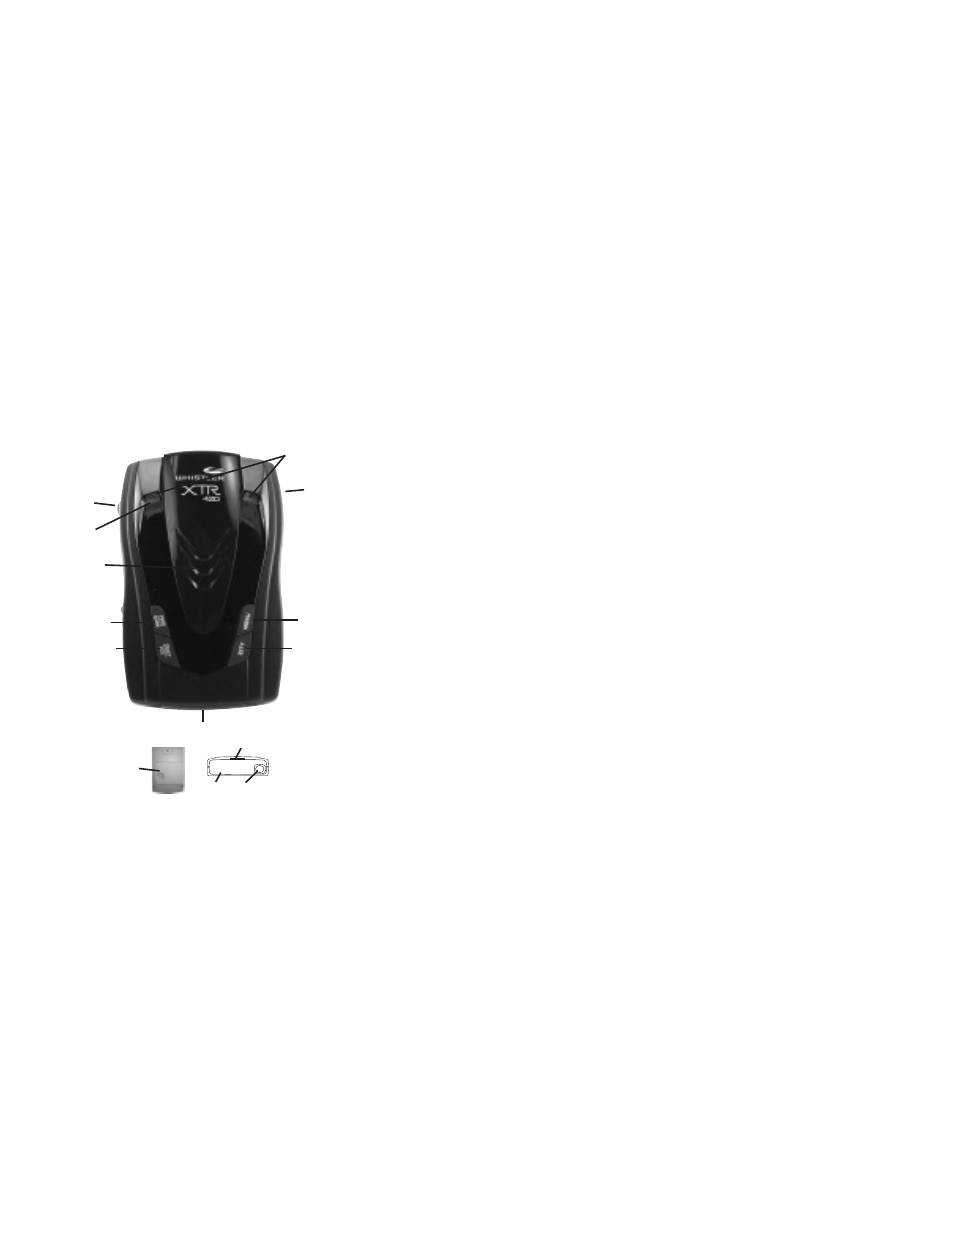
XTR-420
Whistler’s ergonomic and user-friendly design
provides a new level of operating convenience.
Special features include:
1. Bracket Release Button – Provides quick
and easy release of the mounting bracket.
2. Speaker
– Provides distinct audio warnings
for X, K, Ka band radar, safety radar, laser and VG-2.
3. Mounting Bracket Location – Slot holds
mounting bracket firmly.
4. Radar Antenna – Compact, high-efficiency
antenna receives radar signals.
5. Front Laser Antenna – High gain optical lens
provides increased sensitivity and field of view
for leading-edge laser detection.
6. Rear Laser Antenna – An integrated optical
waveguide provides superior detection of
laser signals transmitted from behind.
7. City Button - Reduces the annoyance of
false alerts typically encountered in urban
driving areas.
8. Quiet/VOL Button - Pressing QUIETbefore
a signal is detected engages Auto Quiet
Mode. Pressing QUIET during a radar/laser
encounter silences audio alerts. (A long press
of QUIET turns VG-2 On/Off) Adjusts volume
Up/Down.
9. Power/Dark -Turns unit on/off and engages
Dim/Dark settings (press and hold).
10. Menu Button - enters Option Select mode
11. Icon Display – Provides distinct visual
confirmation of signals detected, signal
strength, and engaged modes of operation.
12. Low Profile Alert Periscopes - Provides
an additional attention getting visual alert
13. Battery Compartment – Compartment for
3 NiMH batteries.
14. Power Jack – Provides connection for the
power cord.
3
4
2
13
1
2
6
7
8
9
10
11
12
14