Maintenance – Weed Eater 530164008 User Manual
Page 5
-- 5 --
thrown out through the discharge opening,
damaging the unit or property, or causing
serious injury to bystanders or the operator.
STARTING A COLD ENGINE (or a
warm engine after running out of
fuel)
1. Move throttle lever to the
position.
2. Move choke lever to the FULL CHOKE
position.
3. Slowly press the primer bulb 6 times.
Primer
Bulb
Choke Lever
Throttle
Lever
4. Pull starter rope sharply until engine at-
tempts to run, but no more than 5 pulls.
5. Move choke lever to 1/2 CHOKE. Pull
starter rope sharply until engine runs.
NOTE:
If engine has not started after 5 pulls,
repeat all of the above steps.
6. After a 10 second warm-up, move the
choke lever to CHOKE OFF.
NOTE:
Move throttle lever to the
posi-
tion for low speed.
7. To stop the engine, move the throttle lever
to the STOP position.
NOTE:
If engine does not stop, move choke
lever to FULL CHOKE.
STARTING A WARM ENGINE
1. Move throttle lever to the
position.
2. Move the choke lever to the CHOKE OFF
position
.
3. Pull starter handle sharply until engine
runs.
NOTE:
If engine does not run after 5 pulls,
repeat STARTING A COLD ENGINE proce-
dure.
DIFFICULT STARTING (or starting a
flooded engine)
Flooded engines can be started by placing the
choke lever in the CHOKE OFF position and the
throttle lever to the
position; then, pull the
starter handle sharply to clear the engine of ex-
cess fuel. This could require pulling the starter
handle many times depending on how badly the
unit is flooded. If the unit still does not start, refer
to TROUBLESHOOTING TABLE or call
1-800-554-6723
.
MAINTENANCE
GENERAL RECOMMENDATIONS
The warranty on this unit does not cover items
that have been subjected to operator abuse
or negligence. To receive full value from the
warranty, the operator must maintain unit as
instructed in this manual. Various adjust-
ments will need to be made periodically to
properly maintain your unit.
CHECK FOR LOOSE
FASTENERS AND PARTS
S
Spark Plug Boot
S
Air Filter
S
Housing Screws
CHECK FOR DAMAGED OR
WORN PARTS
Contact an authorized service dealer for re-
placement of damaged or worn parts.
S
Choke Lever -- Ensure choke lever func-
tions properly by moving to the START/
STOP position. Make sure engine stops;
then restart engine and continue.
S
Fuel Tank -- Discontinue use of unit if fuel
tank shows signs of damage or leaks.
INSPECT AND CLEAN UNIT AND
DECALS
S
After each use, inspect complete unit for
loose or damaged parts. Clean the unit us-
ing a damp cloth with a mild detergent.
S
Wipe off unit with a clean dry cloth.
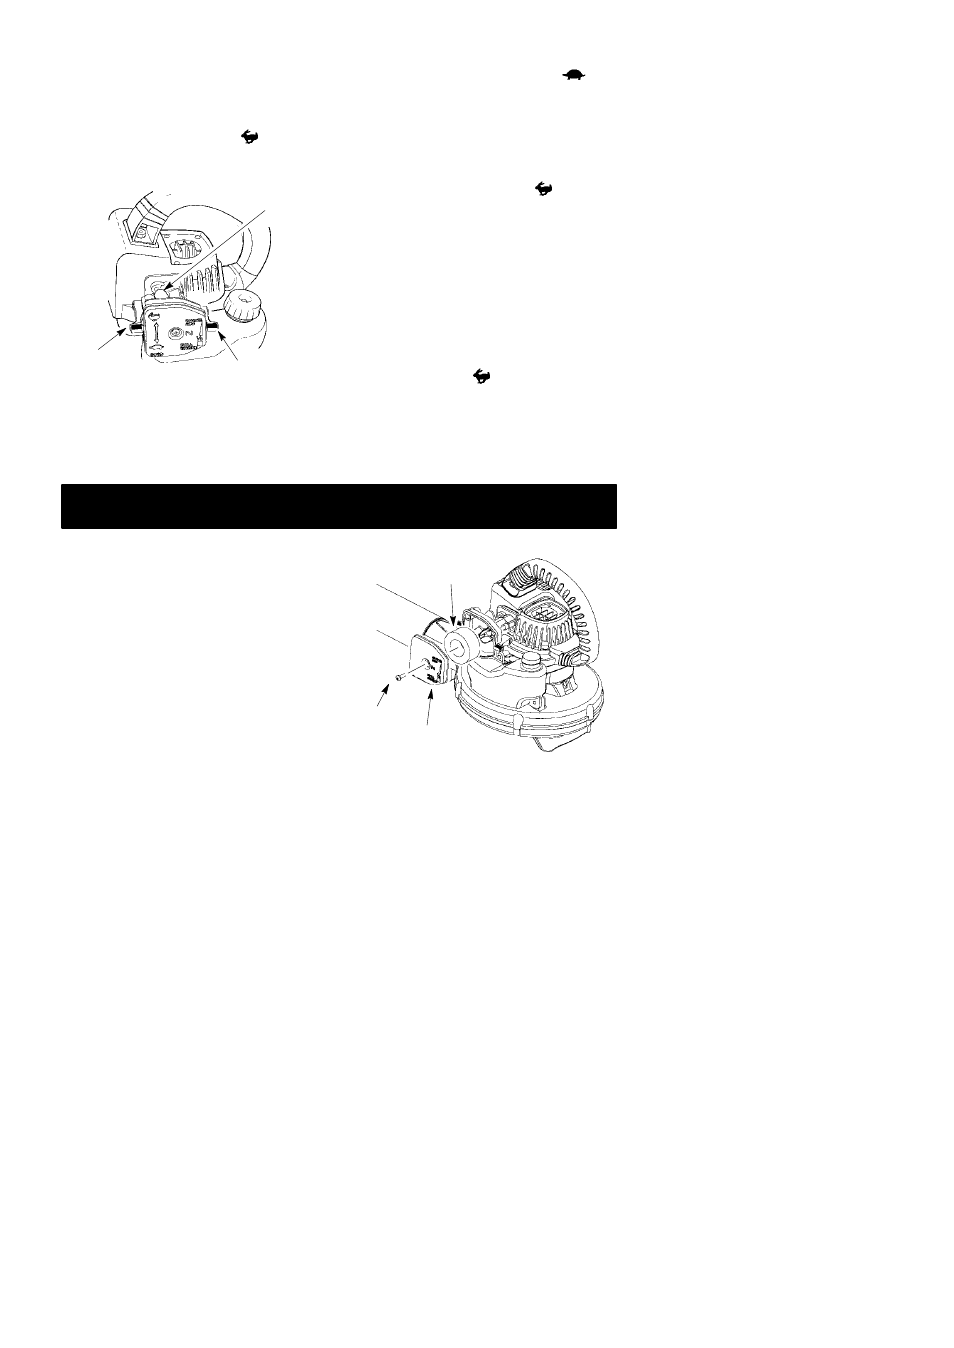
CLEAN AIR FILTER
Screw
Air Filter
Air Filter Cover
Cleaning the air filter:
A dirty air filter decreases engine perform-
ance and increases fuel consumption and
harmful emissions. Always clean after every
5 hours of operation.
1. Clean the cover and the area around it to
keep debris from falling into the carburetor
chamber when the cover is removed.
2. Remove parts as illustrated.
NOTE:
Do not clean filter in gasoline or other
flammable solvent. Doing so can create a fire
hazard or produce harmful evaporative emis-
sions.
3. Wash the filter in soap and water.
4. Allow filter to dry.
5. Apply a few drops of oil to the filter;
squeeze filter to distribute oil.
6. Replace parts.