Storage – Weed Eater 530088132 User Manual
Page 13
13
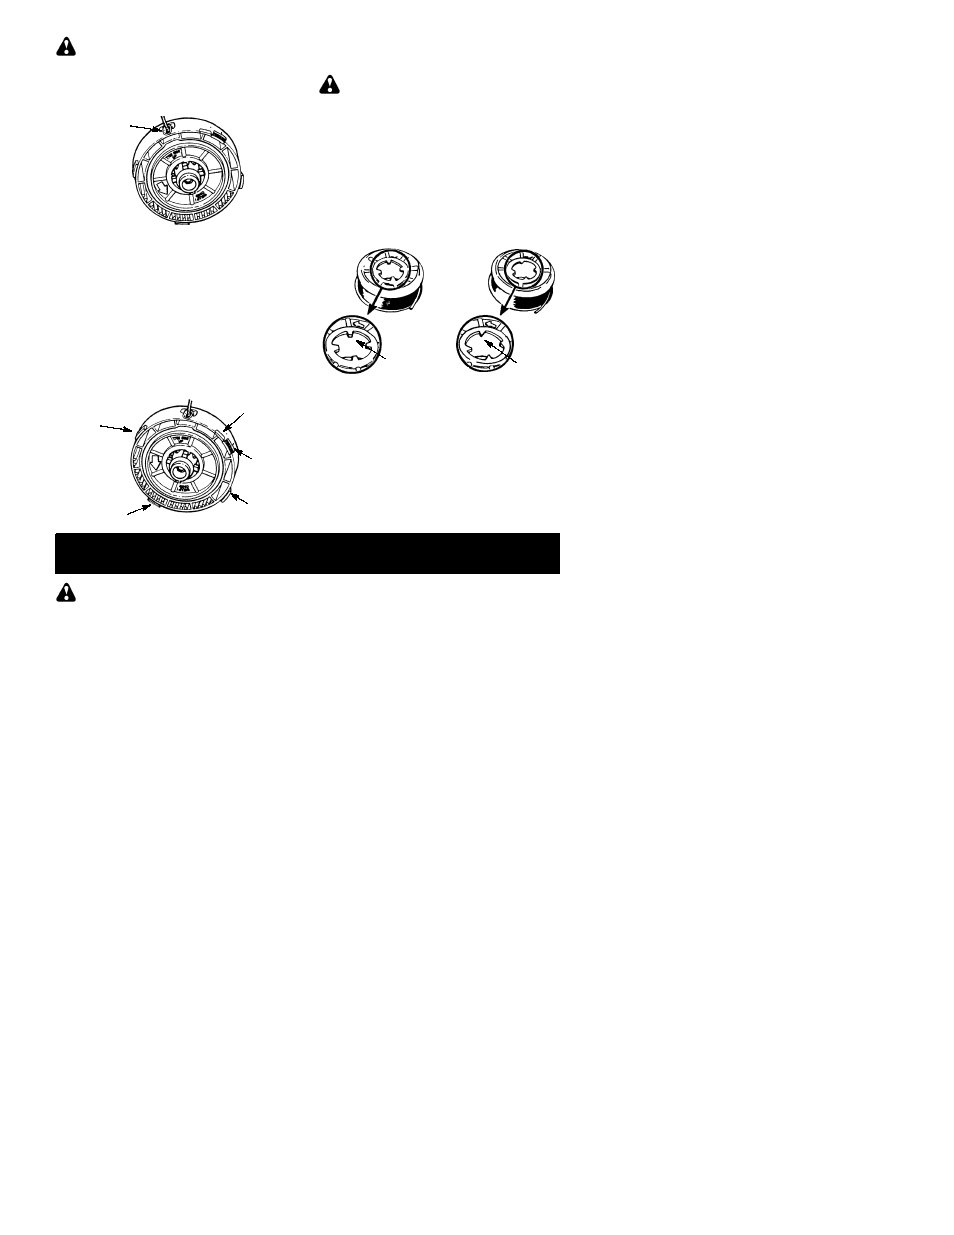
WARNING:
When installing the metal
insert, you must install from the inside of the trim-
mer head. If installed on the outside of the trim-
mer head, this insert can fly off and become a
dangerous missile.
Metal Insert
8. Once line is passed through the exit hole,
place the spool in the trimmer head. Press
the spool down and turn it until it locks
down and does not pop up when you re-
lease it.
9. Make sure the line is not caught between
the rim of the spool and the wall of the trim-
mer head.
10. Replace the tap button, and place the lock
ring onto the trimmer head.
11. Align the lock ring over the catches on the
trimmer head. Push the ring down and turn
until catches lock into place.
Catch
Catch
Catch
Catch
Lock
Tab
12. Make sure the lock ring is securely fas-
tened by pulling on it and twisting it in both
directions.
WARNING:
All catches must be fas-
tened and lock tab latched in the lock ring. If
installed incorrectly, lock ring can fly off and be-
come a dangerous missile.
13. Pull the line extending from the trimmer
head. This will allow the spool to release
from the locked position.
SPOOL REPLACEMENT
Replace the spool when the square corners on
the lugs are rounded off, reduced in size, or bro-
ken. Follow instructions under REPLACING
THE LINE for removing and installing the spool.
Worn
Lug
Normal lug
CARBURETOR ADJUSTMENT
Your carburetor is equipped with limiter caps.
Damage will occur if you turn the needles be-
yond the limiter caps. Carburetor adjustment is a
complicated task. We recommend that you take
your unit to an authorized service dealer.
STORAGE
WARNING:
Perform the following
steps after each use:
S
Allow engine to cool before storing or trans-
porting.
S
Store unit and fuel in a well ventilated area
where fuel vapors cannot reach sparks or
open flames from water heaters, electric
motors or switches, furnaces, etc.
S
Store unit with all guards in place. Position
unit so that any sharp object cannot acci-
dentally cause injury.
S
Store unit and fuel well out of the reach of
children.
SEASONAL STORAGE
Prepare unit for storage at end of season or if it
will not be used for 30 days or more.
If your unit is to be stored for a period of time:
S
Clean the entire unit before lengthy storage.
S
Store in a clean dry area.
S
Lightly oil external metal surfaces.
FUEL SYSTEM
Under FUELING ENGINE in the OPERA-
TION section of this manual, see message la-
beled IMPORTANT regarding the use of ga-
sohol in your engine.
Fuel stabilizer is an acceptable alternative in
minimizing the formation of fuel gum deposits
during storage. Add stabilizer to the gasoline
in the fuel tank or fuel storage container. Fol-
low the mix instructions found on stabilizer
container. Run engine at least 5 minutes after
adding stabilizer.
ENGINE
S
Remove spark plug and pour 1 teaspoon of
40:1, 2-cycle engine oil (air cooled) through
the spark plug opening. Slowly pull the start-
er rope 8 to 10 times to distribute oil.
S
Replace spark plug with new one of recom-
mended type and heat range.
S
Clean air filter.
S
Check entire unit for loose screws, nuts,
and bolts. Replace any damaged, broken,
or worn parts.
S
At the beginning of the next season, use
only fresh fuel having the proper gasoline to
oil ratio.
OTHER
S
Do not store gasoline from one season to
another.
S
Replace your gasoline can if it starts to rust.