Steps to programming 2 – Wibur Curtis Company SD2 User Manual
Page 2
Steps to Programming
2
YYYYYour Curtis Cafe System is F
our Curtis Cafe System is F
our Curtis Cafe System is F
our Curtis Cafe System is F
our Curtis Cafe System is Factor
actor
actor
actor
actory Pre-Set for Optimum P
y Pre-Set for Optimum P
y Pre-Set for Optimum P
y Pre-Set for Optimum P
y Pre-Set for Optimum Performance.
erformance.
erformance.
erformance.
erformance. Usually this Does Not Change.
Usually this Does Not Change.
Usually this Does Not Change.
Usually this Does Not Change.
Usually this Does Not Change.
Number of
Flashes
10%
20%
30%
40%
100%
1
2
3
4
10
Volume
Enter Program Mode –
Enter Program Mode –
Enter Program Mode –
Enter Program Mode –
Enter Program Mode – press and hold STOP/W
STOP/W
STOP/W
STOP/W
STOP/WASH
ASH
ASH
ASH
ASH for about ten [10] seconds until all
lights start blinking.
TTTTTo program Product % Ra
o program Product % Ra
o program Product % Ra
o program Product % Ra
o program Product % Ratio,
tio,
tio,
tio,
tio, press and hold the selected PUSH button for approximately
one second, then release. The current setting will be indicated by LED flashes.
TTTTTo change the product thro
o change the product thro
o change the product thro
o change the product thro
o change the product throw
w
w
w
w,,,,, press and hold the button until light starts quick flashing. Each quick flash increases
the amount by 10%. Release the button when the desired throw amount is achieved. After releasing the button, the
number of blinks represent the new setting.
TTTTTo exit the P
o exit the P
o exit the P
o exit the P
o exit the Pooooowder Dispensing Mode,
wder Dispensing Mode,
wder Dispensing Mode,
wder Dispensing Mode,
wder Dispensing Mode, push the other PUSH button.
Enter
Program Mode
Enter
Product % Ratio
Change
Product Throw
Exit
Program Mode
Product % Ra
Product % Ra
Product % Ra
Product % Ra
Product % Ratio
tio
tio
tio
tio
This controls the amount of dry product that is metered from the hoppers. This can be programmed from 10% to 100% of the capacity of
the dispensing system. By counting LED flashes you can determine the product % ratio currently set for this dispense button (see table).
PPPPPortion Control Liquid Dispensing Mode
ortion Control Liquid Dispensing Mode
ortion Control Liquid Dispensing Mode
ortion Control Liquid Dispensing Mode
ortion Control Liquid Dispensing Mode
This program adjustment allows you to setup the machine to automatically dispense a preset volume of coffee. When the user makes a
PUSH button selection, the SD2 unit dispenses only the volume of coffee programmed by the Portion Control Dispensing Mode. By setting
the unit for Portion Control Dispensing, you have locked out the manual dispense feature.
Enter Program Mode –
Enter Program Mode –
Enter Program Mode –
Enter Program Mode –
Enter Program Mode – press and hold STOP/W
STOP/W
STOP/W
STOP/W
STOP/WASH
ASH
ASH
ASH
ASH for about ten [10] seconds until all lights start blinking.
TTTTTo select & change the P
o select & change the P
o select & change the P
o select & change the P
o select & change the Portion Control Dispensing
ortion Control Dispensing
ortion Control Dispensing
ortion Control Dispensing
ortion Control Dispensing VVVVVolume
olume
olume
olume
olume – while in the programming mode, press and hold the
selected PUSH button until the liquid begins to flow, then release. The timing starts when liquid begins to flow.
Stop flo
Stop flo
Stop flo
Stop flo
Stop flow and Exit –
w and Exit –
w and Exit –
w and Exit –
w and Exit – When the desired volume is achieved, press this PUSH button once again to stop the
dispensing.
You have now set the timing for this button and have exited the programming mode. Pressing the selected
dispense button now will provide the liquid volume that you just set. To reset the timing, you must start again by
entering the programming mode.
Enter
Program Mode
Select & Change
Preset Liquid
Dispense
Stop & Exit
WARNING HOT LIQUID, Scalding
may occur. Avoid splashing.
Place an empty container under the
dispensing nozzles while programming.
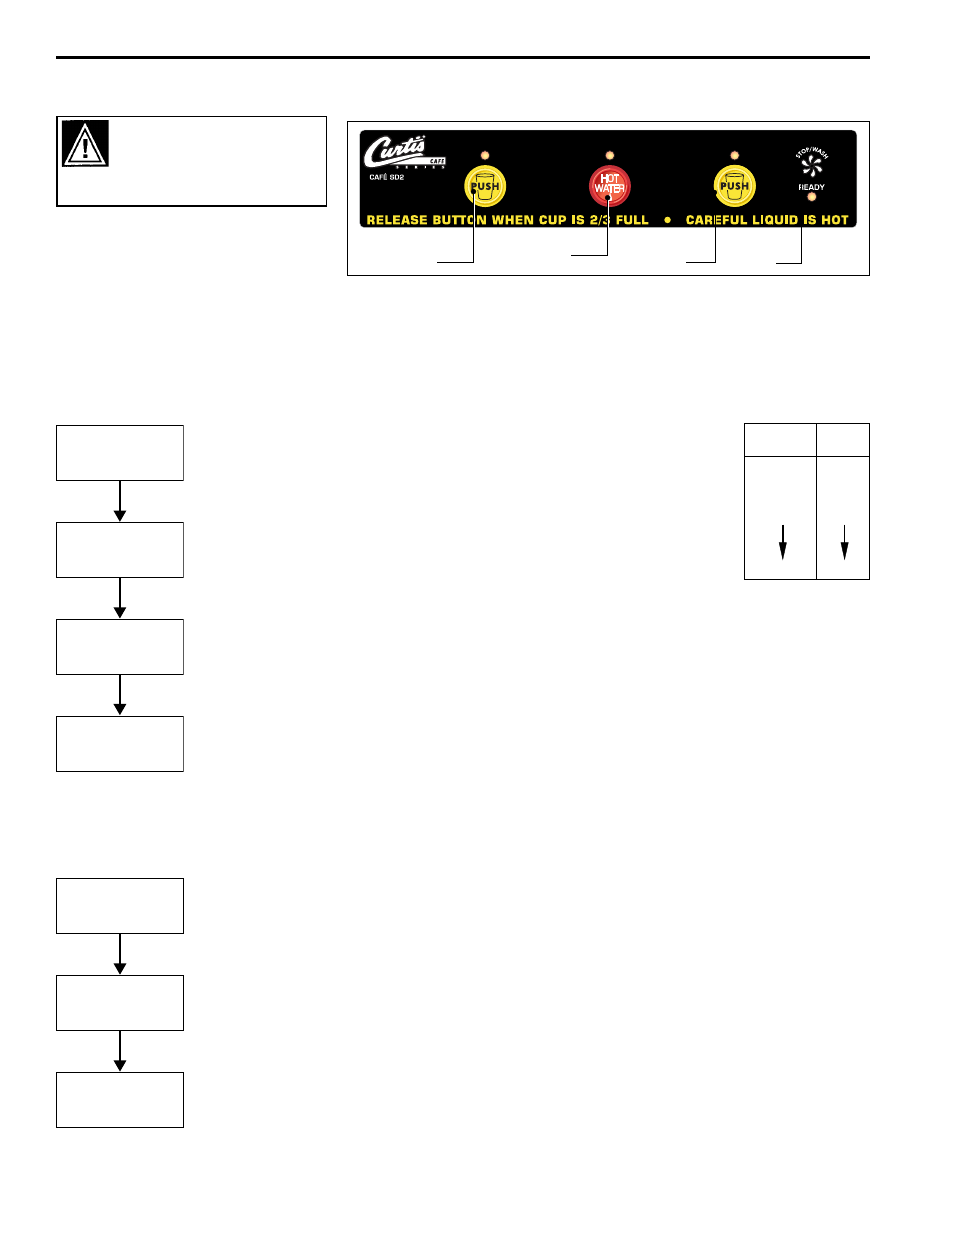
All programming is performed at the control
panel (illustration, right).
The Hot Water button is used for only for
dispensing hot water and does not require any
programming. Water is dispensed as long as the Hot Water button is held down.
The STOP/WASH BUTTON has several functions. This button is used to stop a Portion Control dispense cycle. It is used to wash out the
mixing and dispensing systems and it is used to enter programming functions.
COFFEE
DISPENSE
HOT WATER
DISPENSE
COFFEE
DISPENSE
STOP/WASH
BUTTON