Pg 10 front_top panel.pdf, Front/top panel descriptions and controls – VocoPro DA2277 User Manual
Page 12
10
DIGITAL KEY CONTROLLER
Digital Key Control Mixer with/Dual Rechargeable Wireless Mic System
POWER
Down
Vocal Partner Vocal Cancel A/V Source
Normal
Up
Music
0
0
0
0
5
10
10
0
-15
+15
0
-15
+15
0
10
0
10
9
Mic 4 Input
Mic 3 Input
Remote
Key Control
Delay
Mic Master Volume
Repeat
Bass
Treble
Digital Echo
Mic 4
Mic 3
Mic 1
(wireless)
Mic 2
(wireless)
Echo On
Echo On
Echo On
8
12
11
13
9
10
TOP VIEW OF DA-2277
14
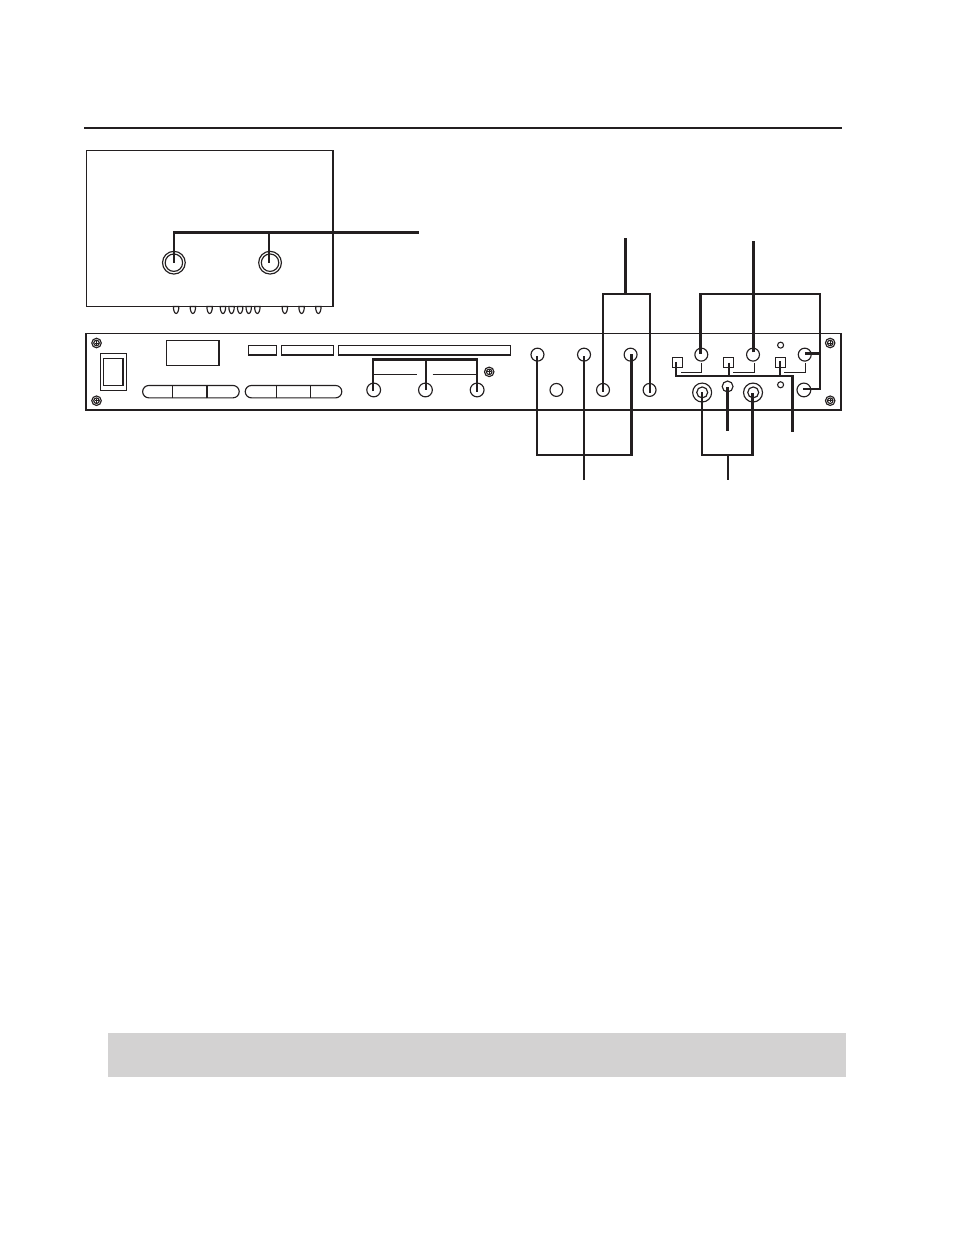
Front/Top Panel Descriptions and Controls
8. MIC BASS AND TREBLE controls
– These controls adjust the low and high frequency levels for all
microphone output. turn clockwise to increase and counter- clockwise to decrease.
9. DIGITAL ECHO, REPEAT AND DELAY controls
–The DIGITAL ECHO, REPEAT and DELAY controls
adjust the DA-2277’s processing of DIGITAL ECHO. The DIGITAL ECHO, DELAY and REPEAT knobs will
alter the levels of effects on all 3 Mic channels simultaneously. The DIGITAL ECHO knob controls the
overall echo applied to the 3 Mic channels, the DELAY knob controls the interval time between each echo
and the REPEAT knob controls the # of times the echo will repeat. For all 3 effects knobs, turn clockwise
to increase and counter- clockwise to decrease.
10. MIC 3 AND 4 jacks
- These 1⁄4 inch input jacks are for connecting microphones or instruments.
11. REMOTE KEY CONTROL jack
– This jack is for connecting the 1/8" plug found on a key controllable
microphone. After plugging the in the microphone, you can control the DIGITAL KEY CONTROLLER with
the key controls located on the microphone.
12. MIC 1, 2, 3 AND 4 LEVEL controls
–These knobs control the MIC CHANNELS output levels
individually. This makes it possible to adjust just one Mic channel without affecting the other 3 channels.
This can be useful when one person or (Mic channel) might be overpowering others in a duo or trio. Turn
clockwise to increase output levels, and counter-clockwise to decrease output levels.
13. DIGITAL ECHO ON/OFF button
– Microphone channels 1, 3 and 4 have one of these buttons.
By pressing it, you activate the DIGITAL ECHO for that channel. By depressing it, you remove the
DIGITAL ECHO from that channel.
NOTE:
Microphone channel 2 does not have an ECHO ON/OFF switch as that channel is used as a "dry"
(no echo) microphone channel.
14. MICROPHONE CHARGING terminals
– These terminals are for charging the microphones when they
are not in use. Place microphone in the terminal and twist it clockwise till it "clicks" into position.