Vehicle battery installation (and removal), Vehicle, Transmitter – Tyco 37512 User Manual
Page 3: Battery installation (and removal) transmitter, Special nitro dozer controls & driving modes, Estimated run time for this vehicle: 25 minutes, 25min, Right turn, Turbo 360° spin left, Turbo 360° spin right
GO BACK
GO BACK
ON
OFF
TM
VEHICLE
BATTERY INSTALLATION (and removal)
O P E N
006P
9V
Estimated run time for this vehicle: 25 minutes
Battery must be charged for 4 hours.
VEHICLE
1.
Turn vehicle over, with the rear wing facing toward you. Fold the FlexPak battery pack into an
“L” shape, as shown. Make sure the label marked “1” in the upper left-hand corner is facing
up, as shown, with the metal battery contacts as shown.
2.
Insert the battery pack into the battery compartment so that the lower portion of the battery
pack (with the label marked “2” in the upper left-hand corner) fits into the deep “well” por-
tion of the battery compartment, as shown. Make sure the top portion of the battery pack
(with the label marked “1” in the upper left-hand corner) is lying flat in the shallow portion of
the battery compartment. You may need to snap it into place.
3.
Rotate the battery compartment latch. The latch will force the battery pack to slide
toward the front of the vehicle until it locks into place.
4.
To remove the battery pack, rotate the battery compartment latch to release the battery pack.
Insert your finger into the slot at the front of the battery compartment (next to the on off
switch). Slide the battery pack back toward the rear of the battery compartment.
5.
Grasp the battery pack by its center “hinge” portion, reaching in from the sides at the two side
slots. Lift the battery pack completely out of the battery compartment.
Transmitter
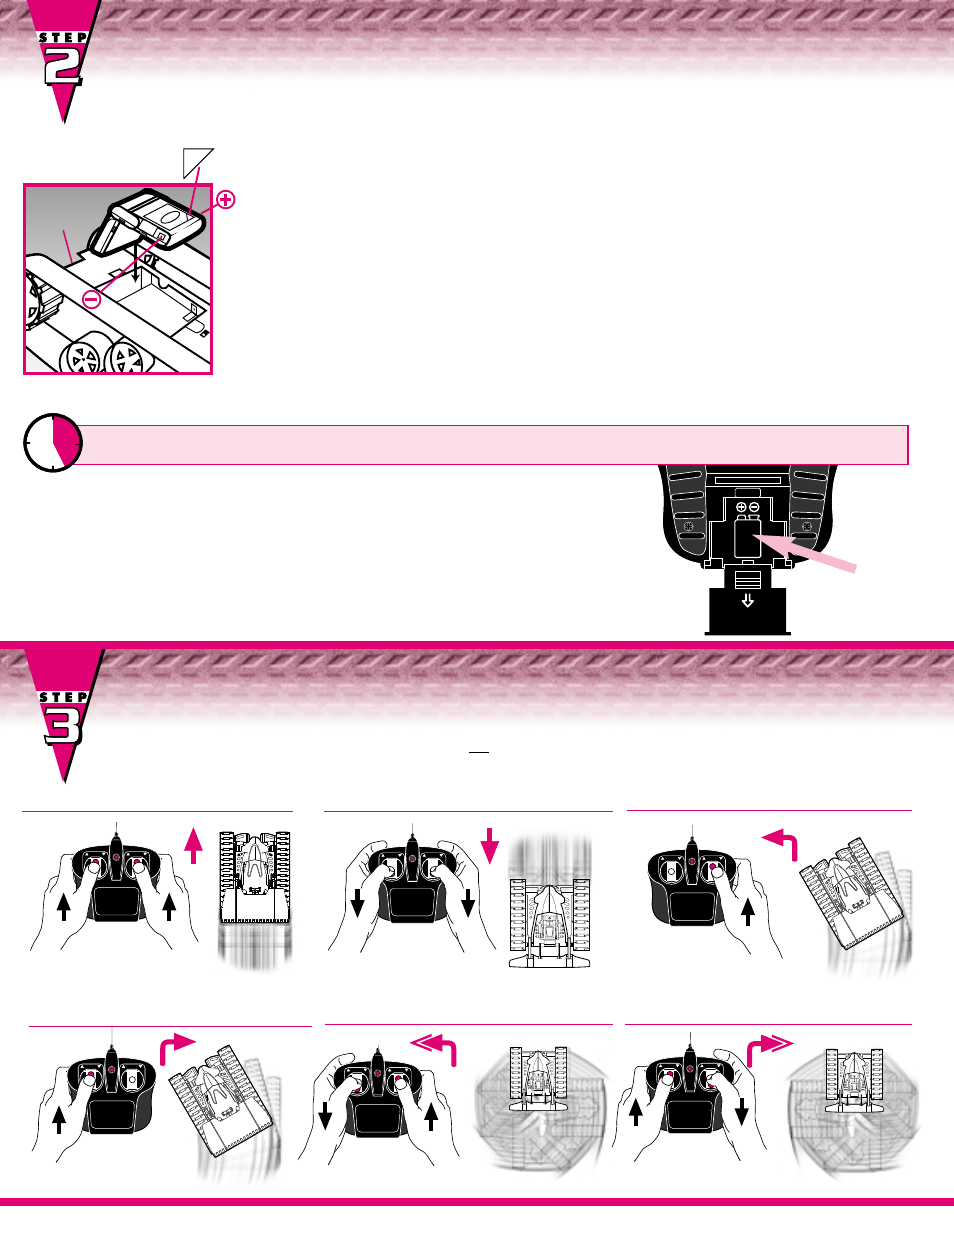
6.
Install one 9-volt battery with polarity (+/-) as shown inside battery compartment.
7.
The 9-volt transmitter battery will last much longer than the run time of the
TMH FlexPak rechargeable battery pack.
BATTERY INSTALLATION (and removal)
Transmitter
25min.
25min.
GO BACK
GO BACK
ON
OFF
TM
GO BACK
GO BACK
ON
OFF
TM
GO BACK
GO BACK
ON
OFF
TM
RIGHT TURN
GO BACK
GO BACK
ON
OFF
TM
TURBO 360° SPIN LEFT
GO BACK
GO BACK
ON
OFF
TM
TURBO 360° SPIN RIGHT
NOTE: Your Nitro Dozer can be “locked in” to flat-out Racer Mode OR barrier- blastin’ Dozer Mode!
Push the lockout buttons to lock your Nitro Dozer into either mode. Push the buttons again to release the locks for more wild transforming action!
The enclosed Stunt Guide will tell you what mode to “lock into” for maximum stunt performance!
LEFT TURN
1
1
REVERSE
FORWARD
Rear Wing
SPECIAL NITRO DOZER CONTROLS & DRIVING MODES
SPECIAL NITRO DOZER CONTROLS & DRIVING MODES
™