Removing the handles and doors – Tappan pmn User Manual
Page 11
1 1
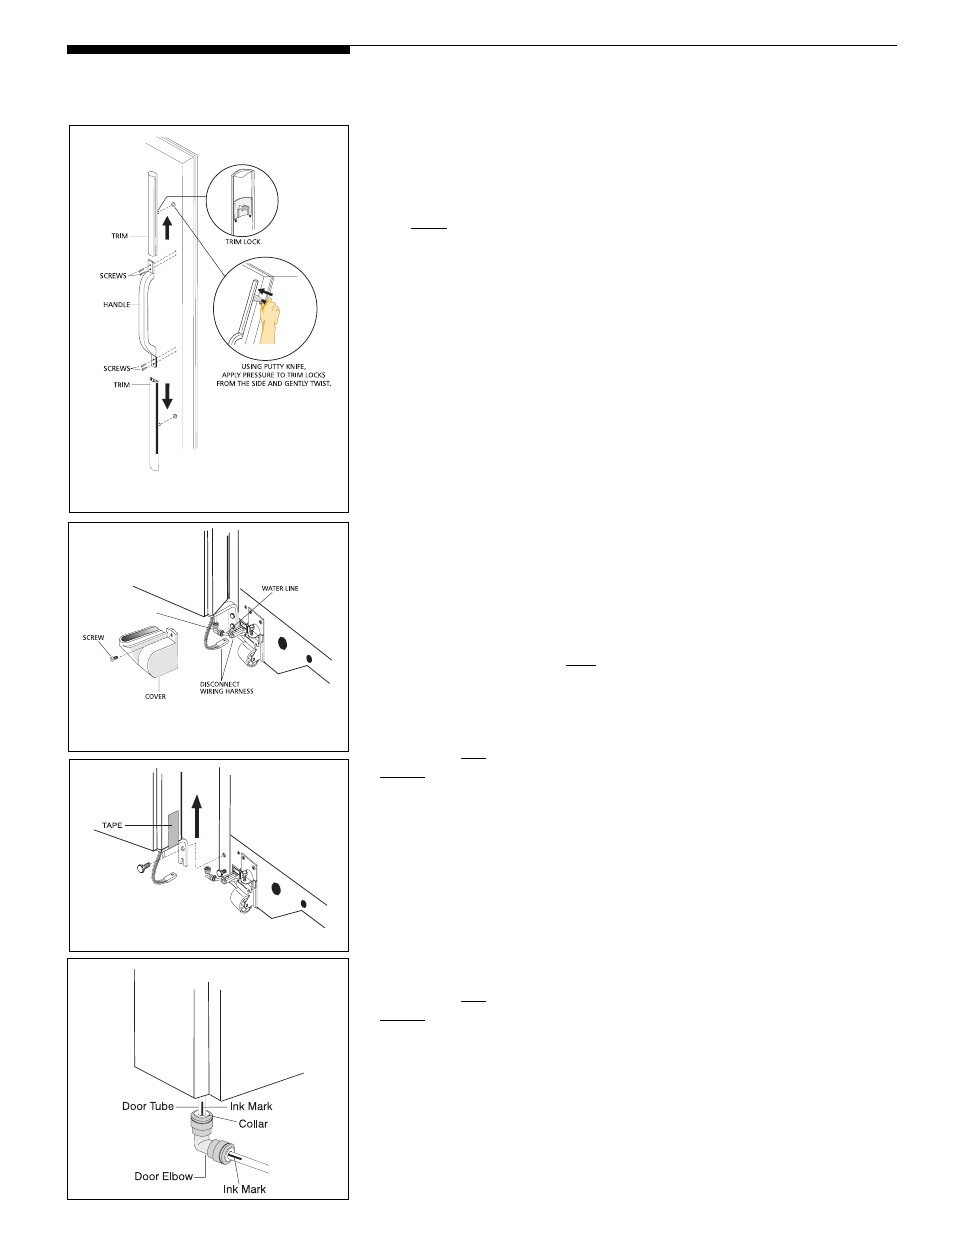
Removing the Handles
and Doors
If it is necessary to move the refrigerator through narrow doorways,
follow these steps to remove the handles and/or refrigerator and freezer
doors.
To Remove Handles
Full-length
Trim:
1. Using
a
putty
knife,
carefully
slide
the
corner
of
the
blade
under
the
trim.
Slide
blade
down
until
you
find
the
trim
lock.
Carefully
maneuver
the
blade
against
the
trim
lock
from
the
side
as
shown.
Note: Pressing down on the trim lock
from
above
will
not
release
it.
2. Carefully
push
the
putty
knife
firmly
against
the
trim
lock
and
twist
gently.
The
trim
lock
will
snap
free
from
the
door.
(Each
trim
piece
will
have
two
trim
locks.)
3. Grasp
trim
and
pull
up
away
from
handle
using
a
slight
side-to-side
motion.
4. Remove
screws
attaching
handle
to
door.
5. Repeat
these
steps
for
each
handle
end.
Keep
screws
and
trim
pieces.
6. To
replace
handles,
line
up
handle
with
screw
holes,
insert
screws
and
tighten.
Slide
upper
and
lower
trim
pieces
back
on
handle
ends,
and
snap
trim
locks
back
into
holes
on
door
front.
To Remove Doors
Before
removing
the
doors,
be
sure
the
freezer
control
is
turned
to
OFF.
Remove
all
food
from
the
doors
and
unplug
the
refrigerator.
Remove
the
toe
grill.
Trace
around
the
hinges
with
a
soft
lead
pencil.
This
will
make
it
easier
to
realign
the
doors
when
they
are
replaced.
Completely
remove
one
door
before
starting
removal
of
the
other.
Freezer
Door:
1. Remove
the
toe
grill.
(See
Outside
in
the
"Care
and
Cleaning"
section.)
2. Remove
the
wiring
cover
located
over
the
lower
hinge
of
the
freezer
door.
The
cover
is
held
in
place
by
a
single
screw.
(Figure
1)
3.
To
disconnect
wiring
harness
plug
(connector),
position
yourself
to
be
able
to
place
your
thumbs
on
the
flat
sides
of
each
connector
piece.
Bend
both
parts
back
and
forth.
Then
with
a
firm
grasp,
pull
the
two
pieces
apart
as
shown.
4. To
disconnect
water
line,
hold
water
line
elbow
and
push
in
on
gray
collar,
forcing
elbow
down,
off
from
tube
that
runs
into
door.
5. Place
a
strip
of
tape
along
the
door
bottom,
over
the
lower
hinge
and
up
the
side
of
the
door.
This
will
hold
the
hinge
in
place
when
the
door
is
removed.
6. Remove the top bolt of the lower hinge. Loosen, but DO NOT REMOVE, the
bottom
bolt
of
the
lower
hinge.
7. Remove
top
hinge
cover
by
lifting
back
of
cover
and
sliding
forward.
Remove
hinge
screws
from
hinge
bracket
with
a
counter-clockwise
motion.
Note:
Hinge
has
minimal
spring
tension.
Hold
bracket
when
removing
last
screw.
DO
NOT
remove
hinge
bracket
from
door.
8. Carefully
lift
the
door
up
and
off
the
loosened
lower
hinge
bolt.
(Figure
2)
Refrigerator
Door:
1. Remove
top
hinge
cover
by
lifting
back
of
cover
and
sliding
forward.
Remove
hinge
screws
from
hinge
bracket
with
a
counter-clockwise
motion.
Note:
Hinge
has
minimal
spring
tension.
Hold
bracket
when
removing
last
screw.
DO
NOT
remove
hinge
bracket
from
door.
2. Remove the top bolt of the lower hinge. Loosen, but DO NOT REMOVE, the
bottom
bolt
of
the
lower
hinge.
3. Carefully
lift
the
door
up
and
off
the
loosened
lower
hinge
bolt.
Store
the
doors
in
a
safe
place
until
the
refrigerator
is
moved
to
the
desired
location.
Keep
all
hardware
for
reinstallation.
To
Reinstall
Doors
To
reinstall
the
doors,
reverse
the
instructions
used
to
remove
the
doors.
Note:
To
reinstall
water
line,
push
elbow
up,
onto
door
tube,
until
collar
touches
tube
ink
mark
as
shown
left.
C05I0122
Removing
handles
and
trim
C05I0124
Figure
1
WATER LINE NUT
Figure 2