Preparation for use, Hint, Yes es – Sylvania 6260VF User Manual
Page 3
- 3 -
EN
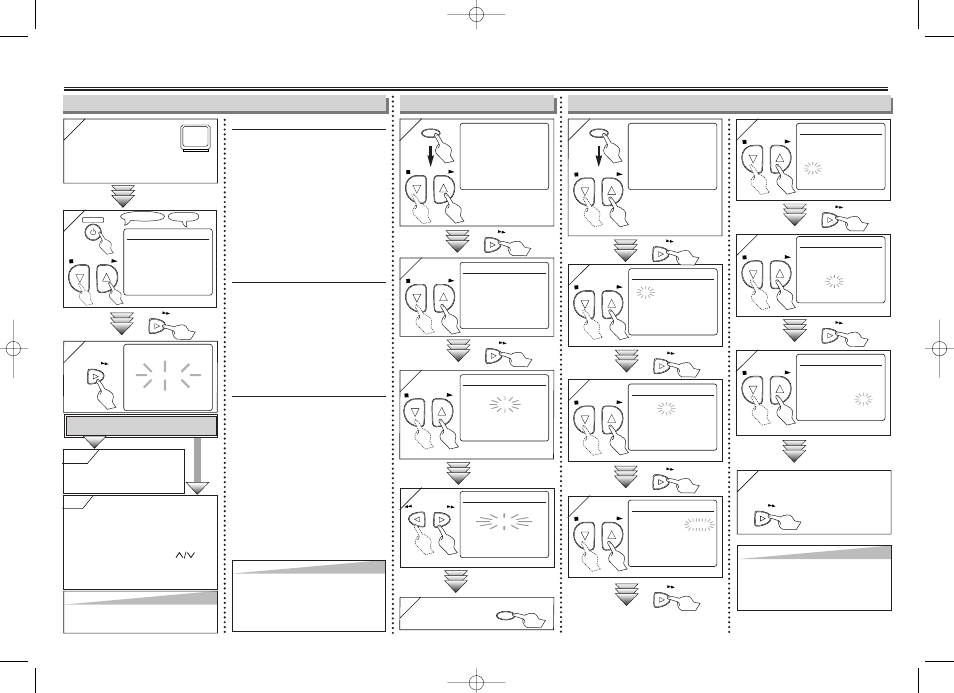
3. Preparation for Use
2
2
LANGUAGE SELECT
B
ENGLISH
[ON]
FRANCAIS
ESPAÑOL
Hint
Hint
• Repeat these steps only if either there
was a power failure or if this unit has been
unplugged for more than 30 seconds.
1
1
Turn on the TV and set
it to channel 3.
• If channel 3 is already occupied for broad-
casting, see “RF Output Channel” section.
POWER
STOP
PLAY
3
3
CH 01
AUTO SET UP
F.FWD
To Select a Channel
You can select a channel by using
the Number buttons on the remote
control.
Notes for using the Number but-
tons:
• When selecting cable channels which
are higher than 99, enter channel
numbers as a three-digit number (for
example: 117, hit [1], [1], [7]).
• You must precede single-digit
channel numbers with a zero (for
example: 02, 03, 04 and so on).
To Preset the Channel Again
1) Hit [MENU] until the main menu appears.
2) Select "CHANNEL SET UP" by pressing
[PLAY B
B
] or [STOP C
C
]. Then, hit
[F.FWD g
g
].
3) Select "AUTO SET UP" by pressing
[PLAY B
B
] or [STOP C
C
]. Then, hit
[F.FWD g
g
]. After scanning, the tuner stops
on the lowest memorized channel.
To Change the On-Screen Language
1) Hit [MENU] until the main menu appears.
2) Select "LANGUAGE SELECT" by pressing
[PLAY B
B
] or [STOP C
C
]. Then, hit
[F.FWD g
g
].
3) Select "ENGLISH", "FRANCAIS" or
"ESPAÑOL" by pressing [PLAY B
B
] or
[STOP C
C
]. Then, hit [C.RESET/EXIT].
1
1
- M E N U -
TIMER PROGRAMMING
AUTO REPEAT [OFF]
B
CHANNEL SET UP
CLOCK SET
LANGUAGE SELECT
AUDIO OUT
TV STEREO
[ON]
SAP
MENU
2
2
CHANNEL SET UP
AUTO SET UP
B
MANUAL SET UP
STOP
PLAY
3
3
MANUAL SET UP
CHANNEL 30
(CATV)
ADD
4
4
MANUAL SET UP
CHANNEL 30
(CATV)
DELETE
STOP
PLAY
F.FWD
F.FWD
STOP
PLAY
F.FWD
1
1
- M E N U -
TIMER PROGRAMMING
AUTO REPEAT [OFF]
CHANNEL SET UP
B
CLOCK SET
LANGUAGE SELECT
AUDIO OUT
TV STEREO
[ON]
SAP
MENU
2
2
CLOCK SET
MONTH DAY
YEAR
1 0 / – –
– – – –
HOUR MINUTE
AM/PM
– – : – –
– –
STOP
PLAY
STOP
PLAY
F.FWD
F.FWD
3
3
CLOCK SET
MONTH DAY
YEAR
1 0 / 0 3
– – – –
HOUR MINUTE
AM/PM
– – : – –
– –
STOP
PLAY
F.FWD
4
4
CLOCK SET
MONTH DAY
YEAR
1 0 / 0 3 2 0 0 5
HOUR MINUTE
AM/PM
– – : – –
– –
STOP
PLAY
F.FWD
5
5
CLOCK SET
MONTH DAY
YEAR
1 0 / 0 3 MON 2 0 0 5
HOUR MINUTE
AM/PM
0 5 : – –
– –
STOP
PLAY
F.FWD
6
6
CLOCK SET
MONTH DAY
YEAR
1 0 / 0 3 MON 2 0 0 5
HOUR MINUTE
AM/PM
0 5 : 4 0
– –
STOP
PLAY
F.FWD
7
7
CLOCK SET
MONTH DAY
YEAR
1 0 / 0 3 MON 2 0 0 5
HOUR MINUTE
AM/PM
0 5 : 4 0
P M AM
B
PM
STOP
PLAY
Hint
Hint
• To go back one step, hit [REW h
h
] (during
steps 2 to 7).
• Your clock setting will be lost if either there
is a power failure or if this unit has been
unplugged for more than 30 seconds.
REW
F.FWD
No
No
Please wait for a few minutes.
After scanning...
• The tuner stops on the lowest memorized
channel.
• You can select only the channels memorized
in the unit by using [CHANNEL ].
• If "AUTO SET UP" appears on the TV screen
again, check the cable connections. Then, hit
[F.FWD g
g
] once again.
Hint
Hint
• If you accidentally select Spanish or French
and need English: Hit [MENU] and choose
SELEC. IDIOMA, or SELECTION LANGUE.
Hit [F.FWD g
g
] and select ENGLISH.
Finally, hit [C.RESET/EXIT].
Select “ADD” or “DELETE”.
Select the channel to be
added or deleted.
5
5
To exit the
menu.
C.RESET
EXIT
Select the current month.
Select the current day.
Select the current year.
Select “AM” or “PM”.
8
8
To exit the CLOCK SET
screen
Select the current hour.
Select the current minute.
Y
Y
es
es
Hit [MENU] to
exit
• Refer to “Hint for Cable Box or
Satellite Box” section on page 1.
No
Clock Set Up
To Add/Delete Channels
Turn on the Unit for the First Time
TV Screen
Remote Control
F.FWD
• If the clock is not set, the
CLOCK SET screen
appears when you press
[MENU]. In this case, go
to step 2).
or
or
or
or
or
or
or
or
or
or
or
or
Do you connect the cable from the cable box
or the satellite box to the VCR’s ANT-IN jack?
Yes
HJ411UD.QX33 05.3.8 13:09 Page 3