Id b – Radio Shack 43-3903 User Manual
Page 2
2
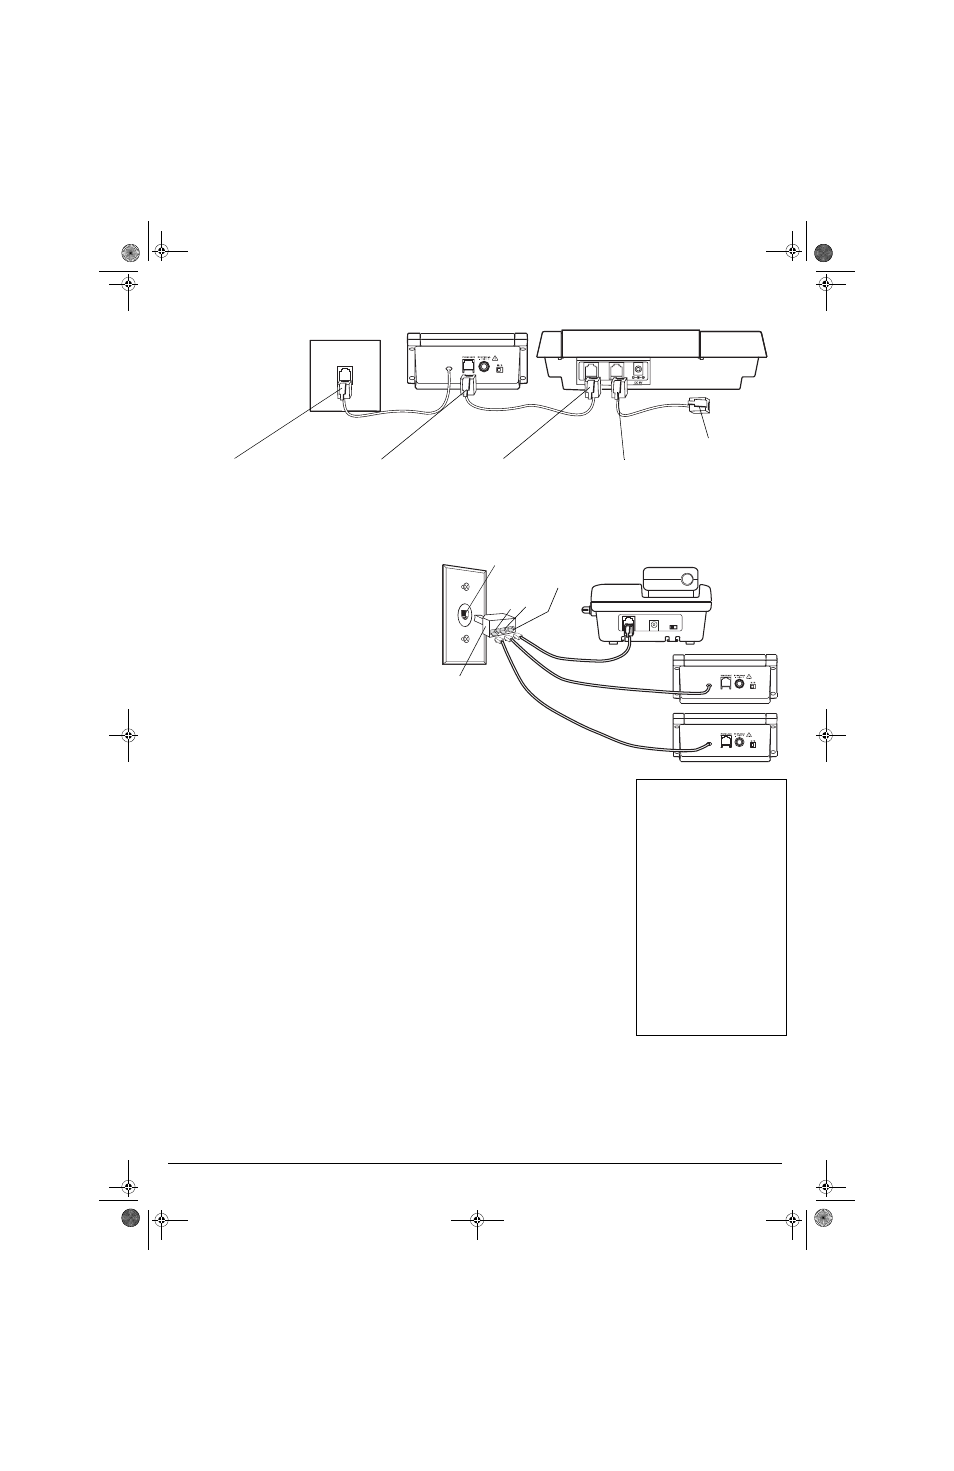
Connecting to a Two-Line Phone
To record information about calls received on a two-line
phone, you can connect two Caller ID boxes using a triplex
adapter (not supplied, available at RadioShack). Each
Caller ID box only records information about calls received
on the line to which it is connected.
Your modular phone wall jack must be an RJ14 jack wired
for two phone lines.
1. Disconnect the telephone line cord from the modular
phone wall jack, and plug it into the
L1 + L2
jack on the
triplex adapter.
2. Plug the triplex adapter into the modular phone wall
jack.
3. Plug the pre-wired telephone line cord from your Caller
ID box into either
L1
or
L2
on the triplex adapter.
4. Repeat Step 3 to connect another Caller ID box to the
other available jack (
L1
or
L2
) on the triplex adapter.
Connecting to an Answering Machine
M
OUNTING
T
HE
C
ALLER
ID B
OX
You can set the Caller ID box flat on a desk, shelf or
table by itself or with the supplied mounting bracket,
or use the mounting bracket to mount the Caller ID
box on a wall.
You need two screws (not supplied) with heads
larger than the keyhole slots in the mounting
bracket.
1. Using the keyholes in the bracket as a template,
mark the mounting screw locations on the wall.
2. Drill a hole in the wall at each marked location.
3. Thread the screws into the holes, letting the
heads extend about
1
/
8
inch (3mm) from the
mounting surface.
4. Attach the mounting bracket to the Caller ID
box.
5. Align the keyhole slots on the mounting bracket
with the screws and slide the Caller ID box
down until it is secure.
6. Lift the Caller ID box’s screen to adjust it to the
desired angle.
Be sure to set your
answering machine to
answer after two or
more rings, so the
Caller ID box has time
to record the call
information.
1. Plug one end of a third
telephone line cord into the
answering machine’s phone
jack and the other end into the
phone’s modular jack.
1. Plug the line cord’s
other end into the
answering machine’s
line jack.
1. Plug one end of
another modular
cord (not supplied)
into PHONE JACK.
1. Plug the Caller ID box’s pre-
wired telephone line cord
into the modular wall jack.
To Telephone
L1 + L2
L1
L2
Modular Phone Wall Jack
Triplex
Adapter
S
ETTING
U
P
T
HE
C
ALLER
ID B
OX
1. With the time displayed, hold down
REVIEW
and
simultaneously until
ENTER
LANGUAGE
and then
ENG
ESP
FRA
appear.
ENG
flashes.
2. Press
REVIEW
or
to select the desired
language. Press
DELETE
to confirm.
LCD
CONTRAST
and
1 2 3 4 5
appear, and
3
flashes.
3. Press
REVIEW
or
to select the
contrast level (from 1 – 5). Press
DELETE
to
confirm.
ENTER AREA CODE
, and
_ _ _
appears,
and the first
_
flashes.
4. Press
REVIEW
or
to select the area
code. Press
DELETE
to confirm the selection.
5. Repeat Step 4 to set the second and third
digit.
Ô
6.
M/S
(master/secondary) on the back of the
Caller ID box lets you connect up to four
Caller ID boxes to the same phone line, so
you can receive Caller ID information on
more than one phone on that line.
Ô
If you are installing one Caller ID box, set
M/S
to
M
. If you are installing more than one
Caller ID box, set
M/S
on one Caller ID box to
M
then set
M/S
to
S
on the other Caller ID
boxes.
Ô
NOTE
Ô
• If no keys are pressed for 20
seconds, the Caller ID box exits
setup.
• If you install more than one Caller
ID box on the same phone line
and do not set M/S on at least
one Caller ID box to M, incoming
calls might be disconnected.
• You can also connect other Caller
ID modules that do not have the
Call Waiting function to the same
phone line as your Caller ID box,
as long as you do not connect
more than four modules at the
same time (including this Caller
ID box).
• If you connect another type of
CID module (other than this Caller
ID box) that has Call Waiting to
the same phone line, the CID
Waiting signal might be garbled or
not received.
43-3903.fm Page 2 Wednesday, January 8, 2003 9:49 AM