Step 6: connect to your audio/video system, Step 3: unfold the antenna’s elements, Step 4: attach antenna to the mast – Radio Shack VU-190XR User Manual
Page 2: Step 5: route cable to your audio/video system
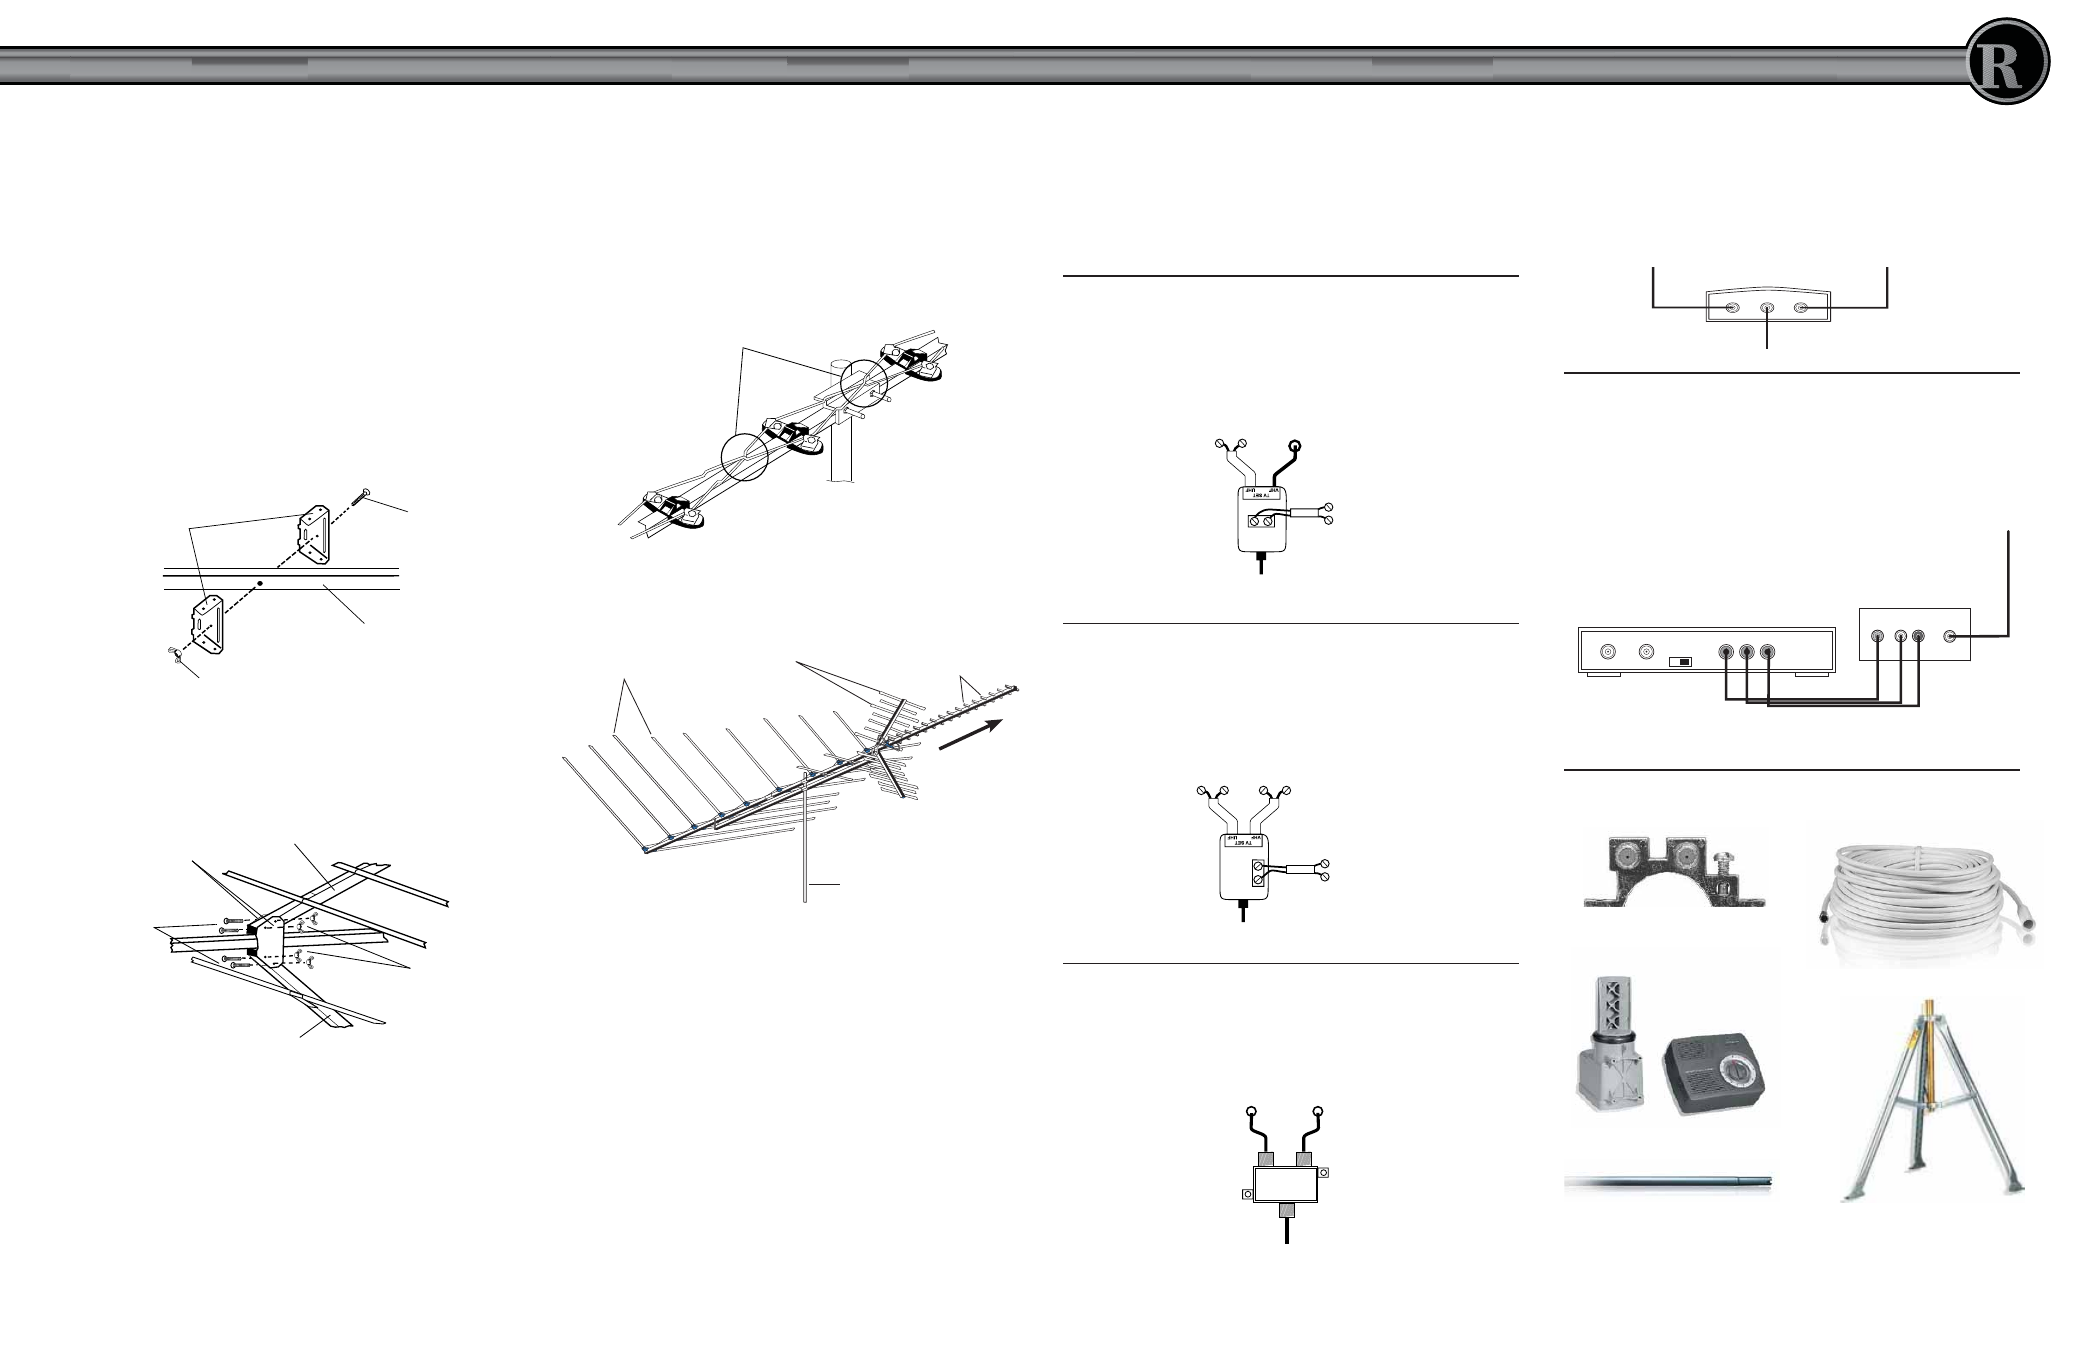
Step 6: Connect to your Audio/Video System
Connect the antenna’s coaxial cable to your audio/video
system’s antenna terminals according to the type of
connections you have.
RadioShack carries a variety of
splitters and other accessories; choose one that best suits
your needs. Below are some sample connections.
If you have:
• Twin-lead UHF terminals
• Coaxial VHF terminal
• Twin-lead FM antenna terminals
Use a RadioShack Splitter with 75-Ohm Input
To FM Receiver
From Antenna
UHF 300 Ohm
VHF 75 Ohm
If you have:
• Twin-lead UHF terminals
• Twin-lead VHF terminals
• Twin-lead FM antenna terminals
Use a RadioShack Transformer/Splitter
To FM Receiver
From Antenna
UHF 300 Ohm
VHF 300 Ohm
If you have:
• Combined coaxial VHF/UHF terminal
• Coaxial FM antenna terminal
Use a RadioShack VHF/UHF Splitter/Combiner
From Antenna
TV VHF/UHF
To FM Receiver
If you want to:
• Use the antenna in combination with a cable or satellite
set-top-box, and
• Your TV has a coaxial (antenna in) terminal.
Use a RadioShack High Isolation A/B Switch.
A IN
TV OUT
B IN
From Antenna
From set-top-box
To TV
If you want to:
• Use the antenna in combination with a cable or satellite
set-top-box, and
• Your TV has both a coaxial (antenna in) terminal and A/V
terminals (usually red/yellow/white).
Use a RadioShack Gold A/V cable.
CABLE/ANT. IN
AUDIO IN
VIDEO IN
RIGHT
LEFT
ANTENNA IN
TV OUT
VIDEO
L
R
CH3 CH4
Set-top-box
TV
From Antenna
A/V Cable
RadioShack also carries these and many other antenna
mounting accessories:
Grounding Block
Tripod Mount
Antenna Mast
Antenna Rotator
Outdoor Coaxial Cable
Step 3: Unfold the Antenna’s Elements
1.
Hold the main boom’s elements near the pivot points
and pull them away from the boom until they snap into
the self locking plastic support insulators.
Caution: To avoid damage to the elements, do not pull
them near their outer ends. Once the elements are locked
into position, do not attempt to unlock them. Doing so
might break the self-locking tabs.
2.
Hold each wing boom and turn its elements until they
snap squarely into place perpendicular to the boom.
3.
Press the supplied small end plugs into the wing booms.
4.
Bolt the triangular wing boom brackets onto the main
boom using the supplied 1½-inch screw and small wing
nut, as shown.
5.
Insert the top and bottom wing booms into the wing
boom brackets. Secure them with the four supplied 1¼-
inch screws and small wing nuts, as shown.
Step 4: Attach Antenna to the Mast
We recommend that you enlist the help of another person
before you put up the mast or attach your antenna to
it. How you set up your mast depends on your specific
installation. Refer to the separate Consumer Product
Safety Commission information sheet for recommended
methods.
1.
Slide the antenna’s mast clamp assemblies over the end
of the mast.
2.
Tighten the mast clamp assemblies’ lock nuts to hold
the antenna in place. Do not overtighten the lock nuts.
Caution:
The crossover wires must not touch the antenna
boom, the mast, or each other. If necessary, carefully bend
the crossover wires to provide at least ½-inch of clearance
between parts.
3.
Set up the mast, then rotate it so the antenna’s shorter
elements point toward the broadcast antennas of the
stations you want to receive.
Step 5: Route Cable to Your Audio/Video System
• Use plastic tape or mast standoff insulators to secure
the coaxial cable to the mast at about 3-foot intervals.
Continue down the roof and the side of the house using
roof and wall standoff insulators.
• Use coaxial cable nail-in clips every few feet to secure
the cable between the mast and where the cable enters
the house.
• Use a 75-ohm grounding block at the point where the
coaxial cable enters the house. Read the Consumer
Product Safety Commission information sheet for
grounding instructions.
• Use a wall-through lead-in tube (not supplied) to neatly
route the coaxial cable through walls.
• Loosely bend the cable to form a drip loop before the
cable enters the house.
1½-Inch
Screws
Main Boom
Small Wing Nut
Wing Boom
Brackets
Wing Boom Brackets
Top Wing Boom
Small Wing
Nuts
Bottom Wing Boom
1¼-Inch
Screws
Crossover Wires
Mast
Wing Boom
Elements
Main Boom
Short Elements
Main Boom
Long Elements
Toward
TV Station
Antennas