Commandcenter – Raritan Computer CC-NOC User Manual
Page 2
CommandCenter
®
NOC
IV. Licensing for CC-NOC 100/250/2500N
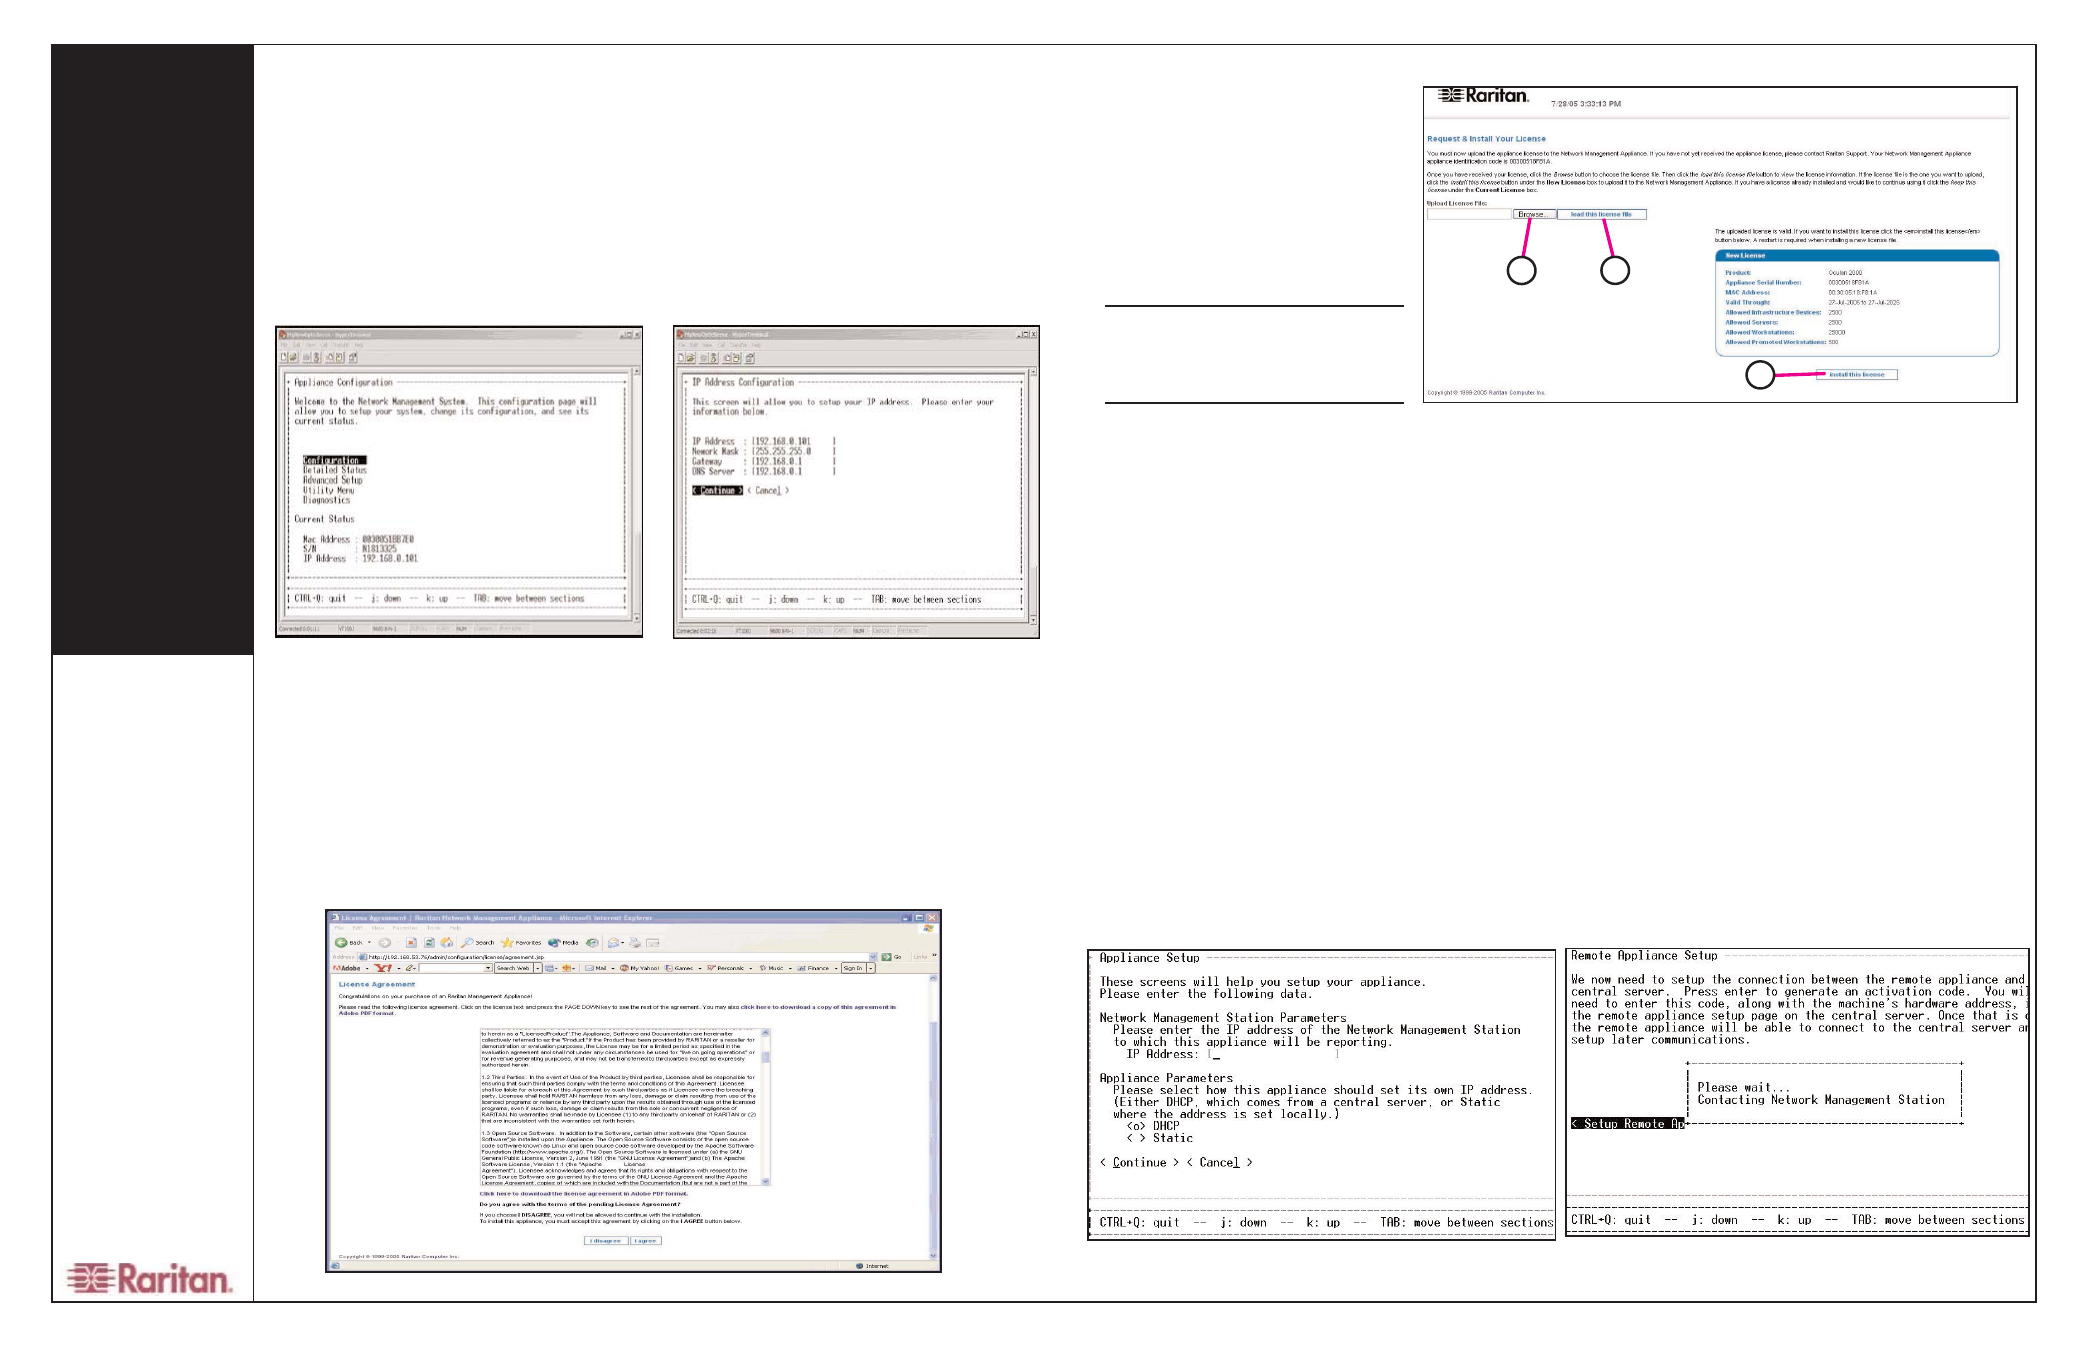
Each CC-NOC unit requires a device-specific license to operate. Your Raritan Regional Channel Manager will pro-
vide you with a license file. If you do not have a license, contact Raritan Support. Be sure to have your appliance
serial number (see Section II. Physical Installation) and the appliance identification code as shown in Figure 4.
IV. Licensing for CC-NOC 100/250/2500N (cont)
1. Type the URL
http://
where CommandCenter_NOC_IP is the
TCP/IP address you used in Section
III. Network Configuration.
2. The License Agreement page
appears (see Figure 3). Read the
agreement and click I Agree to con-
tinue.
3. The license installation screen
appears (Figure 4).
4. To upload the license file, click Browse
and navigate to the license file provided by
Raritan.
5. Once you have linked to the file, click load
this license file. If your current license is
invalid or expired, you must provide a new
file.
6. If the license file is correct, click install
this license under the New License infor-
mation box.
Note: If a license is already installed and you
want to continue using it, an information box
labeled Current License appears (in place
of New Licence, shown here). Click keep
this license below the information box.
V. Network Configuration and Licensing for CC-NOC 2500M and CC-NOC 2500S
In a distributed environment, a CC-NOC 2500M and CC-NOC 2500S (remote appliances) report to a CC-NOC 2500N (central server). You
must configure the IP address of the CC-NOC 2500N on the remote appliance, configure a static IP address, generate an activation code
on the remote appliance, upload a license for the remote appliance, and enter the activation code on the CC-NOC 2500N. If you do not
have a license, contact Raritan Support. Be sure to have your appliance serial number (see Section II. Physical Installation).
III. Network Configuration for CC-NOC 100/250/2500N
Network Settings
1. Connect one end of the null-modem cable
(provided) to the serial port and the other
end to a serial port on a system with a ter-
minal emulation program, such as Hyper
Terminal, Tera Term, Minicom, etc.
2. Configure the terminal emulation program
settings as follows:
- Mode: VT11
- Connection Speed: 9600 Baud
- Data Bits: 8
- Parity: none
- Stop bits: 1
- Flow Control: none
3. In the terminal emulation program, press
the Enter key on your keyboard a few times
to activate the login prompt.
4. Type config (all lower case) to login and
press Enter. A password is not required.
5. Click Configuration and type the IP
address of the CC-NOC 2500N.
6. Click Static to configure network settings
for the remote appliance (see Figure 5).
7. Type the TCP/IP address, network mask,
default gateway, and DNS server settings
for the remote appliance.
8. Verify network settings by clicking Done
and then clicking Commit Changes.
9. Click OK to set up and establish the con-
nection between the CC-NOC 2500N and
the remote appliance.
Connect to CC NOC 2500N
1. Click Remote Appliance and press the
Enter key to generate an activation code.
2. Record the activation code, log into the
2500N, and type the URL
http://
CommandCenter_NOC_IP is the TCP/IP
address you specified in Section III.
Network Configuration.
3. Type your username and password
(default: admin, admin).
4. In the home page, click on the Admin tab
and then click Upload Appliance
Licenses.
5. Click load new appliance license.
6. Clicking Browse and navigate to the
licens file.
7. Click load this license.
8. Click new activation code and type the
code that you recorded in step 2 of this sec-
tion. Click OK.
9. Toggle to the serial connection screen
(see Figure 6) and press Enter to finish.
10. Click Reboot Now to reboot the remote
appliance.
11. Exit the serial configuration and discon-
nect the null-modem cable. Wait approxi-
mately five minutes for the remote appliance
to initialize.
1. Connect one end of the null-
modem cable (provided) to the seri-
al configuration port and the other
end to a serial port on a system with
a terminal emulation program, such
as Hyper Terminal, Tera Term,
Minicom, etc.
2. Configure the terminal emulation
program settings as follows:
- Mode: VT11
- Connection Speed: 9600 Baud
- Data Bits: 8
- Parity: none
- Stop bits: 1
- Flow Control: none
3. In the terminal emulation pro-
gram, press the Enter key several
times to display the login prompt.
4. Type config (case-sensitive) to
login. A password is not required.
5. Click Configuration to administer
network settings including TCP/IP
address, network mask, default
gateway, and DNS server (see
Figure 1).
6. Provide appropriate values for the
fields indicated (see Figure 2), then
click Continue, Done, and OK to
save and exit the serial configura-
tion.
Figure 1
Figure 2
Figure 3
Figure 4
Figure 5
Figure 6
5
4
6