Mixer features – Numark Industries CM-100 User Manual
Page 8
CM100
- The Leader in DJ Technology
©1999
Industries
- 8 -
http://www.numark.com
MIXER FEATURES
1
2
3
4
5
6
7
8
10
9
13
11
12
14
15
17
16
18
19
20
21
22
23
24
25
26
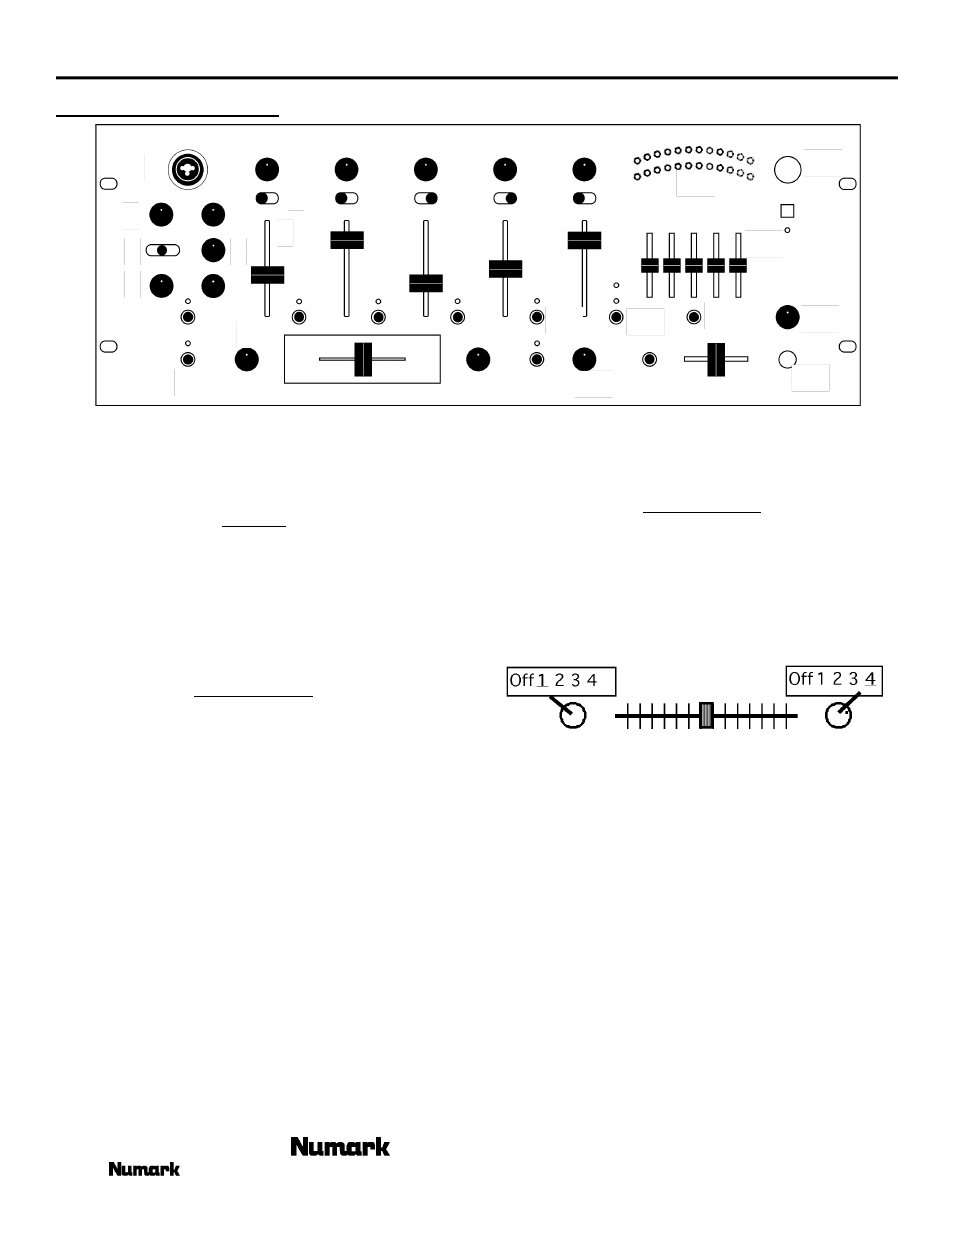
We have divided this section into various functional
blocks: Inputs, Microphone, Crossfader, Equalizer, Outputs,
and Headphone Cueing. It is important to learn how each of
these work.
INPUTS
1. Input faders - control individual source levels in the
mix.
2. Input Toggle Switches - select which source will be
live to that channel based on what you have connected to
the rear panel input section.
3. Pre-fader Gain Controls – adjust the pre-fader
volume for cleaner sound.
MICROPHONE
4. Mic Gain Controls – The DJ Mic Fader controls
the D J M i c volume for the Neutrik™ “Combo”
connector. The Mic 2 Fader controls the M i c volume
for the 1/4” connector on the rear of the mixer.
5. Mic Talkover/On/Auto-Talkover Switch –
controls DJ Mic only. Mic 2 activation is controlled only
through the Mic 2 level fader.
Talkover turns down the input level of your music
sources from Channels 1-4.
Auto-Talkover automatically reduces the input level of
Channels 1-4. This works with the talk-over
s e n s i t i v i t y adjustment. Talkover is very useful for
making announcements without adjusting any levels.
6. Talkover sensitivity adjust – determines the point
in which auto-talkover activates. The more sensitive the
adjustment, the quieter you need to speak into your
microphone to activate auto-talkover.
7. Treble and Bass Controls – for fine-tuning the tone
of your voice on both mics through the sound system.
The controls are detented for setting tone "flat". For best
results, use a dynamic cardioid microphone.
8. Neutrik™ “Combo” connector - allows connection
of either a 1/4” jack or an XLR jack. This is ideal for
connecting an XLR gooseneck directly into the mixer.
C R O S S F A D E R
9. Crossfader Assign Knob - determines which input
channel will be heard when the crossfader is moved
towards the knob.
N o t e : All channels not assigned will remain active.
10. Replaceable Crossfader - achieves clean segues
between the two input channels selected by the Crossfader
Assign.
In this example "Hard left" selects Channel 1 and "Hard
right" selects Channel 4. With the crossfader centered,
both assigned channels are live. Use the crossfader for fast
and seamless segues from one selected channel to the
other.
N o t e : The crossfader is user replaceable in case of failure.
Simply unscrew the two large screws that hold it in place,
lift it out and disconnect its cable. Re-attach the new
crossfader and screw the mounting plate back onto the unit
- you’re back in business!
11. Fader Start – activates the crossfader to send play and
cue commands to your auto-start Numark CD player or
other popular brand. For fader start, attach your mixer to a
remote start CD player using industry standard
1/8”(3.5mm) cables. When you move the crossfader
toward the active channel, the attached CD player will
start. When it is moved away, that side will cue (similar
to pressing the cue button).