NEC PX-60XM5A User Manual
Page 35
En-34
VIDEO WALL POSITION
Set the position of each display.
Example: Setting “4”
On “VIDEO WALL” menu, select “POSITION”, then press
the MENU/ENTER button.
The “VIDEO WALL POSITION” screen appears.
Select “4” of “POSITION NO.”.
ADJ.
RETURN
V I D E O WA L L P O S I T I O N
P O S I T I O N N O . 4
EXIT
NO. 1
NO. 2
NO. 4
NO. 3
NO. 7
NO. 8
NO. 9
NO. 10
NO. 11
NO. 12
NO. 13
NO. 14
NO. 15
AUTO ID
This feature automatically sets the ID numbers of multiple
displays connected to each other.
Example: Setting “ON”
Set the ID number for the No. 1 display on ID NUMBER
menu.
On “AUTO ID” of “VIDEO WALL” menu, select “ON”,
then press the MENU/ENTER button.
W I R E D C A B L E
C O N N E C T I O N T U R N
ADJ.
RETURN
A U TO I D
A U TO I D
: O N
EXIT
1
2
8
9
3
4
6
5
7
1
2
4
3
DISP. MODE
Select the screen mode between two choices (Splitting,
Blanking).
Example: Setting “BLANK”
On “DISP. MODE” of “VIDEO WALL” menu, select
“BLANK”.
SEL.
ADJ.
RETURN
V I D E O WA L L
D I V I D E R
P O S I T I O N
D I S P. M O D E
AU TO I D
I M AG E A D J U S T
P. O N D E L AY
P L E L I N K
: 1
: B L A N K
: O F F
: O F F
: O F F
EXIT
Information
Ⅵ DISP. MODE settings
SPLIT: Combines enlarged screens and creates
multiple screens.
BLANK: Corrects misalignment of combined screen
portions and creates multiple screens.
NO. 16
NO. 17
NO. 18
NO. 19
NO. 20
NO. 21
NO. 22
NO. 23
NO. 24
NO. 25
NO. 26
NO. 27
NO. 28
NO. 29
NO. 30
NO. 31
NO. 32 NO. 33 NO. 34 NO. 35 NO. 36
NO. 37 NO. 38 NO. 39 NO. 40 NO. 41
NO. 42 NO. 43 NO. 44 NO. 45 NO.46
NO. 47 NO. 48 NO. 49 NO. 50 NO. 51
NO. 52 NO. 53 NO. 54 NO. 55 NO. 56
DIVIDER
Set the video wall.
Example: Setting “2
ן2”
On “DIVIDER” of “VIDEO WALL” menu, select “2
ן2”.
SEL.
ADJ.
RETURN
V I D E O WA L L
D I V I D E R
P O S I T I O N
D I S P. M O D E
AU TO I D
I M AG E A D J U S T
P. O N D E L AY
P L E L I N K
: 2
ן2
: S P L I T
: O F F
: O F F
: O F F
EXIT
Information
Ⅵ DIVIDER settings
OFF, 1: 1 Screen (Matrix display function does not work)
2
ן2: 4 Screens
3
ן3: 9 Screens
4
ן4: 16 Screens
5
ן5: 25 Screens
5
ן1: 5 Screens horizontally
1
ן5: 5 Screens vertically
* When you select 2
Ч2, 3Ч3, 4Ч4, 5Ч5, 5Ч1, 1Ч5, set the
VIDEO WALL POSITION.
Video Wall setting
Use this feature to configure a (2
ן2, 3ן3, 4ן4, 5ן5,
5
ן1, 1ן5) video wall.
On “OPTION3” menu, select “VIDEO WALL”, then press
the MENU/ENTER button.
The “VIDEO WALL” screen appears.
SEL.
ADJ.
RETURN
V I D E O WA L L
D I V I D E R
P O S I T I O N
D I S P. M O D E
AU TO I D
I M AG E A D J U S T
P. O N D E L AY
P L E L I N K
: O F F
: S P L I T
: O F F
: O F F
: O F F
EXIT
Note: A contingency method of shutting off the electric
power should be used in cases of emergency during video
wall setup.
Information
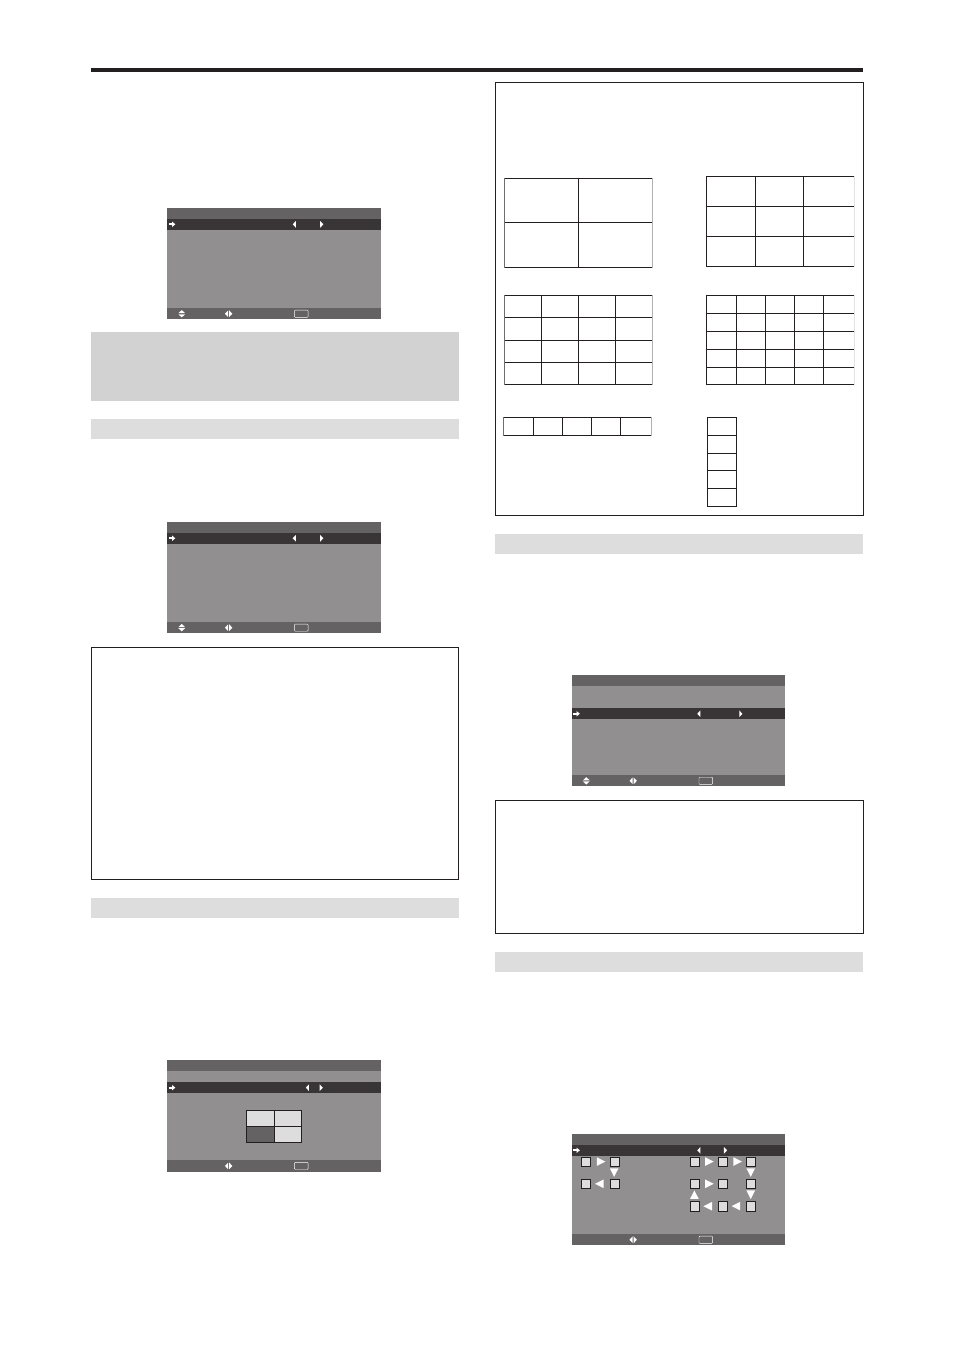
Ⅵ VIDEO WALL POSITION settings
1 Screen: There is no need to set POSITION.
2
ן2 Screens
3
ן3 Screens
4
ן4 Screens
5
ן5 Screens
5
ן1 Screens
1
ן5 Screens
NO. 1
NO. 2
NO. 3
NO. 4
NO. 5
NO. 1
NO. 2
NO. 3
NO. 4
NO. 5