Various operations, Use the digit buttons to select disc, Disc (–/+) 6 mode clear – Pioneer PD-F19PD-F17 User Manual
Page 12: 3mode clear digit buttons disc set disc (–/+), Erasing all the discs from the each custom file, Checking the numbers of the stored discs, Reference file–type cd player, D/a converter phones level
12
(
=
)
MODE
HI-LITE
CLEAR
PROGRAM
DISC
FILE–TYPE
COMPACT DISC PLAYER
Î
SINGLE LOADER
STANDBY / ON
STANDBY
RDM
CUSTOM
ALL
BEST
CD TEXT
SCAN
DISC
REPEAT
REMAIN
PGM
1
PREVIOUS
SINGLE
TRACK
MIN
SEC
DISC
'
ACSESS
PLAY
DISPLAY
TITLE
UNLOAD
OPEN/
CLOSE
BEST
PREVIOUS
INPUT
6
7
¡ ¢
4 1
◊Û¿X
,7
Hi-bit Legato Link Conversion
REFERENCE FILE–TYPE CD PLAYER
PULSEFLOW
D/A CONVERTER
PHONES
LEVEL
MODE
3
1
2
3
MODE
7
8
3
RANDOM
DISC
SET
TRACK
SET
TIME/
CHARA
HI-LITE
BEST
PREVIOUS
MODE
CLEAR
PGM
REPEAT
Î
FILE-TYPE CD PLAYER
REMOTE CONTROL UNIT
TITLE
DISPLAY
TITLE
INPUT
1
¡
4
¢
CURSOR
<
>
PQRS
7
TUV
8
MARK
0
WXYZ
9
GHI
4
JKL
5
MNO
6
1
ABC
2
DEF
3
DISC
–
+
VARIOUS OPERATIONS
This unit lets you program up to 100 of your favorite discs. For
example, you can store all the discs of your favorite artist, or some
other group of personal selections, and play only those discs.
You can even add other discs to the custom later on.
Operation example:
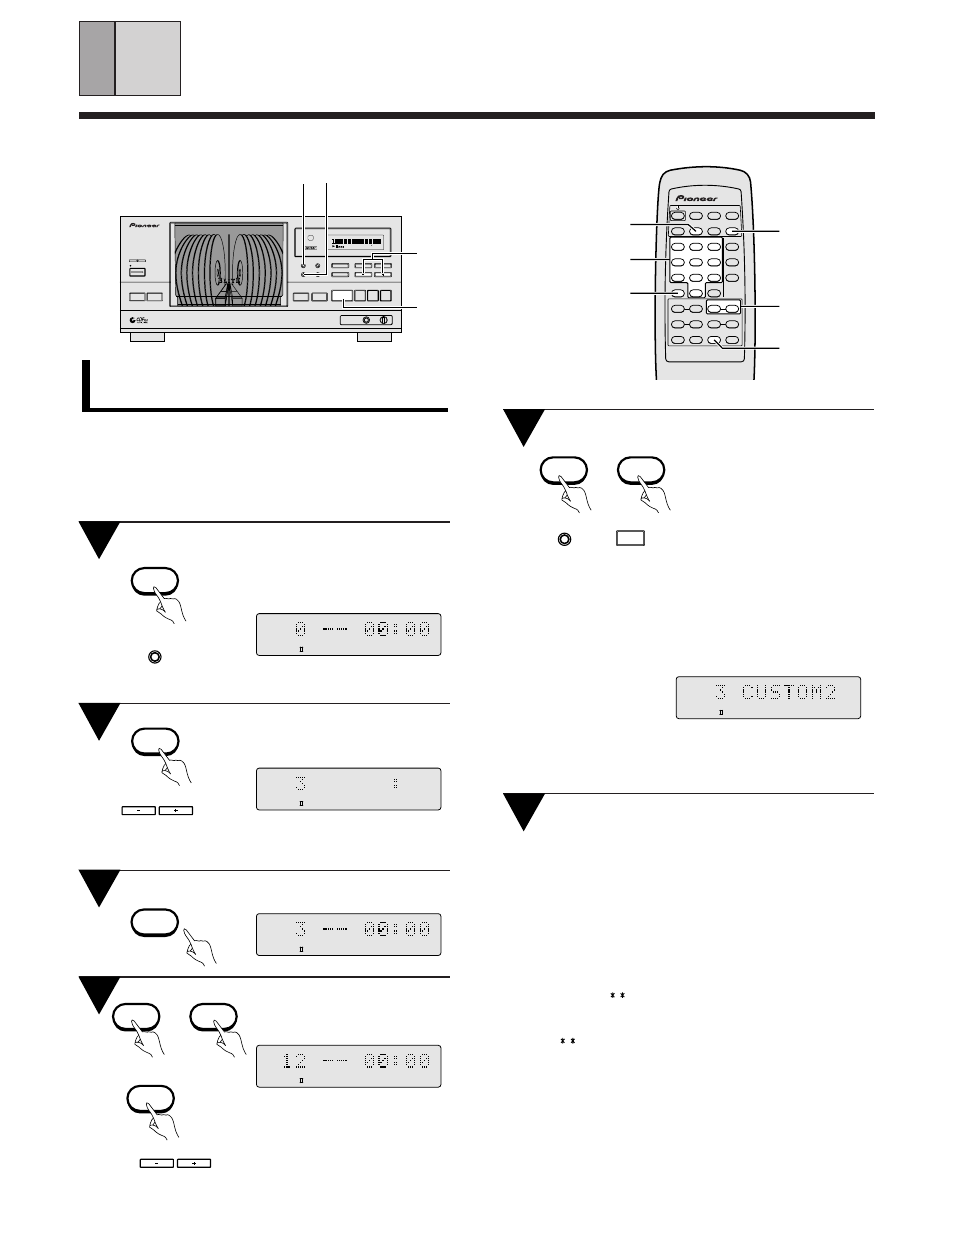
Storing discs 3 and 12 in the CUSTOM II
file.
During stop mode, press
MODE so that the CUSTOM
II indicator lights.
÷ If you use DISC (–/+) to select a disc, it will be programmed
automatically after approximately 2 seconds.
To program and play only the discs
you want to hear (CUSTOM play)
÷ The parenthesis ( ) show operations for the main unit.
Use the digit buttons to
select disc.
÷ If some disc number appears, press CLEAR.
Press DISC SET.
Repeat steps 2 and 3 to
store other discs.
4
3
2
1
\
To start playback
Press MODE to select CUS-
TOM and press
3.
Playback starts from the lowest
disc No.
DISC (–/+)
6
MODE CLEAR
÷ The remote control is the most convenient way to perform these
operations.
3
MODE
CLEAR
Digit buttons
DISC SET
DISC (–/+)
( )
(
)
DISC
SET
DISC
SET
(
)
\
Note!!
You cannot change the discs stored in the CUSTOM file. Likewise,
you cannot erase just one disc from the CUSTOM file.
÷ Pressing DISC (–/+) during CUSTOM playback lets you choose
among other discs stored in the CUSTOM file.
÷ If you use the digit buttons and DISC SET on the remote control
during CUSTOM playback to choose a disc not stored in the
CUSTOM file, “
NO DISC” will be displayed for approximately
3 seconds.
÷ When a disc appointed to the CUSTOM file is not loaded in the
rack, “
NO DISC” is displayed for approximately 3 seconds,
the disc is erased from memory, and CUSTOM searches for the
next disc.
÷ The discs stored in the CUSTOM file will not be erased when you
turn off the power.
÷ Items stored in memory are saved, even if the power cord is
unplugged.
(Memory Back-Up Function).
÷ While the hood is open, DISC (–/+) cannot be used for CUSTOM
file entry.
Erasing all the discs from the each CUSTOM
file.
Press MODE to choose CUSTOM, then press the CLEAR
button.
TRACK
MIN
SEC
DISC
CUSTOM
ROM
ALL
BEST
ADLC
CD TEXT
SCAN
DISC
REPEAT REMAIN
PGM
1
PREVIOUS
SINGLE
TRACK
MIN
SEC
DISC
CUSTOM
CUSTOM
TRACK
MIN
SEC
DISC
TRACK
MIN
SEC
DISC
CUSTOM
TRACK
MIN
SEC
DISC
CUSTOM
DISC
MODE
DISC
MODE
÷ The disc title can be registered even during checking the discs in
the custom file [Page 18] However, it is not possible to register the
disc title if the disc number is blank.
Checking the numbers of the stored discs.
Press TIME repeatedly (3 times) during stop mode so that the display
changes as shown below.
Press DISC(–/+). Each time you press DISC(–/+), a disc number
stored in the CUSTOM file is displayed. When all the disc numbers
have been displayed, the disc number changes to a blank.
6
6