Connections, Connecting to a tv & decoder, English – Philips 721VR User Manual
Page 10
English
Connections
10
Tips
● Depending on your TV and other equipment you wish to
connect, there are various ways you could connect the
unit.
● Please refer to the manuals of your TV, Stereo System or
other devices as necessary to make the best connections.
● For better sound reproduction, connect this unit’s AUDIO
OUT jacks to the audio in jacks of your amplifier, receiver,
stereo or audio/video equipment. See “Connecting to
optional equipment” on page
11
.
Caution
– Make sure this unit is connected directly to the TV. Set the
TV to the correct video input channel.
– Do not connect this unit’s AUDIO OUT jack to the
phono in jack (record deck) of your audio system.
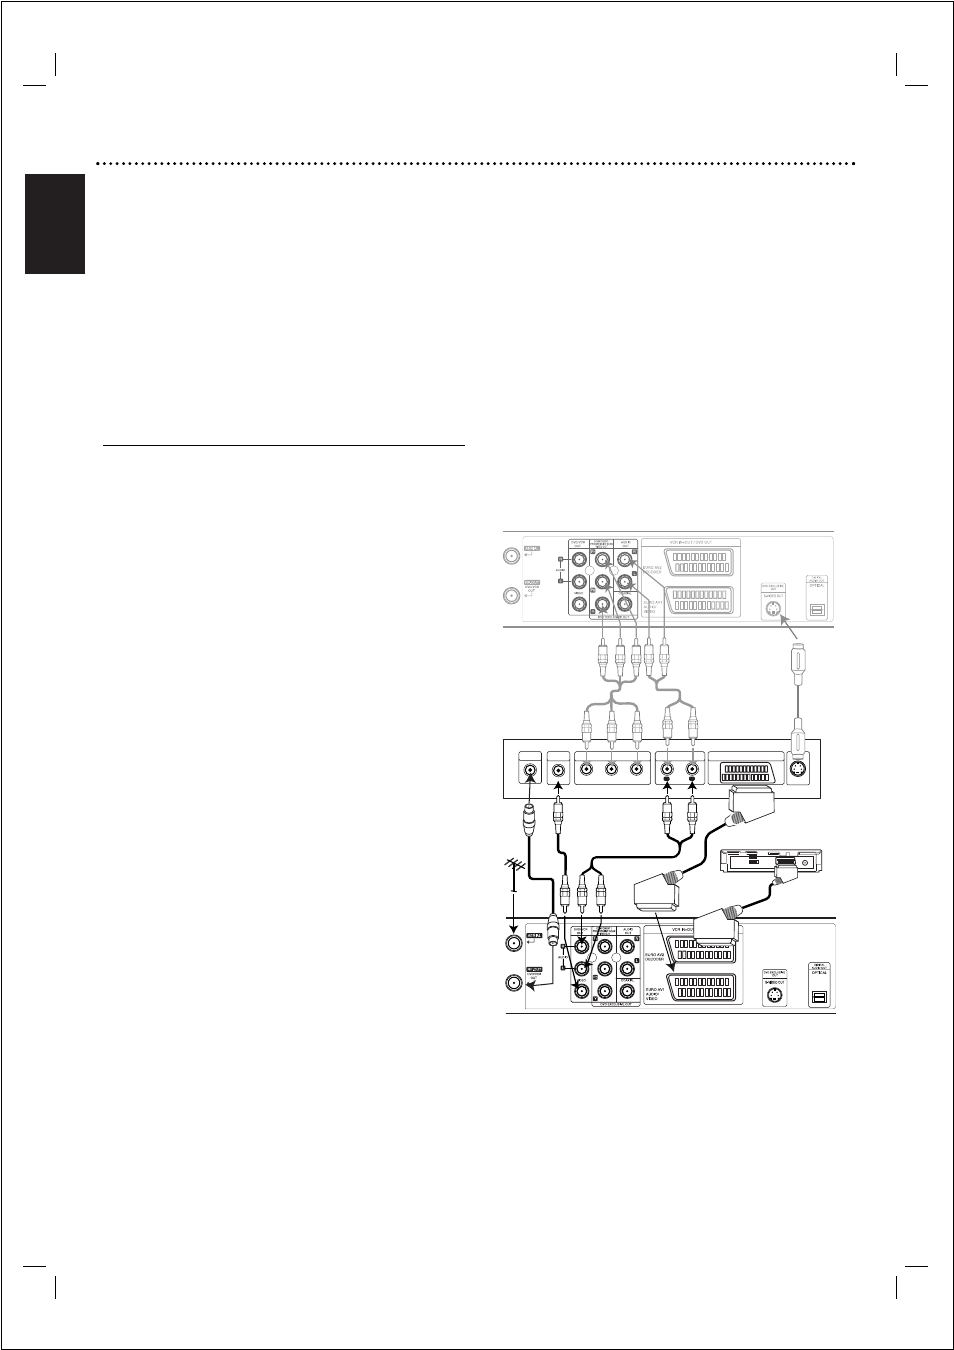
Connecting to a TV & Decoder
● Make one of the following connections, depending on the
capabilities of your existing equipment.
Basic connection (AV)
1
Connect the EURO AV1 AUDIO/VIDEO on the rear
panel of this unit to the SCART input socket on the TV
using a SCART lead.
2
Some TV broadcasters transmit encoded television signals
which you can only see with a purchased or rented
decoder.You can connect such a decoder (descrambler) to
the DVD+VCR.
Basic connection (RF)
1
Connect the RF antenna cable from your indoor/ outdoor
antenna to AERIAL jack on the rear panel of this unit.
2
Connect the supplied RF antenna cable from the RF OUT
(DVD/VCR OUT)
jack on the rear panel of this unit to
your television’s Antenna Input.
DVD exclusive out connection
● Component Video (Color Stream®) connection
1
Connect the COMPONENT/PROGRESSIVE
SCAN VIDEO OUT
jacks on the DVD Player to the
corresponding in jacks on the TV using the Y Pb Pr
cable.
2
Connect the Left and Right AUDIO OUT jacks of the
DVD Player to the audio left/right in jacks on the TV
using the audio cables.
● S-Video connection
1
Connect the S-VIDEO OUT jack on this unit to the S-
Video input jack on the TV using the S-Video cable.
2
Connect the Left and Right AUDIO OUT jacks of the
DVD Player to the audio left/right in jacks on the TV
using the audio cables.
Progressive Scan (ColorStream®Pro) connection
● If your television is a high-definition or “digital ready”
television, you may take advantage of the DVD Player’s
progressive scan output for the highest video resolution
possible.
● If your TV does not accept the Progressive Scan format,
the picture will appear scrambled if you try Progressive
Scan on the DVD Player.
1
Connect the COMPONENT/ PROGRESSIVE
SCAN VIDEO OUT
jacks on the DVD Player to the
corresponding in jacks on the TV using the Y Pb Pr
cable.
2
Connect the Left and Right AUDIO OUT jacks of the
DVD Player to the audio left/right in jacks on the TV
using the audio cables.
Notes
– Set the Progressive to “On” on the setup menu for
progressive signal, see page
18
.
– Progressive scan does not work with the analog video
connections (yellow VIDEO OUT jack) or S-VIDEO
connection.
AUDIO INPUT
L
R
S-VIDEO INPUT
AERIAL
Rear of TV
Rear of this unit (Basic connection)
Rear of this unit (DVD exclusive out connection)
COMPONENT VIDEO INPUT/
PROGRESSIVE SCAN
Pr
Pb
Y
VIDEO
INPUT
Decoder
SCART INPUT
Note
– If the TV has an S-video input, connect the DVD player
with the S-video cable.When using an S-video cable, do
not connect the yellow video cable.