4a 4b 4c 4d, 5c 5d, 5a 5b – Petsafe PPA00-10984 User Manual
Page 4
6
Customer Care Center 1-800-732-2677
www.petsafe.net 7
Step
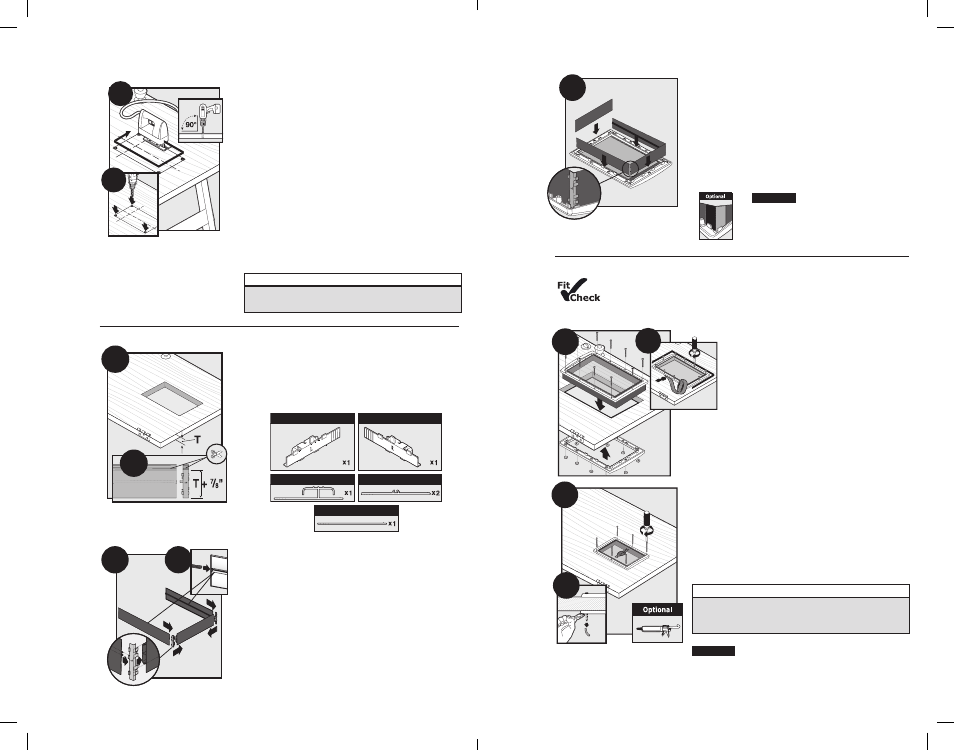
3
Step
4
Cut Pet Door Opening
3B
3A
3A Drill ½” holes in inside corners of drawn template.
These will be the pilot holes for the saw blade.
Helpful Tip: Use both hands to hold drill steady and
straight at a 90° angle.
3B Beginning in one of the holes just drilled, cut along
the drawn template lines. After cutting out the opening,
you may need to recut to square the opening. This is
necessary for the pet door frame to fit correctly.
Helpful Tip: Use proper saw blade length and type
according to door thickness and material (for example
a wood blade for a wood door and a metal blade for
a metal door). Cut slowly using both hands to hold
the saw steady and straight at a 90° angle. This will
prevent the blade from cutting unevenly between
interior and exterior sides of the door.
NOTICE
Make sure there is nothing underneath the door where
you will be drilling the holes or cutting out opening.
Fit Core Covers
4A
4B
4C
4D
4A Measure the thickness (T) of your door. Note this
measurement.
4B Cut the grooved side of the plastic core covers and
core cover supports to equal the thickness (T) of your
door + ⅞”.
Top
Bottom
Side
Left Support
Right Support
4C Place cut edge of bottom core cover toward you
with ribbed side facing up. Snap left core cover
support into left end of “T”-shaped rib on bottom core
cover. Snap right core cover support into right end of
“T”-shaped rib on bottom core cover. With channel
sides facing in, align uncut edge (side with one rib)
of side core covers with uncut edge of core cover
supports. Slide channel of side core covers onto tab of
core cover supports to form a “U”-shape.
4D Slide weather strips into channels of side core
covers. Weather strips should face inside. Weather
strips may need trimming to meet at end of side core
covers.
4E
4E Snap uncut edge (side with one rib) of
assembled core covers inside bottom and side tabs
of interior frame (frame with 2 flaps). The bottom
core cover should be at bottom of interior frame.
Weather strips and ribbed sides (uncut edges)
should face flap. Snap the uncut edge (side with
one rib) of top core cover inside top tabs of interior
frame. Uncut edge (side with one rib) of top core
cover should face flap. Core covers may need
trimming to meet at corners.
Optional:
Use duct tape in the
corners of core covers to help secure
in place and to improve weather
resistance. Cut off any excess tape.
Step
5
Install Pet Door
Before putting away jigsaw, place the exterior frame (frame with 1 flap) into
the underside of the opening to check the fit. If the screw holes on frame are not visible
through cut-out, you may need to recut opening before proceeding with the installation.
5C
5D
5A Place interior frame (frame with 2 flaps)
into cut-out. Next place exterior frame into
cut-out from under side of door, inserting core
covers inside tabs of frame. Hold frame
together. Insert nylon screws through holes in
interior frame into holes in exterior frame.
Thread a hex nut onto bottom of each screw.
5B Start screws, but do not tighten at
this time. Place foam strip under interior frame for
additional insulation. Cut off any excess.
Helpful Tip: Use a screwdriver to tuck the foam strip
under as you work around the frame.
5C Use a screwdriver to evenly tighten screws through-
out frame while keeping core covers in position. It may
be necessary to adjust screws to make sure pet door
fit is correct.
Helpful Tip: Look though flap opening to check if core
covers are in position as you tighten the screws.
5D Use wire cutters to trim screws flush with exterior
frame.
NOTICE
Use a manual screwdriver to tighten screws. Do not
overtighten. Overtightening can strip the screws or
warp the pet door frame.
Optional:
Caulk around the exterior frame (frame
with one flap) and inside threshold where core covers
meet for weather resistance.
5A
5B