Press [pq ][ut ] to navigate [ok]=select, Pb pr y, Pb pr y aerial rf.out – Philips DVDR3320V/37 User Manual
Page 2: Digital audio in optical in coaxial in, Connection to an amplifier, Connection to your tv, Dvd playback, Vhs playback, Vhs recording, Types of discs used on this recorder
STANDBY-ON
System Menu - Channel Setup
Modify Channel Information
Channel Search
Tuner Input Source
Search
Edit
Cable
Empty Title
2hour 3min
Free
SP
-- / --
2:03:00
1/1
Info
Select
DISPLA Y
Close
Title List
DVD+RW
OK
REC
Empty Title
2hour 3min
Free
SP
-- / --
2:03:00
1/1
Info
Select
DISPLA Y
Close
Title List
DVD+RW
OK
REC
Speaker Level Setup
Front Left
0db
Front Right
0db
Center
0db
Subwoofer
0db
Rear Left
0db
Rear Right
0db
philips
Speaker Distance Setup
Center
0MS
Rear Left
0MS
Rear Right
0MS
philips
Press [pq ][ut ] to navigate [OK]=select
Press [pq ][ut ] to navigate [OK]=select
FIRST INSTALLATION
FIRST INSTALLATION
LANGU AGE AND COUNTRY
LANGU AGE AND COUNTRY
Language
Country
Do ne
English
Unit ed Stat es
Selec t language and c ountr y
Selec t language and c ountr y
Types of Discs used on this Recorder
DVD Recorder (front)
System Menu - General
NTSC
Video Output Format
UK
Country
Screen Saver
On
OK
Restore Factory Settings
To exit, press [SYSTEM MENU].
System Menu - General
NTSC
Video Output Format
UK
Country
Screen Saver
On
OK
Restore Factory Settings
To exit, press [SYSTEM MENU].
System Menu - General
NTSC
Video Output Format
UK
Country
Screen Saver
On
OK
Restore Factory Settings
To exit, press [SYSTEM MENU].
DVD+RW
DVD+R
DVD+R DL
DVD-RW
DVD-R
DVD VIDEO
AUDIO CD
VIDEO CD
DATA CD
DATA CD
Types of Discs used on this Recorder
DVD Recording
1
For recording get a blank
DVD+RW or DVD+R disc.
Place in the tray with the
label facing up and close tray.
Tip
Switch to the DVD Recorder/VCR viewing channel
on the TV to see what channel you are recording.
2
Press DOWN or UP to scroll the
channels, or press to to select the
TV program you want to record.
3
Press REC MODE repeatedly to select
a recording mode.
Tip
For more information about recording modes, refer
to the user manual.
4
Press REC to start recording.
Tip
Press REC again to automatically record 10
minutes, every time you press REC adds 10
minutes recording time.
5
Press STOP to end recording.
‘Recording file information. Please wait…’
will be displayed on the TV.
6
Press LIST/DISC MENU to go to the
disc menu and press PLAY on the title
you just recorded to watch it.
Empty Title
2hour 3min
Free
SP
-- / --
2:03:00
1/1
Info
Select
DISPLA Y
Close
Title List
DVD+RW
OK
REC
OK
THUMBNAIL
CHAPTER
TIMER
REPEAT
TITLE
AUDIO
ZOOM
SEARCH
MARKER
CLEAR
SHOWVIEW
VIDEOPLUS+
D. DUBBING
REW
FWD
Audio Setup Page
Speakers V olume
Speakers Distance
Night Mode
CD Upsampling
SCART IN
SCART IN
To antenna
wall jack,
cable box or
satellite receiver.
Pb
Pr
Y
Television (back)
DVD System (back)
To
antenna
or
set-top
box
Pb
Pr
Y
DVD System (back)
VCR (back)
Pb
Pr
Y
Pb
Pr
Y
Pb
Pr
Y
AERIAL
RF.OUT
LINE IN
DIGITAL
AUDIO IN
OPTICAL IN
COAXIAL IN
OK
1
2
3
4
5
6
7
8
9
0
RETURN
DISPLAY
TV/VIDEO
DVD
MENU
SYSTEM
1
b
2
Television
1
2
3
4
To antenna
wall jack,
cable box or
satellite receiver
1
a
1
b
Auto Programming
Program Edit
Clock Set
TV Aspect
VCR Play Aspect
VCR Play System
AV2 Connection
Progressive Scan
Factory Set
GENERAL
Close
Connection to an amplifier
Remote
control
(back)
Television (back)
DVD recorder/VCR (back)
To
antenna
or set-top
box
LINE IN
DIGITAL
AUDIO IN
OPTICAL IN
COAXIAL IN
DIGITAL
AUDIO IN
COAXIAL IN
Television (back)
Amplifer
(back)
To antenna
or set-top
box
DVD recorder/VCR (front)
6 HEAD HI-FI STEREO
ONE TOUCH RECORDING • LONG PLAY
9
0
MENU
OK
MENU
LIST/DISC
VCR
RECORD
PAUSE/STEP
OK
STOP
PLAY
OPEN/CLOSE
MENU
SYSTEM
REC MODE
DVD recorder
/VCR (back)
Find correct viewing channel
1
Press STANDBY-ON
2
Press SYSTEM MENU on the
recorder’s remote control
3
Switch on TV
4
Press ‘0’ on the TV’s remote control, then re-
peatedly press the Channel Down button until
you see the System Menu. This is the correct
viewing channel for the home theatre system
Tip In some TVs, to find the
correct viewing channel, you
can keep pressing the AV or
the SELECT buttons. If still
unable to find the correct
viewing channel, check the
connections again or check
your TV’s user manual
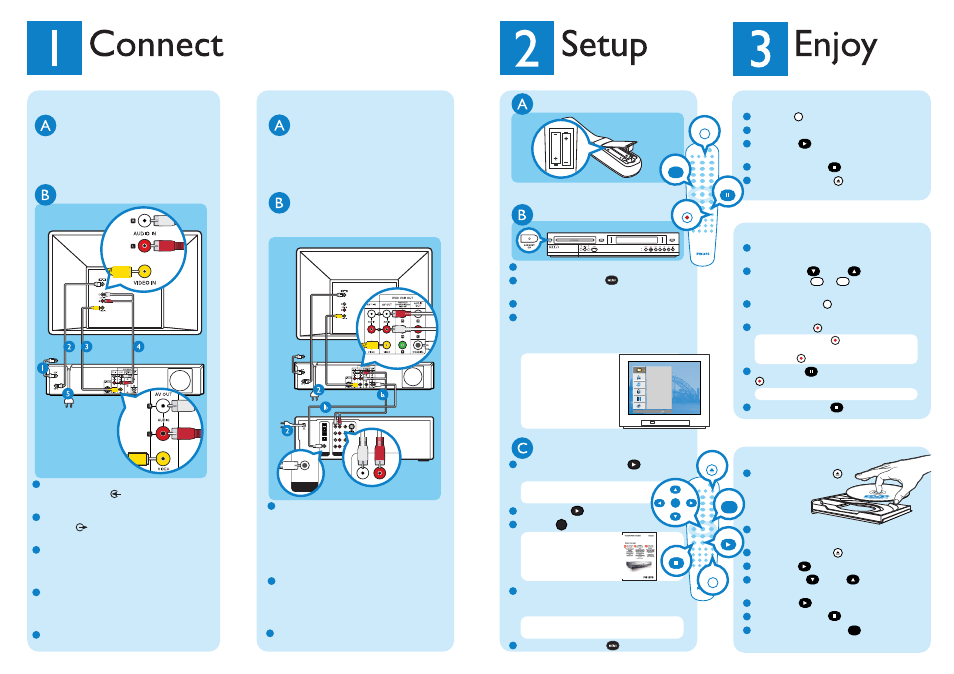
Connection to your TV
Before connecting
Your TV should be connected to the cable
box/set-top box, satellite receiver or antenna,
unplug the antenna cable from the TV
Connecting
1
Connect the antenna cable (plugged out from
the TV) to ANT-IN jack at the rear of the
DVD recorder/VCR
2
Connect the provided antenna cable to the
RF OUT jack on the rear of the recorder
and into the VHF/UHF/RF IN jack of the TV
3
Connect the yellow video cable to the yellow
VIDEO IN jack of the TV and to the yellow
AV OUT video jack at rear the DVD
recorder/VCR
4
Connect the red and white audio cable to the
respective red and white audio jack of the TV
and to the respective red and white AV OUT
audio jack at rear the DVD recorder/VCR
5
Plug in the power cable from the recorder to
an AC power outlet
Conduct Installation
1
In system menu, press RIGHT to select
Auto Programming in General option menu
Tip Use the recorder’s remote
control to make your selections
2
Press RIGHT to select Start
3
Press OK to activate channel search
Tip If no channels were
found, check your antenna
connection then see the
user manual to start chan-
nel search again
4
Check the options for Clock Set, TV Aspect,
VCR Play Aspect and VCR Play System to make
sure they are correct for your TV
Tip If incorrect, use the arrow buttons to
correct them
5
Press SYSTEM MENU when finished
Inserting batteries
Note where the positive and negative ends go
Before connecting
Unplug all connections to the AV amplifier
and unplug the antenna cable from the TV,
below are details for 2 ways to connect your
new DVD Recorder/VCR to the AV amplifier
Connecting
Follow step 1 to 3 under ‘Connection to your
TV’ before following the instructions below
1
a
Use the red and white audio cable (not
supplied) to connect the respective red and
white AV OUT audio jack on the rear of the
recorder to their respective colour audio
jacks of the LINE IN or AUDIO IN portion
on the rear of the amplifier
OR
1
b
Use the coaxial cable (not supplied) to
connect the coaxial jack at the audio out
portion on the rear of the recorder to the
coaxial jack of the LINE IN or AUDIO IN
portion on the rear of the amplifier
2
Connect the power cables from the VCR/DVD
recorder and amplifier to AC power outlets
DVD playback
1
Press OPEN/CLOSE
2
Get a DVD disc and place in the tray with the
label facing up
3
Press OPEN/CLOSE
4
Press PLAY if playback does not start
5
Press DOWN or UP to scroll
through the list of options in the DVD menu
6
Press PLAY on the option you want
7
To stop, press STOP
8
Press LIST/DISC MENU to return to
DVD menu
VHS playback
1
Press VCR on remote control
2
Insert videocassette into the cassette slot
3
Press PLAY if playback does not start
automatically
4
To stop, press STOP
5
Press OPEN/CLOSE to eject the
cassette
VHS recording
1
Insert videocassette with the record tab still
intact into cassette slot
2
Press DOWN or UP to scroll the
channels, or use to to select the TV
program you want to record
3
Press REC MODE repeatedly to select a
recording mode
4
Press RECORD to start recording
Tip Press RECORD again to automatically
record 30 minutes, every time you press
RECORD adds 30 minutes recording time
5
Press PAUSE to pause and RECORD
again to resume recording
Tip Pause will switch to stop after 5 minutes
6
To stop, press STOP
To connect to your television, follow the instructions under ‘Connection to your TV’. If you have an existing
AV amplifier, follow the instructions under ‘Connection to an amplifier’ instead.