Poulan PPWT60022 User Manual
Page 8
8
3. You receive a container of oil with the
unit. Slowly pour 3/4 (15 oz.) of the
oil from the container down the oil fi ll
spout into the engine.
4. Wait one minute to allow oil to settle.
Insert and tighten dipstick, then re-
move it to check oil level.
5. Continue adding small amounts of
oil and rechecking the dipstick until it
reads full. DO NOT overfi ll, or engine
will smoke on startup.
6. Always be sure to retighten oil dipstick
before starting engine.
• Check oil level before each use. Add oil
if needed. Fill to full line on dipstick.
• Change the oil after every 25 hours of
operation or each season. You may
need to change the oil more often under
dusty, dirty conditions.
Gasoline fi ller cap
Engine oil cap
TECUMSEH MODELS:
BRIGGS & STRATTON MODELS:
Gasoline fi ller
cap
Engine
oil cap
ADD GASOLINE
• Fill fuel tank to bottom of gas tank
fi ller neck. Do not overfi ll. Use fresh,
clean, regular unleaded gasoline with a
minimum of 87 octane. Do not mix oil
with gasoline. Purchase fuel in quanti-
ties that can be used within 30 days to
assure fuel freshness.
CAUTION: Wipe off any spilled oil or
fuel. Do not store, spill or use gasoline
near an open fl ame.
CAUTION: Alcohol blended fuels
(called gasohol or using ethanol or
methanol) can attract moisture which
leads to separation and for ma tion of acids
during storage. Acidic gas can damage
the fuel system of an engine while in
storage. To avoid engine problems, the
fuel system should be emptied before
stor age of 30 days or longer. Empty
the gas tank, start the engine and let it
run until the fuel lines and carburetor
are empty. Use fresh fuel next season.
See Storage In struc tions for additional
information. Never use engine or
carburetor cleaner products in the fuel
tank or permanent damage may occur.
TO START ENGINE
1. To start a cold engine, push primer
three (3) times before trying to start.
Use a fi rm push. This step is not
usually necessary when starting an
engine which has already run for a few
minutes.
2. Move throttle control lever to fast posi-
tion.
3. Hold upper handle fi rmly and pull
starter handle quickly. Do not allow
starter rope to snap back.
TO STOP ENGINE
• To stop engine, move throttle control
lever to stop position.
NOTE: In cooler weather it may be
necessary to repeat priming steps. In
warmer weather overpriming may cause
fl ooding and engine will not start. If you
do fl ood engine, wait a few minutes before
attempting to start and do not repeat
priming steps.
13
AIR FILTER
Your engine will not run properly and may
be damaged by using a dirty air fi lter.
Replace the air fi lter every 100 hours of
op er a tion or every season, which ev er oc-
curs fi rst. Service air cleaner more often
under dusty conditions. Do not wash air
fi lter. Refer to engine manual.
MUFFLER
Inspect and replace corroded muffl er as it
could create a fi re hazard and/or dam age.
SPARK PLUG
Change your spark plug each year to
make your engine start easier and run
better. Set spark plug gap according to
engine manual specifi cations.
CLEANING
IMPORTANT: For best performance,
keep trimmer free of built-up grass and
trash. Clean the underside of your trimmer
after each use.
CAUTION: Disconnect spark plug wire
from spark plug and place wire where it
cannot come in contact with the spark
plug.
• Turn trimmer on its side. Make sure air
fi lter and carburetor are up. Clean the
underside of your trimmer by scraping
to remove build-up of grass and trash.
• Clean engine often to keep trash from
accumulating. A clogged engine runs
hotter and shortens engine life.
• Keep fi nished surfaces and wheels free
of all gasoline, oil, etc.
• We do not recommend using a gar-
den hose to clean trimmer unless the
elec tri cal system, muffl er, air fi lter and
carburetor are covered to keep water
out. Water in engine can result in short-
ened engine life.
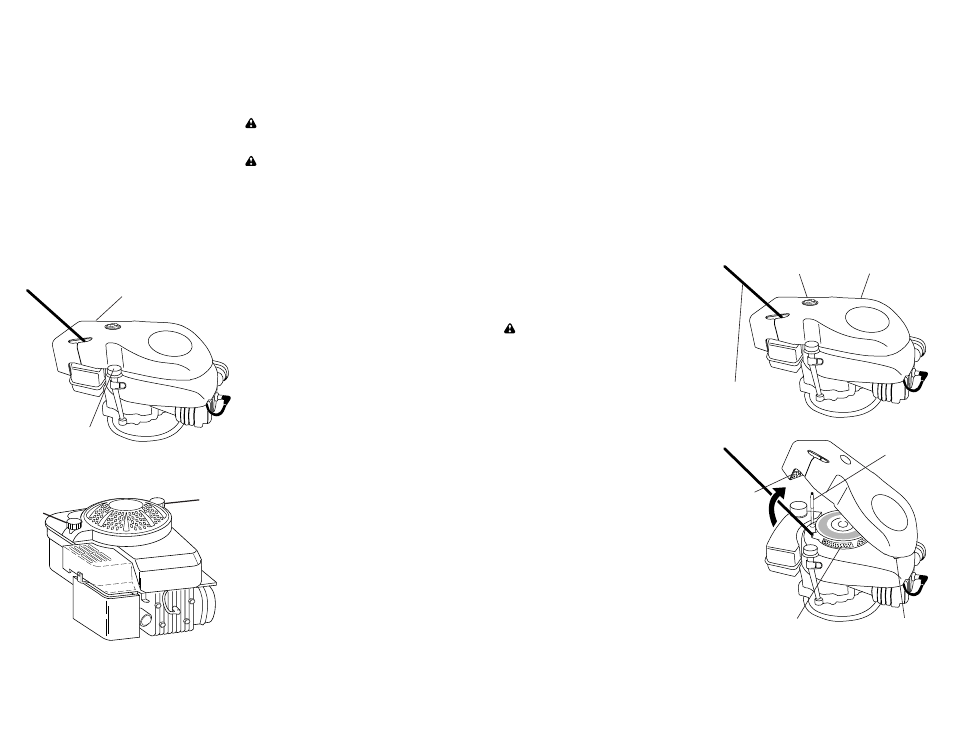
CLEAN UNDER ENGINE COVER
(TECUMSEH MODELS ONLY)
Clean under engine cover before each
use, or more frequently in heavy cutting or
dirty conditions. Engine cover screen and
engine air intake screen must be kept free
of dirt and chaff to prevent engine damage
from over heat ing.
Be sure engine is cool before cleaning.
1. Unscrew knob on top of cover.
2. Lift cover up and away from engine.
3. Clean cover and cover screen thor-
ough ly.
4. Clean top of engine and air intake
screen.
5. Replace engine cover and tighten
knob securely. Be sure the front tabs of
engine cover are located in the slots in
engine housing.
Housing slots
Air intake screen
Engine
cover
screen
Threaded
stud
Knob
Engine cover
Starter
rope