Mount it, Use it – Philips AJL700 User Manual
Page 2
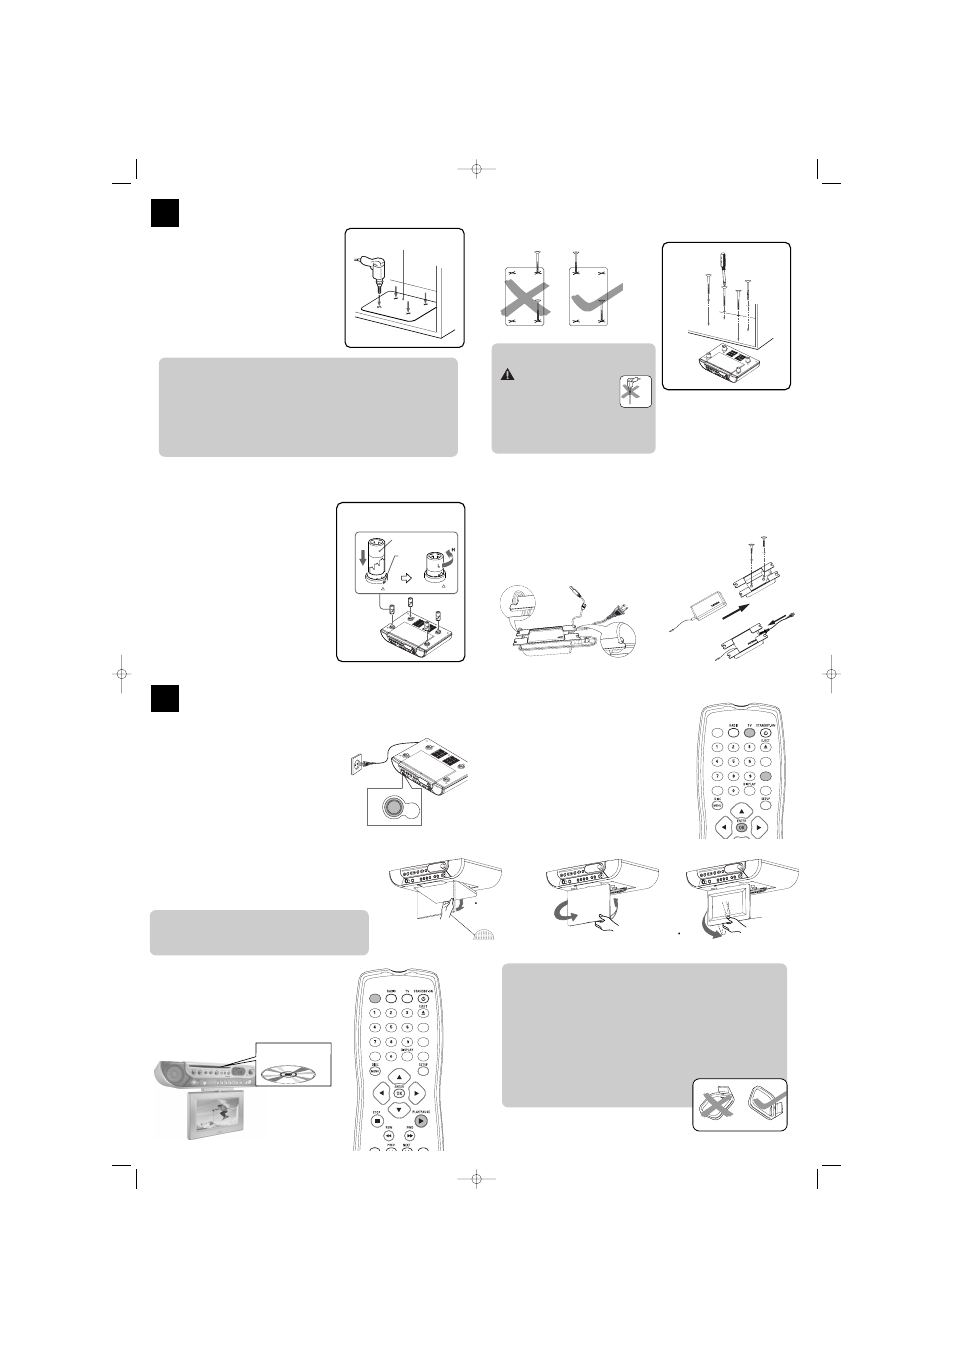
Mount it
Ask a friend to help out. An extra hand to hold the unit makes mounting easier and
quicker.
A
•
Cut the template to fit inside the cabinet.
•
Align the template border marked "FRONT" along the
front edge of your cabinet.
•
Use adhesive tape to fix the template.
•
Drill 1/4 inch holes, as marked X on the template.
•
Remove the template when you finish drilling.
B
Using the spacers
On the spacers, there are 4 pairs of notch length
options. Depending on the thickness of you cabinet bot-
tom (with/ without an overhang), these notch lengths
correspond to the 4 notch height in the space holders,
and allow you to adjust to the best height to help you
mount the unit.
•
Measure the height of the cabinet bottom and/over-
hang.
•
Turn the spacer counterclockwise to determine
which of the 4 heights is most suitable: Low • •
High. Align to the arrow indication.
•
Insert the spacers accordingly.
3
Template
A
Tip
– Clean the bottom of the cabinet surface and also empty your cabinet before mounting.
– Place the unit in a clean, safe place when drilling to avoid wood shavings dropping into the
ventilation slots.
– Use a nail to start each drill hole.
– Drill from the bottom upwards if you do not have enough room inside the cabinet.
– Hold your drill firmly at 90o with the cabinet bottom and drill holes at low speed.
– Clear wood shavings.
C
•
Manually fasten the 4 long screws down into the spacer holder holes to mount your set. Start
screwing at opposite corners of the unit for better support.
D
Using the adapter bracket
Find a suitable place to mount the adaptor bracket.
1 Use 2 small screws (supplied) to mount the bracket.
2 Insert the adapter into the bracket as shown.
3 Use the adapter bracket to wrap and secure the
power cord so that excess cord does not hang
down.
C
Tip
To prevent damage to your
set, do not use an electric
drill to secure screws when
mounting!
– If the overhang is more than 1 1/4 inch, use
longer screws (not included).
Use it
For full details, please read and follow the instructions inside the User manual.
A
Power supply
•
Connect the power plug to the wall outlet.
•
Press POWER (or STANDBY.ON) to switch on.
B
Using the TV screen
1 Press PUSH at the bottom the set to release the TV panel. .
2 Pull down the panel (maximum 115º).
3 Turn around the panel to find the screen.
4 Adjust the screen to a suitable angle (maximum 270º).
C
How to play a DVD /CD
•
Select DVD source.
•
Insert a DVD/CD.
•
Press PLAY/PAUSE to start disc playback.
4
POWER
DISC
AV
PROG
ERASE/WRITE
SHUFFLE
CLOCKSET
CLOCKSET
PICTURE
Insert a12cm disc
D
How to watch TV on the unit
1
P
ress TV once or more to select TV or CATV mode .
2 In CATV, press ENTER on the remote control selects
HRC, IRC, STD or AUTO mode.
3 The first time you use the TV, press and hold AUTO
PROG /RADIO PROG on the set until the channel
number starts running.
•
Available channels are programmed.
4 Use the Numeric Keypad (0-9) on the remote con-
trol to select the channel number directly.
DISC
AV
PROG
ERASE/WRITE
SHUFFLE
E
Improve radio reception
Position the antenna as far as possible from a TV, VCR or radiation source.
FM:
Keep the FM antenna as horizontal as possible . Fix the antenna’s end to
the wall.
AM:
Position vertically. If necessary, use 2 small screws (supplied) to fix the
antenna to a flat, hard and stable place.
AM
Tip
– Swivel with care to avoid breakage. Screen rotates a maximum
270
0
only.
H
L
Spacer
L (Low)
L••H (4 heights)
Arrow
B
PUSH
115
270 maximum
maximum
4
1
2
3
AJL 700 QUG 3/14/2005 19:43 Page 2