Setting the clock, Selecting the standard screen, Getting star ted – Panasonic MW-10 User Manual
Page 9: Total time, Sun mon tue wed thu fri sat
9
RQT9522
Getting star
ted
Setting the clock
This unit is equipped with the calendar and timer functions.
Set the time fi rst.
1. Press Standby/on switch to turn on the unit.
2. Press [SETUP].
Settings Menu
Image Quality Settings
Clock/Calendar Settings
Demo Mode
Remote Control Mode
3. Press [e, r] to select “Clock/
Calendar Settings” and press
[OK].
4. Press [e, r] to select “Set
Clock” and press [OK].
Clock/Calendar Settings
Select Design
Set Clock
Set Date Indication
Set Clock Indication
5. Press [w, q] to select the
items (Month, Day, Year, Hour,
Minute and AM/PM
¼
), and
press [e, r] to set.
20
8
09
24
10
24
AM
Month Day Year Hour Minute
:
¼
Only for the 12-hour display (¼P18)
You can also use the numbered buttons.
e.g.) 9: [0] [9]
10:
[1]
[0]
•
6. Press [OK].
The clock starts from 00 second and the standard
screen (¼right) appears.
To return to the previous screen, press [ RETURN].
•
When the introduction screen for the time
setting appears
If you attempt to operate a function that requires time setting
while the time is not set, the introduction screen for the time
setting appears.
1. Press [e, r] to select “Set time” and press [OK].
2. Perform the above steps
5 and 6.
Note
Period that can be set: January 2000 to December 2099
There is a small precision error of the clock. Periodical time
correction is recommended.
If the AC power supply cord is removed or blackout occurs,
check the time.
•
•
•
Connecting antennas and po
wer sour
ce / Setting the c
loc
k / Selecting the standar
d screen
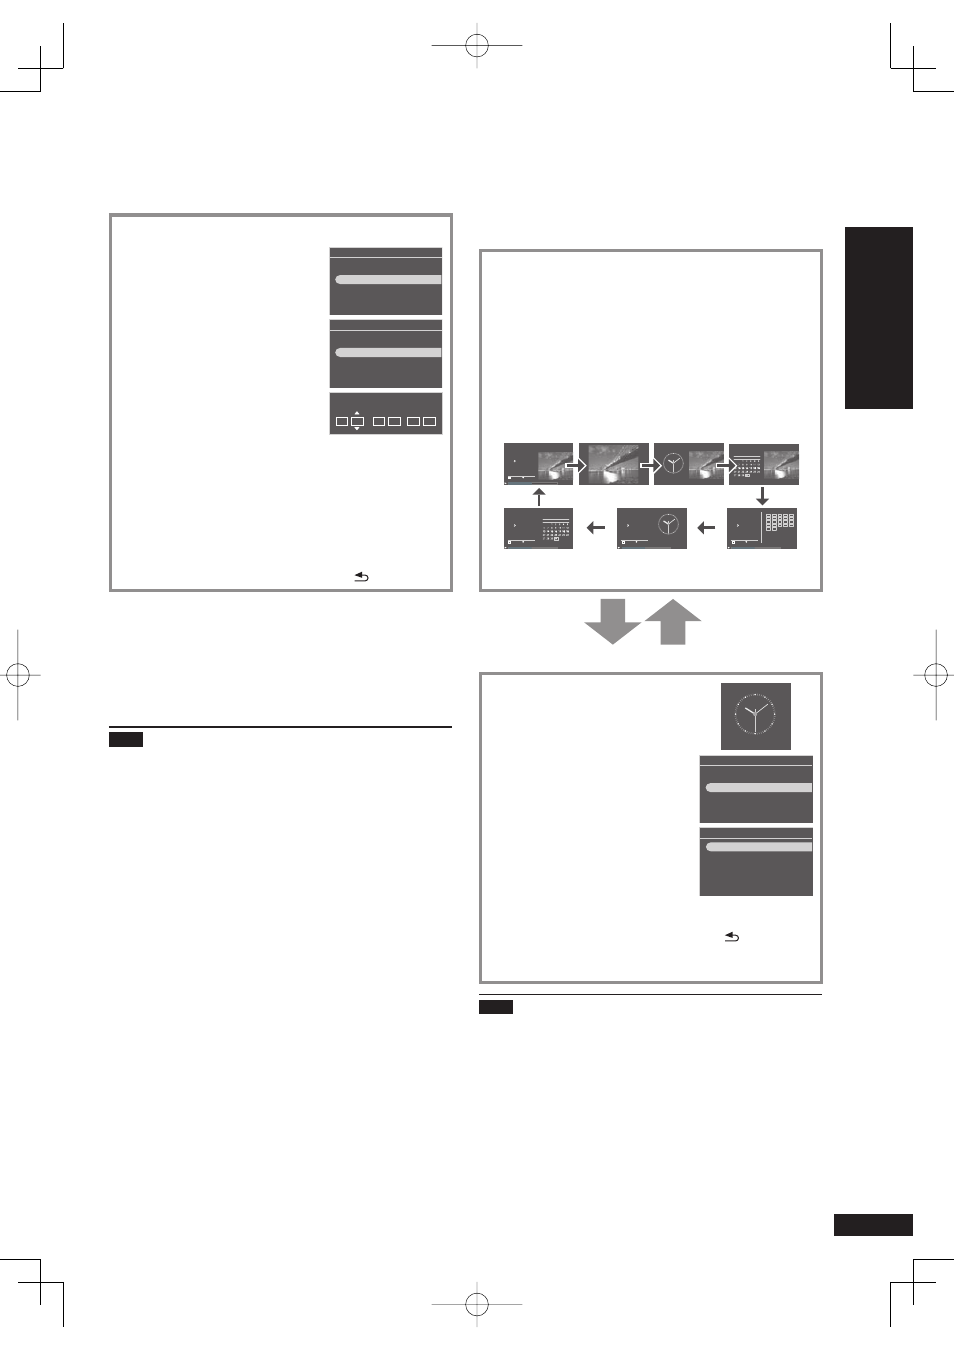
Selecting the standard screen
You can select the standard screen normally displayed
among 7 types of audio/photo screen or 12 types of clock/
calendar screen.
Audio/photo screen
Press [DISPLAY MODE] to select the screen.
Each time you press the button, the screen changes as
follows.
A
Audio + photo (factory setting)
B
Photo
C
Clock + photo
D
Calendar + photo
E
Audio
¼
F
Audio + clock
¼
G
Audio + calendar
¼
Sep. 30. 2009 Wed
1
CD
Track
1/22 60:12
CDDA
2:20
Total Time
1
CD
Track
1/22 60:12
CDDA
2:20
Total Time
1
CD
Track
1/22 60:12
CDDA
2:20
Total Time
1
CD
Track
1/22 60:12
CDDA
2:20
1
2
3
4
5
6
7
8
9
10
11
12
13
14
15
16
17
18
19
20
21
22
Total Time
12
6
9 3
2009
Sep
Sun Mon Tue Wed Thu Fri Sat
Sep. 30. 2009 Wed
12
6
9 3
2009
Sep
Sun Mon Tue Wed Thu Fri Sat
10:08 AM
10:08 AM
A
B
C
D
E
F
G
¼
After the photo operation is performed, the screen B
appears.
Press [CLOCK].
Press [CLOCK].
Clock/calendar screen
You can select the clock/calendar
screen for your preference among
12 types of layout.
12
6
9
3
Sep. 30. 2009 Wed
1. Press [SETUP].
Settings Menu
Image Quality Settings
Clock/Calendar Settings
Demo Mode
Remote Control Mode
2. Press [e, r] to select “Clock/
Calendar Settings” and press
[OK].
3. Press [e, r] to select “Select
Design” and press [OK].
Clock/Calendar Settings
Select Design
Set Clock
Set Date Indication
Set Clock Indication
4. Press [e, r, w, q] to select the screen and press
[OK].
To return to the previous screen, press [ RETURN].
To view a calendar of different month, press [w, q] while
the calendar is displayed.
•
•
Note
When pressing [e] while the photo is displayed, you can
view the photo playback information.
When the audio screen is not displayed during audio
playback and [r] is pressed, you can view the audio
playback information.
The design change of the clock/calendar is refl ected on
the audio/photo screen as well.
•
•
•